


воскресенье, 31 марта 2019 г.
KindleUnpack - The Plugin
What is a plugin?
Functionality in Calibre can be extended through the use of Python code snippets packaged as 'plugins'. The Calibre application itself comes with and makes extensive use of plugins developed by the Calibre development team, including for example:
What plugins are available?
The most comprehensive list of plugins available is here in the MobileRead forums on the Index of plugins sticky thread. This same list is what you will see presented to you using Plugin Updater, discussed below.
In addition you can sometimes find beta versions of upcoming plugins in the Development subforum. These will need to be installed manually (see below).
You may find other Calibre plugins available on the internet using Google. Such plugins are not to be discussed in the MobileRead forums if they are for the purposes of removing DRM. Do not post asking in these forums how to install/use them or issues you have with them as this is against MobileRead policy.
How do I install a plugin using Plugin Updater?
As of Calibre 0.8.6, installing plugins from this sub-forum is easier than ever. Calibre now comes with something called "Plugin Updater", which prior to this release was itself a separate plugin.
How do I update my plugins?
For all of the plugins within this MobileRead subforum, Plugin Updater will notify you in a similar way to new Calibre versions being available with a hyperlink at the bottom of your screen. In addition if you have added the Plugin Updater icon to your toolbar, you will see the icon change to indicate one or more updates are available. Click on either the link or the icon, select the plugin to upgrade and click the Install button as per the instructions above.
You can also check for updates manually if you have the Plugin Updater icon on your toolbar, or from Preferences->Plugins clicking on the Check for updated plugins button.
How do I install a plugin manually?
You will need to manually install a plugin if you:
To install a plugin using the Calibre gui:
To install a plugin using the command line:
What if the plugin doesn't work?
How do I write my own plugin?
Writing a plugin offers a great way to contribute to the Calibre community. In addition to simply looking at the code within the plugins available on this forum, you should find the following links useful:
Functionality in Calibre can be extended through the use of Python code snippets packaged as 'plugins'. The Calibre application itself comes with and makes extensive use of plugins developed by the Calibre development team, including for example:
- GUI features you see on your toolbars and right-click menus (User Interface Actions)
- Reading book metadata/covers from different websites (Metadata Source plugins)
- Conversion between book input/output formats (Conversion plugins)
- Connecting to different devices (Device Drivers)
What plugins are available?
The most comprehensive list of plugins available is here in the MobileRead forums on the Index of plugins sticky thread. This same list is what you will see presented to you using Plugin Updater, discussed below.
In addition you can sometimes find beta versions of upcoming plugins in the Development subforum. These will need to be installed manually (see below).
You may find other Calibre plugins available on the internet using Google. Such plugins are not to be discussed in the MobileRead forums if they are for the purposes of removing DRM. Do not post asking in these forums how to install/use them or issues you have with them as this is against MobileRead policy.
How do I install a plugin using Plugin Updater?
As of Calibre 0.8.6, installing plugins from this sub-forum is easier than ever. Calibre now comes with something called "Plugin Updater", which prior to this release was itself a separate plugin.
- Go to Preferences->Plugins and click on the Get new plugins button. Alternatively, click on the arrow next to the Preferences button on your toolbar and choose Get plugins to enhance calibre.
- This screen will show you all of the plugins available from this forum. Right-click on a plugin to see more options, such as viewing more detailed information about the plugin in the forum thread in your web browser.
- You may need to upgrade your version of Calibre to install some plugins as shown in the Calibre version column.
- Select a plugin you would like to try, click the Install button, follow the prompts for each plugin
- You may then be asked which toolbars/menus you would like the plugin to appear on if it is designed to have a user interface. Take care to put it on all you require, remember that there are different toolbars and menus for while your device is connected. You can always change your mind later using Preferences->Toolbar to change your selections.
- Close the dialog when you are done.
- You must restart calibre after installing plugins. A convenient shortcut for this is Ctrl+R.
- Your plugin can often be customized by selecting it within the list in the Preferences->Pluginsdialog, and clicking the Customize plugin button. You can also customize from the Plugin Updater dialog (after restarting). Some plugins have a menu which offers a Customize plugin shortcut as well.
- Be sure to read the forum thread for your plugin to follow any additional instructions if required. For instance some plugins may require you to setup a custom column or perform some other steps for first usage.
How do I update my plugins?
For all of the plugins within this MobileRead subforum, Plugin Updater will notify you in a similar way to new Calibre versions being available with a hyperlink at the bottom of your screen. In addition if you have added the Plugin Updater icon to your toolbar, you will see the icon change to indicate one or more updates are available. Click on either the link or the icon, select the plugin to upgrade and click the Install button as per the instructions above.
You can also check for updates manually if you have the Plugin Updater icon on your toolbar, or from Preferences->Plugins clicking on the Check for updated plugins button.
How do I install a plugin manually?
You will need to manually install a plugin if you:
- Want to install a beta version of a plugin listed on a forum thread
- Want to install a plugin you downloaded somewhere else off the internet
- Are developing your own plugin
To install a plugin using the Calibre gui:
- Download the plugin zip file, taking care that it is not unzipped or touched by any antivirus or download managers you use.
- In Calibre choose Preferences->Plugins. Click the Load plugin from file button (Calibre 0.8.6 or later) or Add new plugin button (Calibre 0.8.5 or earlier) to browse to your plugin .zip file and click OK.
- You may then be asked which toolbars/menus you would like the plugin to appear on if it is designed to have a user interface. Take care to put it on all you require, remember that there are different toolbars and menus for while your device is connected. You can always change your mind later using Preferences->Toolbar to change your selections.
- Restart Calibre after installing a plugin. Ctrl+R is a convenient shortcut for this.
- As discussed above, your plugin may need further customisation using Customize plugin from Preferences->Plugins or the Plugin Updater dialog.
To install a plugin using the command line:
- Download the plugin zip file, taking care that it is not unzipped or touched by any antivirus or download managers you use.
- Close Calibre if it is currently running.
- From a command prompt, type calibre-customize -a "My Plugin Name.zip"
- Start Calibre and go to Preferences->Toolbar if you want to add it to a toolbar or menu for the first time.
What if the plugin doesn't work?
- Any questions/issues concerning functionality of these plugins should be kept in the relevant thread in this forum. Do not use the Calibre bug tracker, support is within this forum from the plugin developers and other users.
- Before you post, double check you have followed all the install instructions specified above and any in the plugin post itself.
- You can obtain the plugin error details by starting Calibre in debug mode. You can do this from the Preferences menu-> Restart in debug mode or from a command window using calibre-debug -g. Be sure to include the full error output with your post.
- If the plugin is stopping calibre from starting, you can try starting it with the command line of calibre --ignore-plugins
This will prevent any custom plugins from attempting to be loaded. Then go to the Preferences->Plugins dialog and disable or uninstall the plugin which is causing a problem until the developer is able to provide a fix or workaround.
How do I write my own plugin?
Writing a plugin offers a great way to contribute to the Calibre community. In addition to simply looking at the code within the plugins available on this forum, you should find the following links useful:
[GUI Plugin] KindleUnpack - The Plugin
(formerly MobiUnpack - The Plugin: changed 1/29/2013)
Used to unpack/inspect the contents of DRM-free Kindle Books/MOBI files.
KindleUnpack (formerly MobiUnpack) has existed as a standalone python tool for quite some time. Its purpose is to unpack the contents of DRM-free Kindle Books or MOBI files into their source components—all the while trying to maintain as much of the original metadata as humanly possible. This is useful for tweaking existing Kindle Books or MOBIs with the intention of rebuilding with kindlegen... as well as simply being a tool for studying the internals of Kindle Books or MOBI files in general.
It has the ability to extract the data from standard MOBIs, KF8s, Joint MOBI/KF8s, Print Replicas (AZW4), and has some limited (experimental) support for processing MOBI dictionaries (Provided they are DRM-free of course).
KindleUnpack has been contributed to by numerous people over time (pdurrant, KevinH and myself among them), so I'm only claiming responsibility for building the plugin around it. The original MobileRead thread that documents the evolution of the core of this plugin can be found here. The latest versions of that stand-alone tool can be found in this post.
Main Features of KindleUnpack - The Plugin:
Special Notes:
Installation Steps:
Configuration:
Github Repository for the plugin code/releases
Used to unpack/inspect the contents of DRM-free Kindle Books/MOBI files.
KindleUnpack (formerly MobiUnpack) has existed as a standalone python tool for quite some time. Its purpose is to unpack the contents of DRM-free Kindle Books or MOBI files into their source components—all the while trying to maintain as much of the original metadata as humanly possible. This is useful for tweaking existing Kindle Books or MOBIs with the intention of rebuilding with kindlegen... as well as simply being a tool for studying the internals of Kindle Books or MOBI files in general.
It has the ability to extract the data from standard MOBIs, KF8s, Joint MOBI/KF8s, Print Replicas (AZW4), and has some limited (experimental) support for processing MOBI dictionaries (Provided they are DRM-free of course).
KindleUnpack has been contributed to by numerous people over time (pdurrant, KevinH and myself among them), so I'm only claiming responsibility for building the plugin around it. The original MobileRead thread that documents the evolution of the core of this plugin can be found here. The latest versions of that stand-alone tool can be found in this post.
Main Features of KindleUnpack - The Plugin:
- Unpack the source components of DRM-free Kindle Books or MOBI files to an external directory (configured/chosen by the user).
- Split Kindlegen 2 produced files into separate, stand-alone MOBI and KF8 ebooks.
- Convert DRM-free KF8 ebooks to ePubs; and add to the calibre library.
- Extract PDFs from DRM-free Print Replica ebooks (AZW4); and add to the calibre library.
Special Notes:
- Requires calibre v0.8.18 or higher.
Installation Steps:
- Download the attached zip file and install the plugin... add to context menu and/or toolbar... and restart Calibre as described in the Introduction to plugins thread.
Configuration:
- From the Configure menu or the Customize plugin button... configure a "Default Unpack Directory."
- If you want the plugin to automatically use the Default Unpack Directory, then check the "Always use the Default Unpack Directory" box. Otherwise, you will be prompted to choose a directory each time you unpack a MOBI.
Github Repository for the plugin code/releases
How to Optimize Images for Your Ebook
Welcome back to a three-part series on optimizing media for your ebooks. In the first post, we showed you how to optimize videos, because, of all the media types, videos need optimizing the most. If you missed it, check it out How to Optimize Videos and Add Them to Your Ebook. Today we’ll show you how to optimize images.

Image optimization means reducing the file size without reducing your image’s wow factor (or it’s informative value). There are several attributes that contribute to the size of your images’ files: physical image size, resolution, and file type. We’ll show you how the three affect the image’s file size. We’ll also give you ideal dimensions for ebook book covers, ebook app icons, and for the images inside your ebook. Along the way, we’ll give you some extra tips, and in the end, you’ll get to see the results: the images and the real data.
Image size
Many of the extraordinary DLSR photographs and Photoshop® creations are produced for large prints, sometimes even poster size. If your ebook will most likely be read on a phone, there’s no point in cramming a poster size image into the palm of your hand. So, all we need to do is resize the image for your target screen, and you’ll see your file size go down. Not just go down, fall drastically, so that’s what we’ll focus on in this post.
Image Quality
In general, higher quality means larger file sizes; however, often with JPGs lossy compression you’re not losing as much as quality as you might have feared, but you also may not get the file size down as much as you wanted either. I wish I could give you a hard-fast rule to follow, but unfortunately, this is one of those things, that is simply not that simple.
If your images are a very high resolution, you probably can afford to reduce the quality to the lowest setting when you save your JPG files. Although experimenting with reducing JPG quality is ideal, not everyone has time to try different values for quality and compare, for each image. So here’s my recommendation, try one or two images max at four different settings. Pick the setting you like most and use it with all your images. We’ll show you how to play with image quality in Photoshop®.
File Type
Each image file type was designed for a different purpose. The two most popular are PNGs and JPGs. To read more about other types see this larger-than-the-life table comparing 16 file types across more characteristics than I care to count: Common image file formats.
PNGs were designed to reduce file size by limiting the range of colors to RGB for web use, coupled with lossless compression.
JPGs support a much larger range of colors for printing and compensate with varying degrees of lossy compression to reduce the size of the file.
For the average user, the two file types are interchangeable. However, if your images are numerous and integral to your ebook, I recommend you read Rick Mathews plain English, down-to-earth advice: Digital Image File Types Explained. It’s a lengthy article, so here’s the bottom line:
JPG is the format of choice for nearly all photographs on the web. Never use JPG for line art, [use] PNG.Use PNG, if you have an image with large areas of exactly uniform color, or if you want to display a photograph without loss on the web.
Before You Optimize Images
Before we begin optimizing, you need to answer the big question: Do your images need to be optimized? In order to answer that question you’ll need to know two things:
- What is the ideal image file size?
- What sizes are your images?
We’re here to help you. So we’ll give you all the data, then at the end, we’ll make answering these questions quick and easy.
1. What is the right image size?
The answers vary and depend on your purpose and target screen size. We’ll give you some official guidelines, specific recommendations and at the end a general guideline you can use for most images in any form of digital content.
Cover Images
Images inside your Ebook
Note: According to the latest Apple Books Asset Guide: ” A full-bleed image should be no smaller than 738 x 985 (the size of a single page, full screen, in Apple Books on the iPad).”
Official guidelines of the major distribution venues.
Bookmark this page. When it’s time to publish, you’ll need these links.
Ebook Web Apps and Desktop Apps
If you’re creating ebooks to be viewed on a computer screen, as in our ebook web apps or ebook desktop apps, you’ll want larger images than for mobile phones. The ideal image size is the same as with any web image:
- Fill the width of the screen: 1,500 pixels – 2,500 pixels wide.
- Most images: 500 – 700 pixels wide.
- Thumbnails: around 150 pixels wide.
Mobile Devices
If you’re creating ebooks that you expect will be read on mobile devices like EPUBs or Mobile Apps, we recommend you keep image size to a minimum to reduce loading time and overall file size.
To get an idea of the largest image sizes that mobile devices can display, the iPhone XS Max maxes out at 414 x 896 pixels and the iPad Pro at 1024 x 1366 pixels. So any images you have larger than that need to be optimized.
Full page images
Occasionally, you’ll want to include a full-screen image and you’ll want the image to be clear and crisp. We recommend that you set the image width to the same width as the largest device. Any images that are smaller, will not look good when enlarged, and images that are significantly larger are excessive and will weigh down your book.
Aim for the following widths for full-screen images.
Landscape: 1366 – 1450 pixels wide
Portrait: 1024 – 1100 pixels wide
Images surrounded by text
Most images in your ebook will not be alone on the page, there will be text above/below and even around the image. For most images, we suggest you resize your images width to 350 – 1000 pixels.
In case you’re interested in the detailed specs:
iOS
Phones
- Max dimensions 414 x 896 pixels
- Recommended width in portrait mode 300 – 400 pixels
- Recommended width in landscape mode 300 – 800 pixels
iPads
- Max dimensions 1024 x 1366 pixels
- Recommended width in portrait mode 300 – 950 pixels (depending on desired screen coverage)
- Recommended width in landscape mode 300 – 1300 pixels (depending on desired screen coverage)
Android
Phones
- Max dimensions 480 x 853 pixels
- Recommended width in portrait mode 300 – 450 pixels
- Recommended width in landscape mode 300 – 800 pixels
Tablets
- Max dimensions 768 x 1024 pixels
- Recommended width in portrait mode 350 – 750 pixels (depending on desired screen coverage)
- Recommended width in landscape mode 300 – 1000 pixels (depending on desired screen coverage)
App Icons
Icon size differs on phones and tablets. Our recommendation is to create icons that are 512 x 512 pixels. However, do not create icons that are less than 120 x 120 pixels.
2. What sizes are your images?
Windows
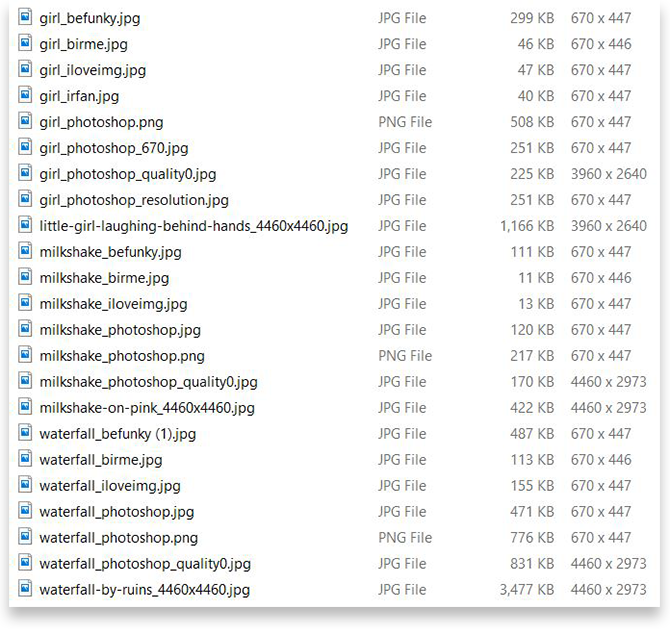
You’ll be surprised by how quick and easy this is. Go to File Explorer and open the folder that has all your images. Set the view to display Content or Details and ta-da! The dimensions in pixels of all your images are displayed. If you selected Details, you’ll be able to sort by file Size or Dimensions. If Dimensions is not displayed, you can add it. For detailed instructions, see the Microsoft Support Center.
If you already added your images to your ebook in Kotobee, all your images are saved in one folder. In Kotobee open your ebook, click on Settings, then Open Working Directory. File Explorer will open with all your files. Open the EPUB folder, then imgs. All the images in your ebook are listed along with their sizes. Go ahead and replace the images here with the optimized ones. Use the same file names as the originals.

Apple
In the Photos app, on your Mac, double-click a photo to view the image. Then click the Info button in the toolbar or press Command-i. All the image data will appear including the file size and image dimensions. For more information, visit Apple Support. Sorry on Macs, you actually have to check the image dimensions individually.
Crop?
The final question before you resize: Would your image look better with some of it cropped out? If so, crop first then resize (if still necessary). In fact, do all edits, before you optimize your image.
Here we have for you the same picture the first two are cropped. The first one was saved in the original size, but with JPG quality set to zero. The second image is the same crop but the image is resized to only 670 pixels wide and the JPG is the quality is set to the maximum twelve. The final image in the series is the original image not cropped but resized to 670 pixels wide. Then last, but not least, my favorite a more severe crop with the waterfalls passageway beneath the bridge in the center of the image.


Surprisingly the largest most stunning image in these is the last one with the smallest file size, less than half the size of the uncropped yet resized original.
We learn two things with this image:
- Cropping can make a beautiful image stunning.
- Occasionally reducing the JPG quality results in smaller files with a higher resolution than resizing.
You’ll see in the data at the end of the post, that in most cases simply reducing the quality does not sufficiently reduce file size.
Image Width Recommendations in Pixels
After all those long details and specifications, here is the summary. The recommended image width for all images in your ebooks.
Now compare your image dimensions to the widths in this table. If the widths of your images are greater than these guidelines, optimize the images.
Let’s do an example together. You’re writing an ebook that will be read on desktops, and you have images on pages alongside text. These images should be 500 – 700 pixels wide. Now take a look at the image width (the first number in the dimensions listed in File Explorer). If the image width is less than 500, it’s probably too small. If the number is greater than 700, optimize it. That’s all there is to it.
Follow the instructions below to resize the image and bring the image file size down.
Optimize Your Images
To save you time, I’m going to show you how to do all your images at once—in one batch if you want all your images the same size. If you want several different sizes, then resize in several different batches.
Online Tools
If you don’t plan on going through this process often and don’t want to download software just to resize the images, you can get it done quickly and easily online. Just drag-n-drop, select the new image size, and the images will be ready to download or even download automatically.
There are many, many online options for resizing images. I’ll share with you my favorites and tell you why I like them. If you don’t like my favorites, don’t worry there are plenty of others. Check out Web Designer Depot’s The Best Image Compression Tools the Web for an in-depth comparison of 14 online platforms.
iLoveIMG
I love iLoveIMG, because it’s fast and easy. They do feature advertisements though.
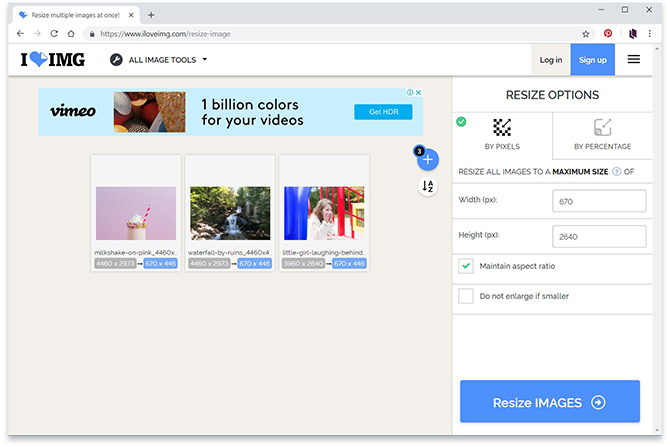
- Drag-n-drop all the images.
- Select by Pixels.
- Enter the image width you want. (Maintain aspect ratio should be checked.)
- Click Resize IMAGES.
Almost instantly your resized images will be ready.
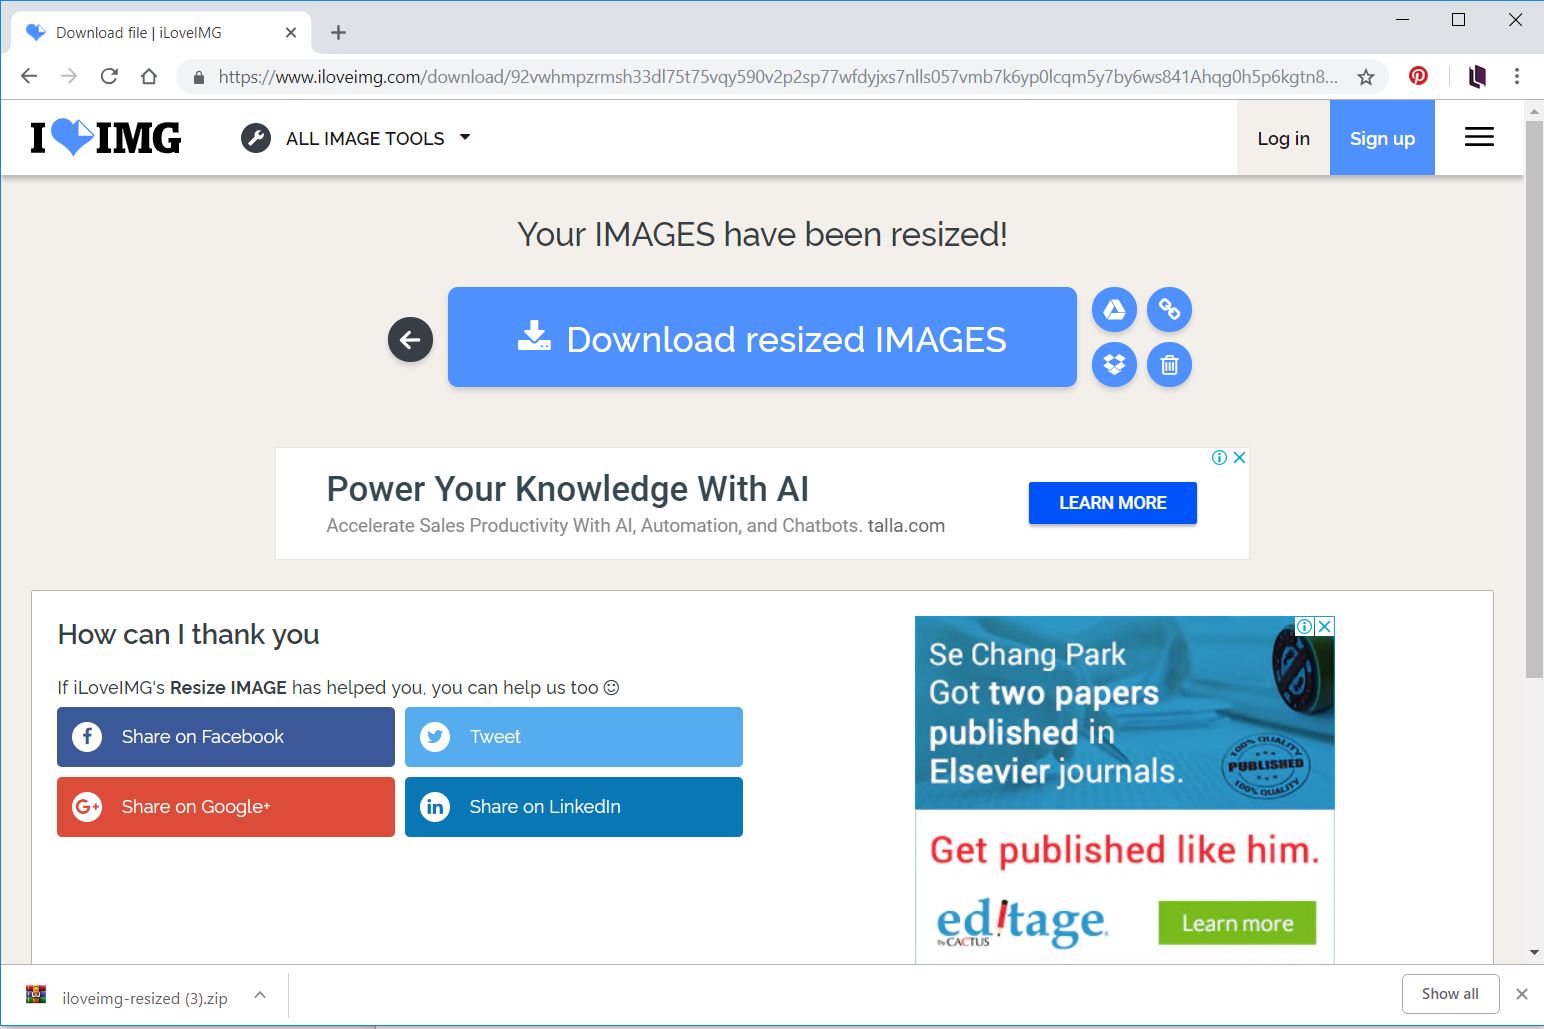
- Click Download resized IMAGES. A zip file will download with all your images.
Crop then Resize
If you want to crop or make minor edits to the images before resizing them, try BeFunky. A nice interface with many free features in their photo editor, including resizing. Batch resizing and other advanced options, unfortunately, require a paid subscription. BeFunky is a little slower than the other options, so I only recommend it, if you want to use their photo editor.
Pixlr is a popular online editor for its Photoshop® mimicry. You do need to have Flash® enabled, in order for Pixlr to work.
Desktop Editors
If you’d like to download a free open source photo editor, you can try Gimp for both MAC and Windows. Here we’ll show you how to use the highly reviewed, IrfanView.
IrfanView
IrfanView 32-bit is only 2.4 MB and will get the job done. Download the 64-bit if your images are over 1.3 GB.
Doing one image at a time is simple: open the image, go to menu Image>Resize/Resample, set the width (make sure aspect ratio is locked) and click OK. The file will be resized. Then go to menu File>Save As and choose JPG.
To do a batch of images in IrfanView isn’t as simple, so we’ll walk you through it.
- Go to File Menu>Batch Conversion/Rename.
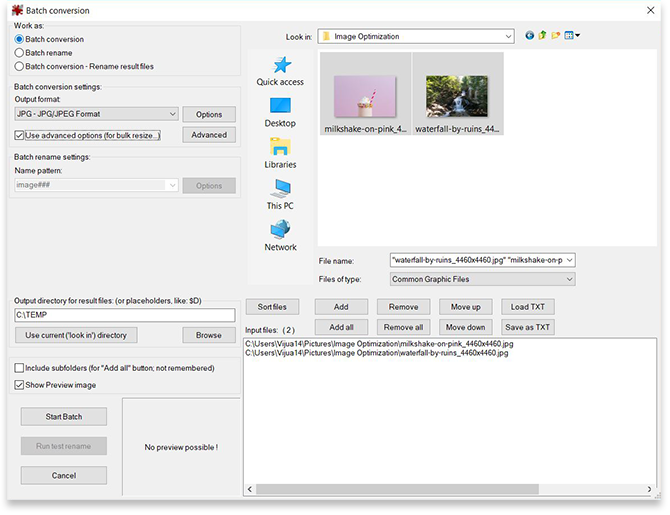
- The Batch Conversion window will appear. Select the files you want to resize. Then click Add all.
- Set the Output directory, to the folder where you want the new images.
- Check Use advanced options. Then click the Advanced button.

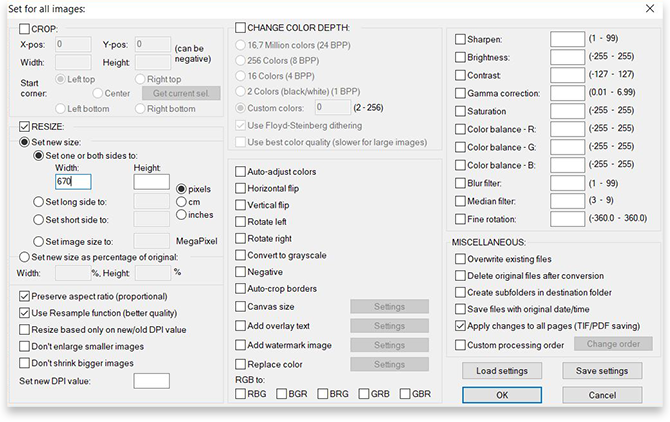
- Another window will appear titled Set for all images. The optional settings can be overwhelming, we’re ignoring them all, except resize.
- Check Resize. Enter the new Width. (Preserve aspect ratio should be checked.) Click OK.
- You’ll be back in the Batch Conversion window. Click Start Batch.
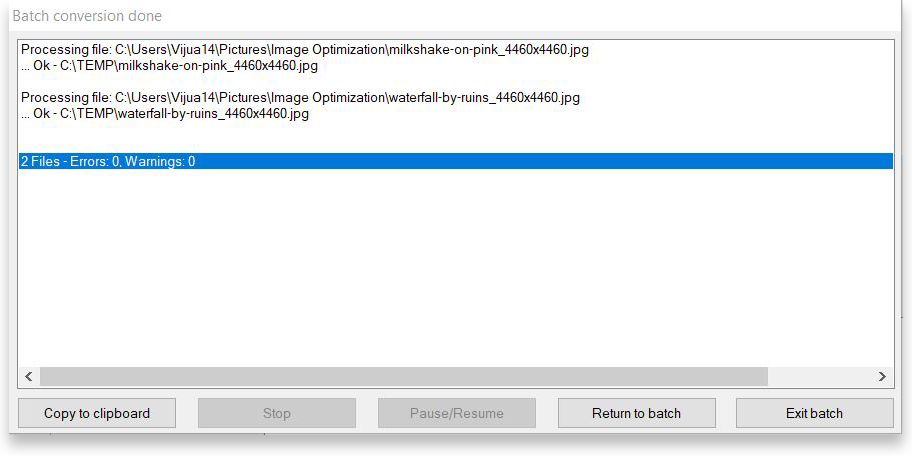
- When the conversion is completed, a report window will appear. You’re done.
While IrfanView offers more options and settings than the online tools. It also involves more steps and can be tedious. You’ll see in the results below though, that it’s resulting file can be comparable to Adobe’s Photoshop. Speaking of which…
Adobe Photoshop®
If you happen to be editing your images in Photoshop®, then add resizing to your list of edits. I recommend do most edits before resizing, except adding text. Add text after you resize the image or it won’t be legible.
Resize while editing
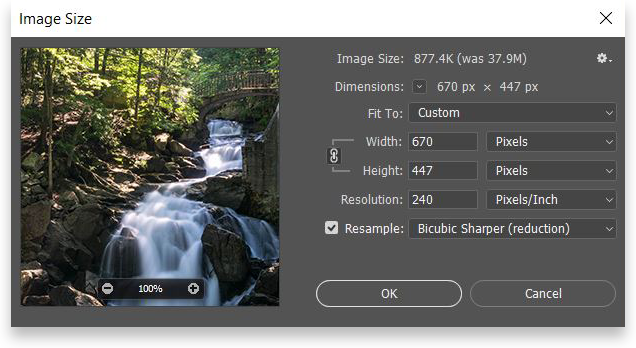
Go to Image>Image Size…. When the window opens enter the desired Width: and as always make certain the Width and Height are locked together. Click OK.
Resize when saving
We mentioned earlier that we’ll show you how to test different image quality settings in Photoshop®, so here it is. When you’re done editing your image, you can resize the image and test different file types and image qualities in one place. From the File menu select Save for Web. The Save for Web window will appear. Before we begin, I recommend selecting the 4-Up tab, to compare different file types and quality settings.
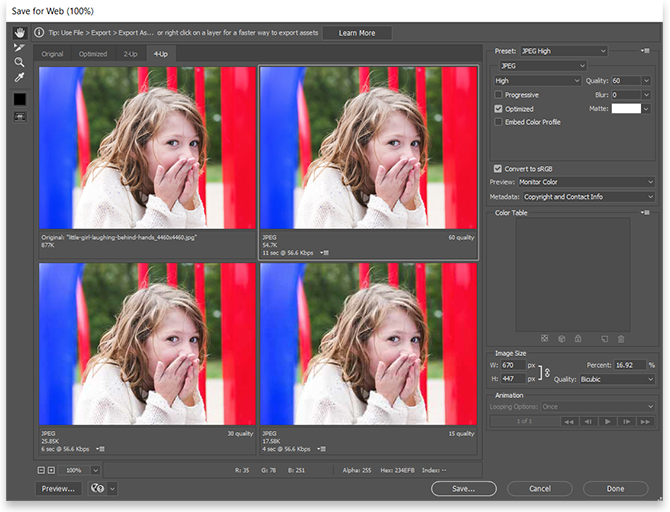
First, set the Image Size (lower right corner), by entering the new width (W:) in pixels, and all the samples will immediately change to the new size. You’ll now have in front of you, your image at the right size and at 4 different quality settings. Then go up to the right corner where you can set the file type and image quality for each window individually: remember, for photographs JPG and for graphics PNG.
When you’re done, select the image sample you like best and click Save, and don’t forget to rename the file, to keep your original intact.
The Results
So here it is, after all the how-to’s, what you’ve all been waiting to see. The Results. Here are the images in their original size and resized using each of the software options.
Below each set of photos, you’ll find a visual showing how small the new file images are compared to the original file size. So a file that is 50% of the original file size is half the original size, etc.
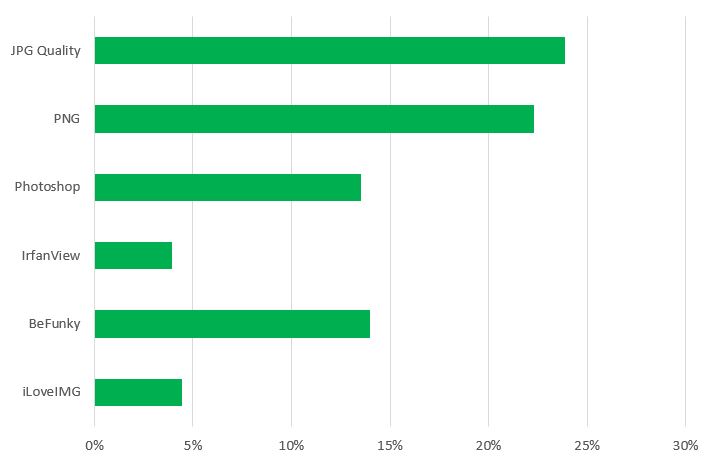
We also included for you extra data for images that we did not include in the blog:
- PNG is for images reduced to the same size as the others in Photoshop, then exported as a PNG.
- JPG Quality is for images of the same size as the original image; however, was saved as a JPG with the quality set to zero.
Original image
4460 x 2973 pixels 3,477 KB

Resized Images
Width: 670 pixels


IrfanView reduced the file size to 137 KB just 4% of the original file size and the waterfall is just as inviting. The picture does look slightly faded compared to the others. You’ll need to decide would your ebook benefit more from by adding more images at this quality, or is having just one large high-quality image more important. In this case, we’re comparing having 1 picture or 25 pictures.
Original image
3960 x 2640 pixels 1.13 MB


IrfanView reduced the file size to just 40 KB only 3% of the original file size and the little girl is just as adorable. The picture does look slightly faded compared to the others. If the image is surrounded by text, this little girl’s spunk will come flying off the page, even in the little 40 KB image. You’ll need to decide would your ebook benefit more from by adding more images at this quality, or is having just one large high-quality image more important. In this case, we’re comparing having 1 picture or 33 pictures.
Original image
4460 x 2973 pixels 422 KB


iLoveIMG reduced the file size to only 12KB just 3% of the original file size and the milkshake is still as stunning as all the others. The colors are not as vibrant nor the sprinkles as crisp, but ultimately it has the same mouth-watering effect on us. You’ll need to decide would your ebook benefit more from by adding more images at this quality, or is having just one large high-quality image more important. In this case, we’re comparing having 1 picture or 33 pictures. Notice, although to our eyes it seems that the background is a uniform color, there are shadows, so technically it’s not, which is why the PNG file did not shrink more than the JPG.
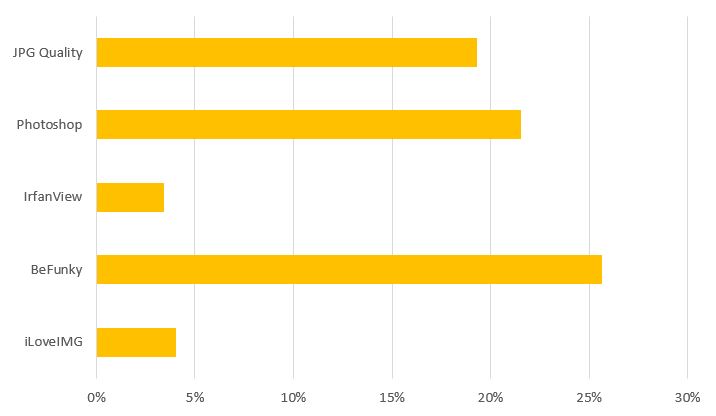
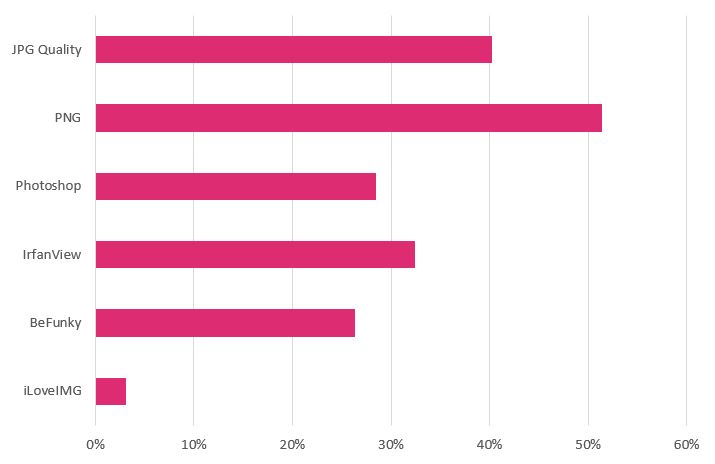
Averages
Here is the average percent reduction for each tool or method.
Although IrfanView outperformed iLoveIMG in two of the three images, iLoveIMG consistently reduced the file size the most. As expected, saving photographs as PNGs is a waste of file space. Photoshop seems to be the perfect middle ground, high quality, and reasonable file sizes.
When you want lots of images in your ebook and they don’t need to be stellar, iLoveIMG will serve you best. It’s also the quickest and easiest tool of them all.
When you want high-quality images and consider file size a fair price to pay, then Photoshop will be your best option, especially if you’re already using it to edit your images.
Recap
Check if your images are within the advised ranges for the devices your ebooks will be read on.
If the details in the image are of the essence, then use Photoshop® and play with the jpg quality setting when you save your image. If the only purpose of the image is its existence, then I recommend using the quick online tool IloveIMGs. You’ll quickly get a tiny file that still looks good. In most ebooks, you’ll need both types of images: Large vibrant images for full-screen displays, and small images that appear only in a portion of the screen. So now you have the perfect tools for all occasions.
Hope this advice helped. Happy optimizing images!


