Показаны сообщения с ярлыком Picture. Показать все сообщения

среда, 15 января 2020 г.

E-Mail Icon Generator

E-Mail Icon Generator

For GMail, Hotmail, MSN, Yahoo!, AOL and many more!

Enter your e-mail address:
 @   Provider not available? Click here!
Here is your e-mail icon:
Jasmin@GMail.com
To display this image elsewhere, use the URL:
https://services.nexodyne.com/email/icon/qCvuMlPQ/lU5ZjHM=/R01haWw=/0/image.png
To save this icon, click here
If you use this service, we request that you include a link to this page wherever you use the e-mail image, so that others can get their own.
The correct link to this page is:
https://services.nexodyne.com/email

вторник, 2 апреля 2019 г.

Preparing Images for Your e-Book


ebooks
Last month I discussed how to clean up your manuscript to prepare it for ebook conversion. This time I’m going to be looking at how to do the same thing with images. [1]
There’s one big difference, however: where the advice that I gave you about getting your text squeaky clean was equally valid for preparing to convert your words to either print or ebook format, these suggestions are ebook-only.
What’s the difference?
Well, in either case, you’re going to start by finding the perfect picture to go with your words. You’re going to crop the picture (cutting out any extraneous bits) and enhance it (or get someone who knows how to do so) so that it looks beautiful.
However, there are two enormous differences between the image files you want to use in an ebook and ones you’re going to get printed on paper:
  1. In a print book, color is expensive, while in an ebook beautiful color costs (essentially) the same as black and white.
  2. On the other hand, in print, you want the image file that goes off to the printer to be as high quality (that is to say, large) as possible, while in an ebook, every kilobyte costs you (I’ll explain how below).

Use color — please!

As someone who’s been around the publishing industry for a long time, this conundrum was one of the hardest things for me to wrap my head around when I first started creating ebooks: that using color wasn’t verboten.
As you probably know, printing a book using even a single color image often more than doubles the production cost of the book. Why? Well, you know that your desktop printer has four colors of ink: cyan, magenta, yellow, and black (CYMK). And unless you tell it not to, it will print every page — even one with only black letters — using all four inks.
A professional offset printing press is essentially the same, though with the ability to use many more colors if needed. [2] A commercial print-on-demand press is exactly like your inkjet — except it’s built to work with much higher volume and with much more consistency.
So unless you do something really special (and expensive) like getting the printer to insert a single plate by hand into each book before it is bound, you’re going to be printing the entire book in full CYMK+ color. Ouch!
With ebooks, none of that is an issue at all! Many dedicated ereaders and all ereader apps used on computers, tablets, or smart phones display in three colors (red, green, and blue — RGB). There is no black pixel! And if you remember your high school science, white light is made up by shining all three colors at once. So color is (in most cases) the default. Why not take advantage of that?
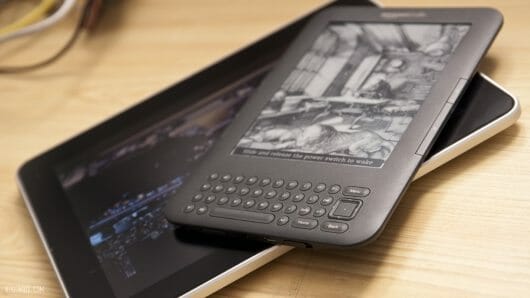
Okay, so some Kindles and other ereader devices use an eInk screen that’s not in living color. These devices’ screens use much less energy, and many people find them easier to read, so there will be folks who will be viewing your beautiful, fully saturated snapshot as if it were being displayed on a 1984 Macintosh. As with those trailblazing computers, the eInk devices are still capable of displaying your picture beautifully — just not in color.[3]
 
5154254605_6bdc9c8bed_ox530
So one word of warning: do make sure that you look at every image in both color and grayscale before you convert it. A picture that looks crisp and clear in brilliant color can lose its contrast when seen in black and white.

Stepping on the scale

What ebooks give us in color, they take away in file size. When you send an image off to a printer or print designer, the idea is to send it at the highest possible quality, in a lossless format like TIFF (Tagged Image File Format, if you care). The files for my 36-page illustrated children’s book The Seven Gods of Luck weigh in at a healthy 128 megabytes (MB).
Many ebook retailers won’t even allow you to upload a file larger than 20MB. And even with those that do, such as Apple, you need to consider how many of your readers will be accessing your masterpiece: on a wireless device, where download speeds are slow, and empty space is taken up by cat videos and audio recordings of a niece’s singing recital. Nothing frustrates a reader more than buying your book — but not being able to download it.
On top of that, our favorite elephant in the room, Amazon, deducts fifteen cents per megabyte from every royalty payment as a “transport fee.” [4] (I always imagine a group of burly truckers carrying floppy disks with your ebook on them from a storage locker to the download bay on the other side of Jeff Bezos’s kingdom.)
So for a 20MB book, that would be $3.00. If you’re charging $9.99 (a high price by indie-published ebook standards), you’ve just lowered your royalty from 70% to 40%. If you’re charging less, the damage is even worse.
What can we do to avoid this catastrophe? What is the cause of all of this bloat?
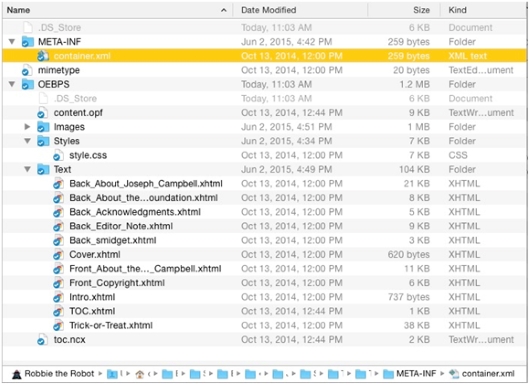
Well, you’ll need to trust me on this: it isn’t your words. If you don’t believe me, look at this picture of the innards of an ebook:
Prepping images screenshot 1
These are the files that make up the text portion of an average-sized book (Joseph Campbell’s Myths to Live By; my paperback copy is 288 pages). See those numbers in the third column, the column headed size? They range from under a kilobyte, to 21KB — the total, including the front and back matter, is 104KB, or just over a tenth of a megabyte.
If you were to buy the ePub file of this ebook, you’d see that the file is actually somewhere around 4.2MB.
So where did the other 4.1MB come from?
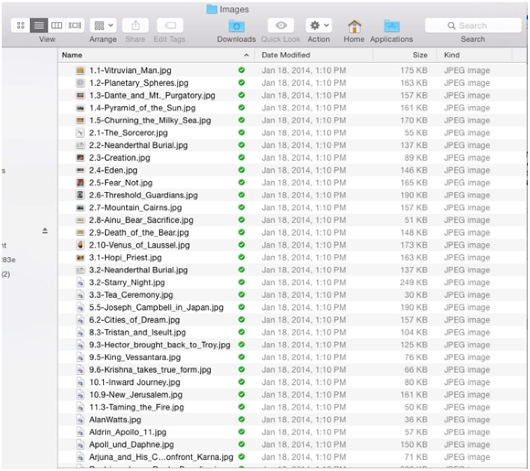
A few kilobytes of it can be found in the stylesheets, navigation files, and such. But most of it came from the ninety-odd lovely pictures that I added when I was creating the ebook edition. [5]
Prepping images screenshot 2
Ouch. That’s sixty cents off the top of every Amazon sale. But the images were integral to the new edition, the first put out by the Joseph Campbell Foundation. So in they stayed.
So what’s a body supposed to do?

Taking a byte out of file size

Before we start our pictures on their weight-loss program, I need to explain something about images in ebook files: they have to be either JPEG or PNG (portable network graphics) files. No bitmap (.bmp) files, no vector (.eps or .ai) files,[6] no Photoshop (.psd) files, no raw camera (RAW or Exif) files. Just .jpg and .png files.
This turns out to be a good thing, because these two formats allow the most control over the final size of your image file.
We’re almost ready to start working with the images — but remember: never work with the original file. Always work with a copy, so that if something goes horribly wrong, all you’ve lost is a little time. Rename your working files. Put them in a different folder. On a different computer. In a different city. (And make sure that there’s a backup of the…. Oh, you know the drill.)
One of the most important, most technical jobs involved in designing an ebook is massaging the images so that they don’t take up too much space, but at the same time still display beautifully.
There are three parts to making that happen:
  1. Sizing (making sure that the height and width of the image are in the right range of pixels)
  2. Compression (using software to make the file as small as possible without losing quality)
  3. Optimization (getting rid of some unnecessary bloat that your image carries around with it needlessly)

Sizing

The easiest way to decrease the file size of your image is to decrease the number of pixels — in other words, simply making the picture smaller.
At this point most phones (let alone dedicated cameras) are capable of taking pictures over 10 megapixels — that is, ten million little collections of red, green, and blue dots. The native dimensions of a picture taken on an iPhone 5s like mine is 3264×2448 pixels.
Guess what?
Even a high-resolution Retina iPad can’t squeeze that many pixels onto its screen. Neither can a Retina MacBook 15”.
So, I ask, why include pixels that will never actually be seen by anyone not reading your ebook on a super-high-definition 30” computer monitor?
I’m going to assume that you’re used to working with a basic image editing program like PhotoScape, GIMP, or Apple Preview — if you can find your way around Adobe Photoshop (even an old version), this should be easy.
So. Open the file.
Wait — you aren’t going to work with the original image, are you? Good. Just checking.
In your app, find the menu item to resize the picture. In Photoshop, it’s under the Image menu: Image Size… In Preview, it’s under the Tools menu. In PhotoScape, click the Resize Photo button at the bottom of the window.
You’ll be shown a box that looks something like this (from PhotoScape):
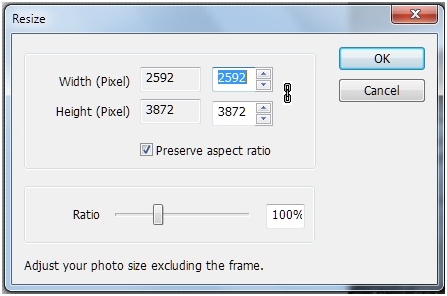
Prepping images screenshot 3
You’ll see the existing width and height (in pixels, inches, centimeters, or whatever), with a box next to it to fill in a new measurement. Somewhere there will be something like that little check box in the picture above that reads “Preserve aspect ratio”; this will keep the height and width of the image proportional. Which is, usually, a good thing.
So what size should you set your image to?
It depends on a number of criteria:
  • How important is the fine detail of the image?
  • How many total images are there in the book?
  • Are the pictures primary, or are they secondary to the text?
  • How sharp is the image to begin with?
  • Is the image a photograph, a painting, or line art?
If the ebook is a picture book or a collection of photographs that you expect readers to examine closely, then by all means, keep the image as close to full-sized as you can. Still, there’s no point in making the image bigger than can be viewed on the device.
The short side on the largest current tablet screens (including the iPad and Kindle Fire HDX) is around 1600 pixels.
If you’re trying to keep your image as large as possible, then set the short side of your image to that size.
If, on the other hand, your picture is more decorative or illustrative than central, you might consider setting that short-side size to something closer to a standard smart phone or ereader width — between 600 and 800 pixels.
Click the “OK” button.
Suddenly, your picture will look tiny on screen. Don’t worry — you can zoom in to see it as it really is. Make sure that you don’t see any “jaggies” (ragged, pixelated lines instead of smooth, flowing ones), and that the important detail is all still visible. If you aren’t happy with the size you chose, go up to the Edit menu and select Undo — then try it again, until you’re happy.

Compression

Once you’re happy, you’re going to save the file, and when you do, you’re going to apply software compression — basically squeezing out the unneeded detail from the image, with the emphasis on unneeded.
At this point, I almost always save files in the JPEG format, since it is very, very good at compressing images.
We’re going to go up to the File menu and select Save As… (in Mac OS X Yosemite, they changed the label to “duplicate” for some reason). You’ll be confronted with a dialog box that looks something like this :
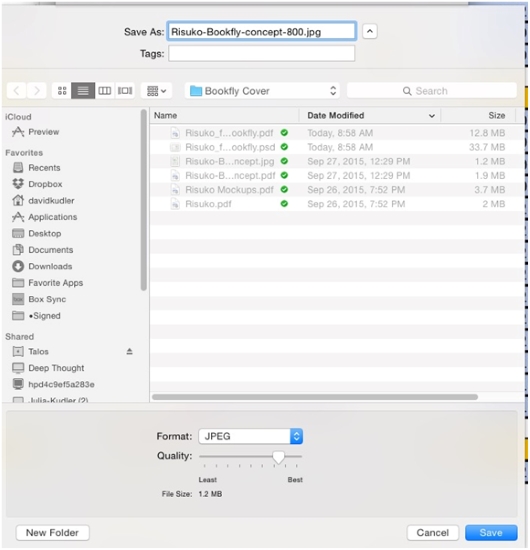
Prepping images screenshot 4
See that slider labeled “Quality”? That’s going to do the magic for us.
How much should you compress the image? As much as you can without compromising the quality of the image. Unfortunately, that scale isn’t calibrated uniformly — different software uses different compression algorithms at different settings. So you’re going to need to play it by ear.
I started out being very conservative in compressing images — close to the right-hand, “Best” side of the slider. At this point, I am often extremely aggressive, around the second tick mark from the left. If I’ve got multiple images in the book, I aim for each to be under 50KB, if I can help it. If this is the only, or one of the few images, I shoot for a file size in the 100–150KB range.
I then type in a new name — so that I still have the previous version, if I want to go back. Generally, I take the width that I choose in step 1 and add that at the end of the file name (that’s the -800 in the file name above) — oh, and I take out any spaces and replace them with hyphens or dashes, since ePub doesn’t like spaces in file names.
Then open the new photo — if it isn’t opened automatically — and see what the compression gods have wrought. Look for lines of gradation in smooth color bands (posterization), or jaggies. See if the detail in the image is still acceptable.
If not, or if the file is still too big, go back to the previous version (this is why you saved it!) and start again. [7]

Optimization

Now we get into some real black magic. Sort of.
Each image carries in it a bunch of metadata — information about when and how the picture was taken, the camera, the date and time, maybe the geolocation. If you’re trying to put together a slide show, this sort of information can be invaluable.
Locked inside of an ebook, it’s useless. And it can add as much as 20KB to an image.
There are several ways to strip this last bit of dead weight away. I use an open source (aka freeware) utility app called ImageOptim that gets rid of the metadata, as well as some other crud, without further compressing the file — Mac only, I’m afraid. In Windows, however, you can simply right click on the image file in Windows Explorer, click on the Properties tab, and then select the link at the bottom of the tab that reads “Remove Properties and Personal Information.” That should help — and it ought to slim down the file at least a bit. If you’re a Linux user, you can use the command line utility JPEGRescan (one of the ones on which ImageOptim is based).
Once you’ve gone through the whole process with each of your images (including the cover art), you’ll be ready to start making your ebook!

[1]Note that I’m not going to be talking about choosing images to accompany the text. I’m going to assume that you’ve spent a lot of time finding the perfect pictures to illustrate what you’re saying — and that you’ve made absolutely sure that you have the right to include them in your book.
[2]Okay. There are many more differences between a home printer and a large web press. Work with me here.
[3]Kindle vs. iPad by Zhao ! (@flickr.com) used through a Creative Commons license.
[4]This $0.15/MB fee applies only if you’re using the Kindle Direct Publishing 70% royalty rate, which you can choose for ebooks priced between $2.99 and $9.99. Go with the other option and you can charge whatever you’d like, and you won’t get charged a fee — but you’ll only make 35%. And that’s 4.1MB after I did all of the things I’m about to tell you to do. When I first converted the book, the Images folder was originally a bit under 14MB.
[5]And that’s not including another 15MB of lovely but ultimately unusable video. By the way, the 1MB that shows up attached to the Images folder? I forgot when I took this screenshot that I’d partially emptied the folder.
[6]You can, in theory, use Scalable Vector Graphics (SVG) files to do all sorts of nifty things in ebooks — but it’s a very difficult format to work in, and the format isn’t fully supported in all ereaders. Likewise, you can, in theory, use Graphics Interchange Format (GIF) files — even animated ones. However, Apple is the only retailer that will accept them.
[7]Be careful not to compress the same image too many times — if you open a JPEG and then select Save As…, you’re going to apply a whole new round of compression. Do that often enough, and your beautiful photo will start to look awful.
воскресенье, 31 марта 2019 г.

How to Optimize Images for Your Ebook


Welcome back to a three-part series on optimizing media for your ebooks. In the first post, we showed you how to optimize videos, because, of all the media types, videos need optimizing the most. If you missed it, check it out How to Optimize Videos and Add Them to Your Ebook. Today we’ll show you how to optimize images.
optimize images
Image optimization means reducing the file size without reducing your image’s wow factor (or it’s informative value). There are several attributes that contribute to the size of your images’ files: physical image size, resolution, and file type.  We’ll show you how the three affect the image’s file size. We’ll also give you ideal dimensions for ebook book covers, ebook app icons, and for the images inside your ebook.  Along the way, we’ll give you some extra tips, and in the end, you’ll get to see the results: the images and the real data.

Image size

Many of the extraordinary DLSR photographs and Photoshop® creations are produced for large prints, sometimes even poster size. If your ebook will most likely be read on a phone, there’s no point in cramming a poster size image into the palm of your hand. So, all we need to do is resize the image for your target screen, and you’ll see your file size go down. Not just go down, fall drastically, so that’s what we’ll focus on in this post.

Image Quality

In general, higher quality means larger file sizes; however, often with JPGs lossy compression you’re not losing as much as quality as you might have feared, but you also may not get the file size down as much as you wanted either. I wish I could give you a hard-fast rule to follow, but unfortunately, this is one of those things, that is simply not that simple.
If your images are a very high resolution, you probably can afford to reduce the quality to the lowest setting when you save your JPG files. Although experimenting with reducing JPG quality is ideal, not everyone has time to try different values for quality and compare, for each image. So here’s my recommendation, try one or two images max at four different settings. Pick the setting you like most and use it with all your images. We’ll show you how to play with image quality in Photoshop®.

File Type

Each image file type was designed for a different purpose. The two most popular are PNGs and JPGs. To read more about other types see this larger-than-the-life table comparing 16 file types across more characteristics than I care to count: Common image file formats.
PNGs were designed to reduce file size by limiting the range of colors to RGB for web use, coupled with lossless compression.
JPGs support a much larger range of colors for printing and compensate with varying degrees of lossy compression to reduce the size of the file.
For the average user, the two file types are interchangeable. However, if your images are numerous and integral to your ebook, I recommend you read Rick Mathews plain English, down-to-earth advice: Digital Image File Types Explained. It’s a lengthy article, so here’s the bottom line:
JPG is the format of choice for nearly all photographs on the web. Never use JPG for line art, [use] PNG.
Use PNG, if you have an image with large areas of exactly uniform color, or if you want to display a photograph without loss on the web.

Before You Optimize Images

Before we begin optimizing, you need to answer the big question: Do your images need to be optimized? In order to answer that question you’ll need to know two things:
  1. What is the ideal image file size?
  2. What sizes are your images?
We’re here to help you. So we’ll give you all the data, then at the end, we’ll make answering these questions quick and easy.

1.     What is the right image size?

The answers vary and depend on your purpose and target screen size. We’ll give you some official guidelines, specific recommendations and at the end a general guideline you can use for most images in any form of digital content.

Cover Images

 KindleKoboiBooks
File typeJPG or TIFJPG or PNGJPG or PNG
Width:Height ratio1:1.63:4
Dimensions1,600 x 2,560 pixels
Min. 625 x 1,000
Max. 10,000 x 10,000
Min. 1400 pixels (short side)
Minimum Resolution300 ppi300 dpi
Ideal: 900 dpi
300 dpi
Maximum File size50 MB5 MB
For more detailsKDP HelpKobo Help CentreAsset Guide

Images inside your Ebook

 KindleKoboiBooks
File typeJPG or GIF JPG or PNGJPG or PNG
Resolution300 dpi 300 – 900 dpiMax: 4 million pixels total
For more detailsKDP Help Kobo Help Centre.Asset Guide
Note: According to the latest Apple Books Asset Guide: ” A full-bleed image should be no smaller than 738 x 985 (the size of a single page, full screen, in Apple Books on the iPad).”
Official guidelines of the major distribution venues.
Bookmark this page. When it’s time to publish, you’ll need these links.

Ebook Web Apps and Desktop Apps

If you’re creating ebooks to be viewed on a computer screen, as in our ebook web apps or ebook desktop apps, you’ll want larger images than for mobile phones. The ideal image size is the same as with any web image:
  • Fill the width of the screen: 1,500 pixels – 2,500 pixels wide.
  • Most images: 500 – 700 pixels wide.
  • Thumbnails: around 150 pixels wide.

Mobile Devices

If you’re creating ebooks that you expect will be read on mobile devices like EPUBs or Mobile Apps, we recommend you keep image size to a minimum to reduce loading time and overall file size.
To get an idea of the largest image sizes that mobile devices can display, the iPhone XS Max maxes out at 414 x 896 pixels and the iPad Pro at 1024 x 1366 pixels. So any images you have larger than that need to be optimized.

Full page images

Occasionally, you’ll want to include a full-screen image and you’ll want the image to be clear and crisp. We recommend that you set the image width to the same width as the largest device. Any images that are smaller, will not look good when enlarged, and images that are significantly larger are excessive and will weigh down your book.
Aim for the following widths for full-screen images.
Landscape:  1366 – 1450 pixels wide
Portrait: 1024 – 1100 pixels wide

Images surrounded by text

Most images in your ebook will not be alone on the page, there will be text above/below and even around the image. For most images, we suggest you resize your images width to 350 – 1000 pixels.
In case you’re interested in the detailed specs:

iOS

Phones
  • Max dimensions 414 x 896 pixels
  • Recommended width in portrait mode 300 – 400 pixels
  • Recommended width in landscape mode 300 – 800 pixels
iPads
  • Max dimensions 1024 x 1366 pixels
  • Recommended width in portrait mode 300 – 950 pixels (depending on desired screen coverage)
  • Recommended width in landscape mode 300 – 1300 pixels (depending on desired screen coverage)

Android

Phones
  • Max dimensions 480 x 853 pixels
  • Recommended width in portrait mode 300 – 450 pixels
  • Recommended width in landscape mode 300 – 800 pixels
Tablets
  • Max dimensions 768 x 1024 pixels
  • Recommended width in portrait mode 350 – 750 pixels (depending on desired screen coverage)
  • Recommended width in landscape mode 300 – 1000 pixels (depending on desired screen coverage)

App Icons

Icon size differs on phones and tablets.  Our recommendation is to create icons that are 512 x 512 pixels. However, do not create icons that are less than 120 x 120 pixels.

2.     What sizes are your images?

Windows

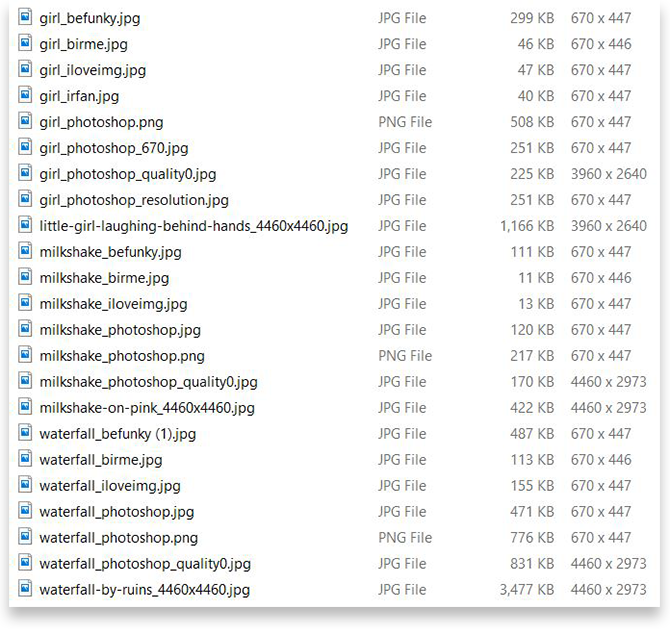
You’ll be surprised by how quick and easy this is. Go to File Explorer and open the folder that has all your images. Set the view to display Content or Details and ta-da! The dimensions in pixels of all your images are displayed. If you selected Details, you’ll be able to sort by file Size or Dimensions. If Dimensions is not displayed, you can add it. For detailed instructions, see the Microsoft Support Center.
Optimize Images File Explorer
If you already added your images to your ebook in Kotobee, all your images are saved in one folder. In Kotobee open your ebook, click on Settings, then Open Working Directory. File Explorer will open with all your files. Open the EPUB folder, then imgs. All the images in your ebook are listed along with their sizes. Go ahead and replace the images here with the optimized ones.  Use the same file names as the originals.
Kotobee working directory

Apple

In the Photos app, on your Mac, double-click a photo to view the image. Then click the Info button in the toolbar or press Command-i. All the image data will appear including the file size and image dimensions. For more information, visit Apple Support.  Sorry on Macs, you actually have to check the image dimensions individually.

Crop?

The final question before you resize: Would your image look better with some of it cropped out? If so, crop first then resize (if still necessary). In fact, do all edits, before you optimize your image.
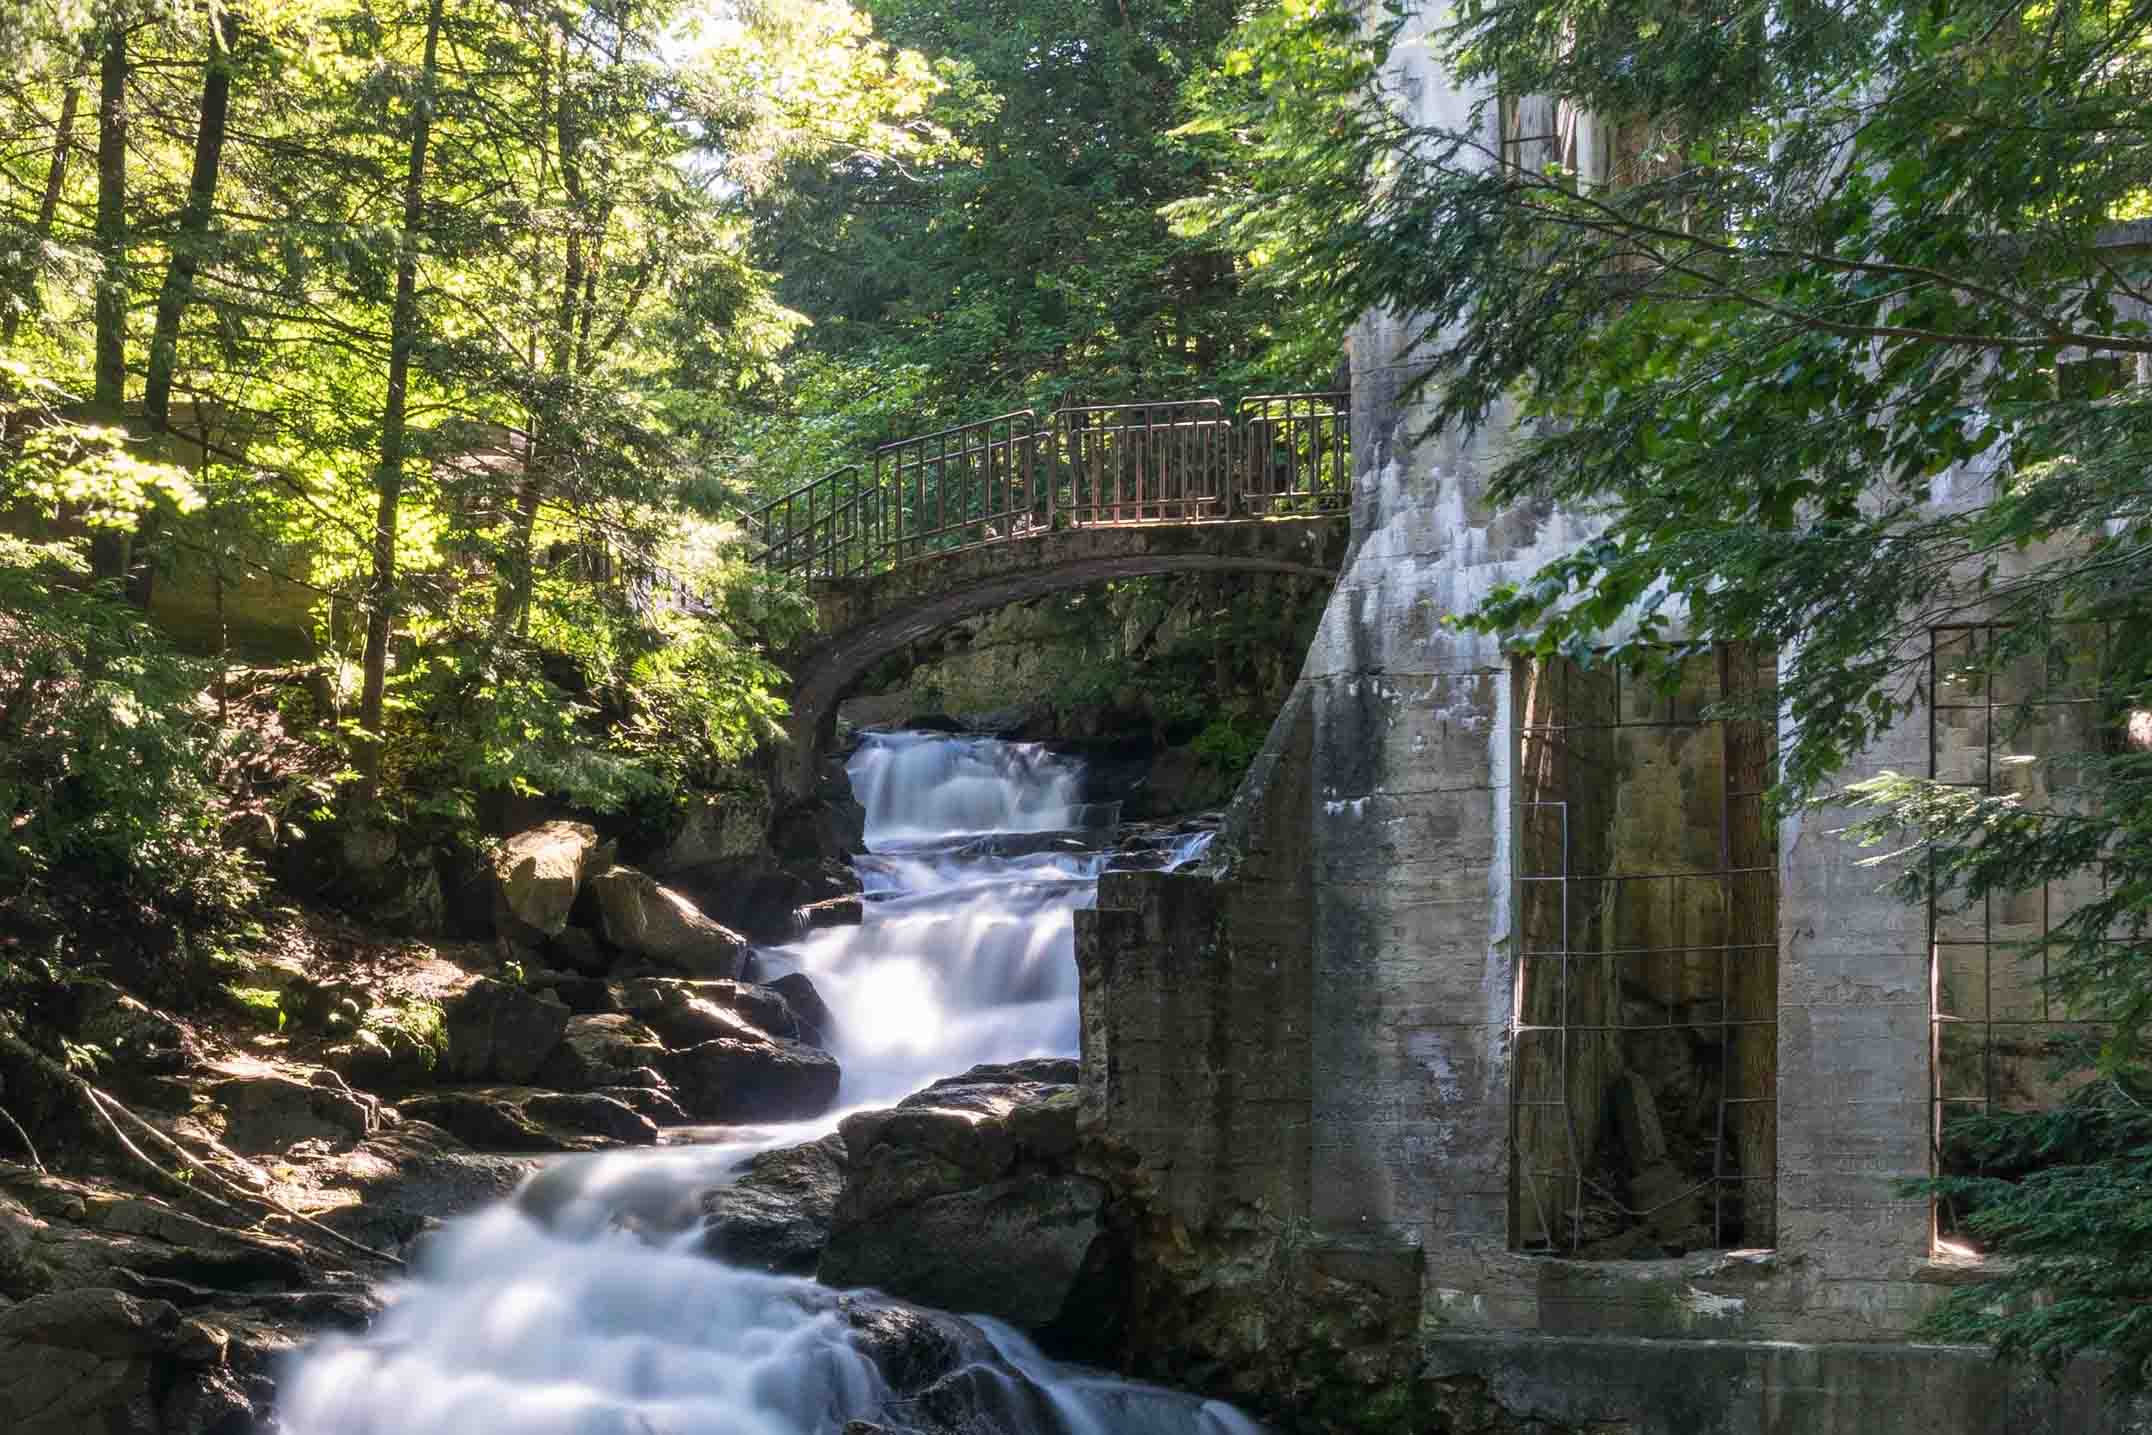
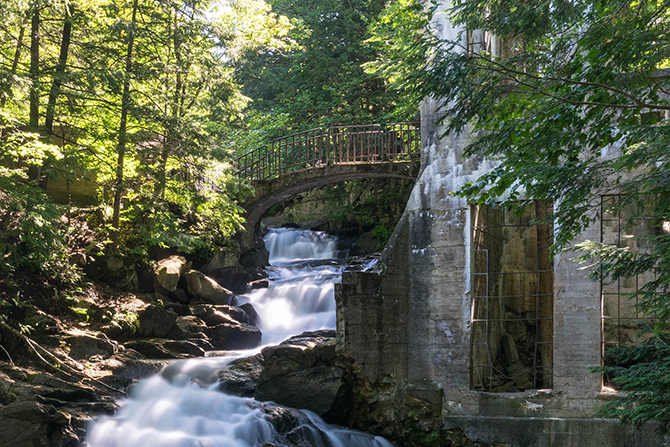
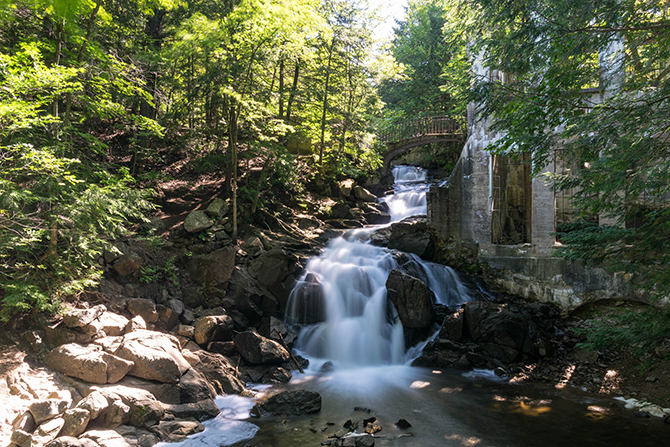
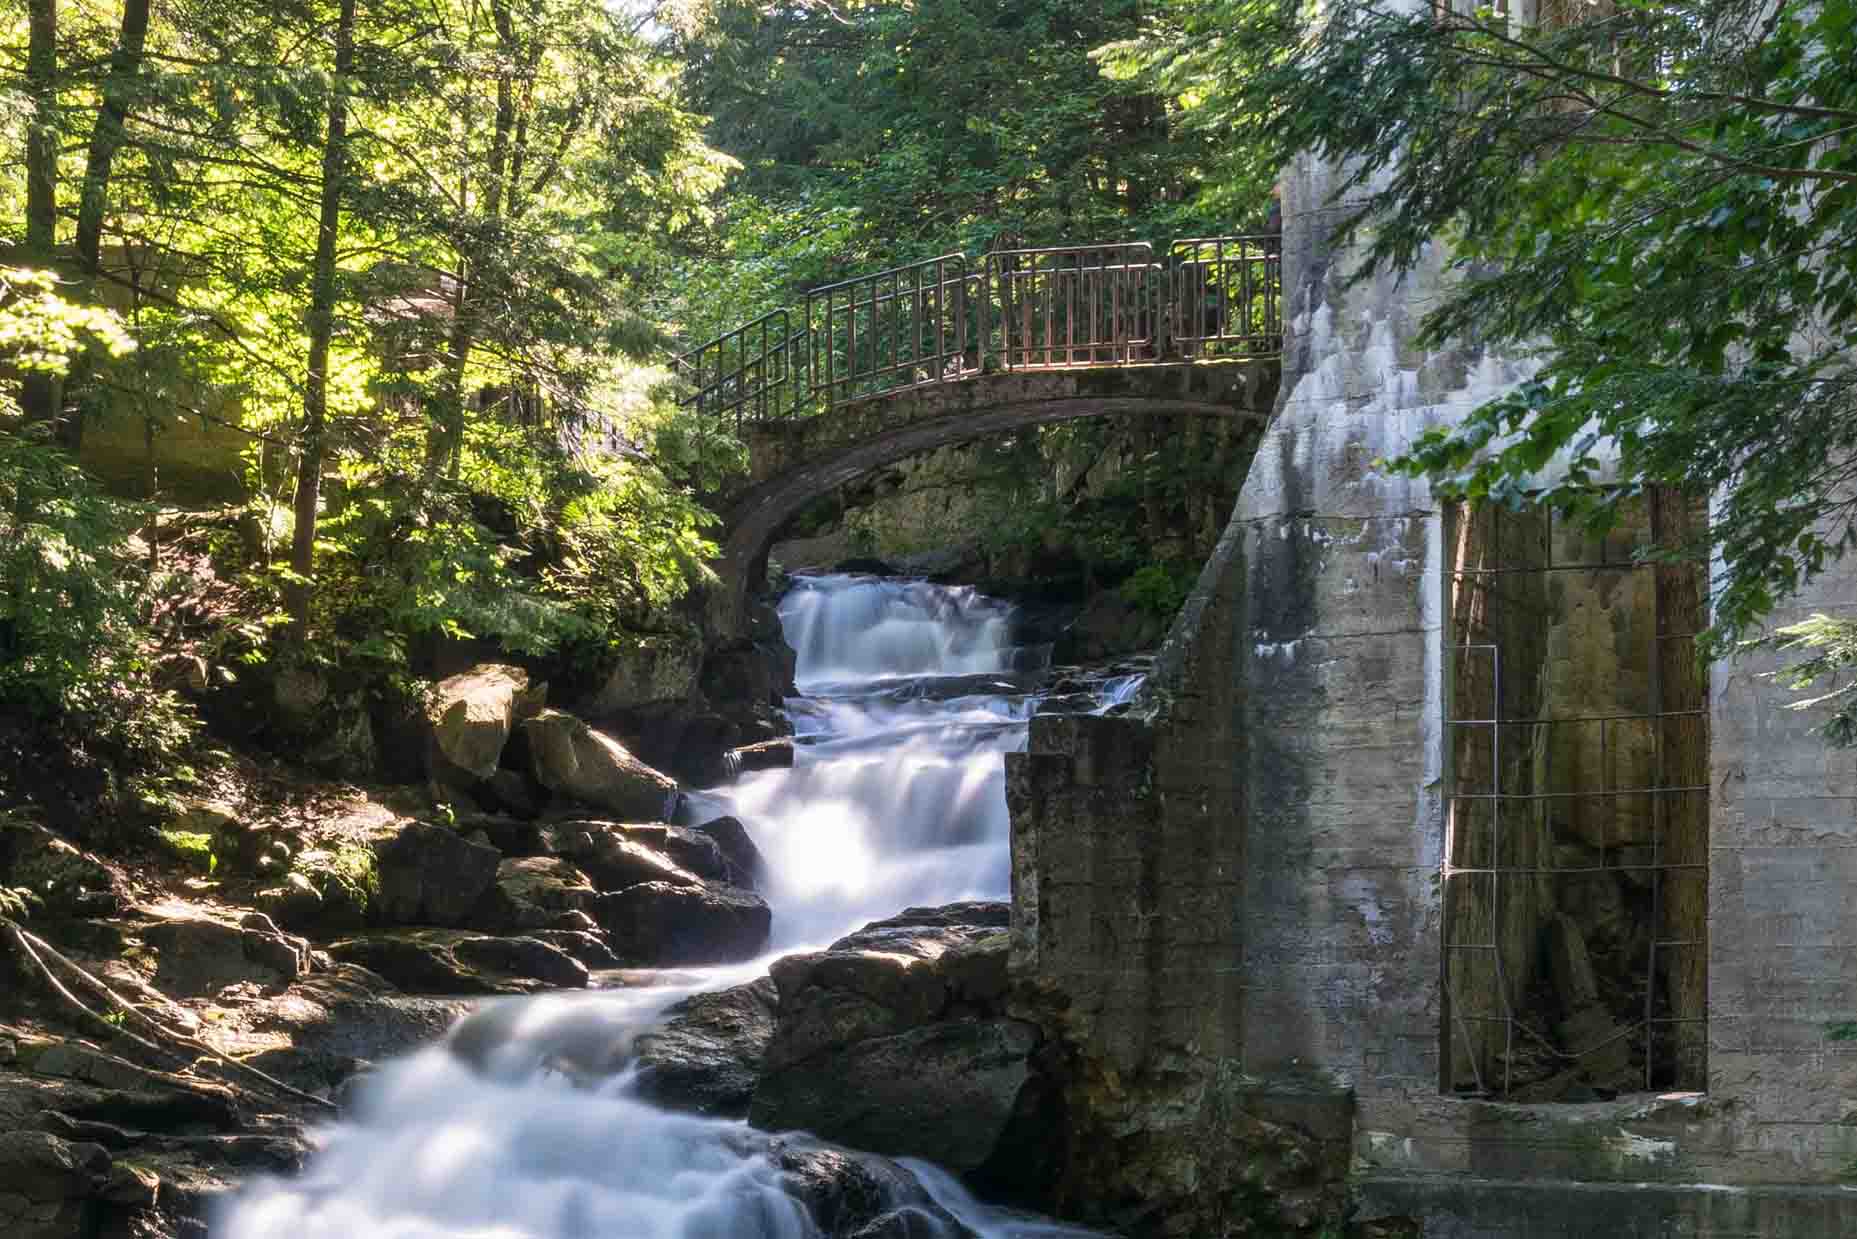
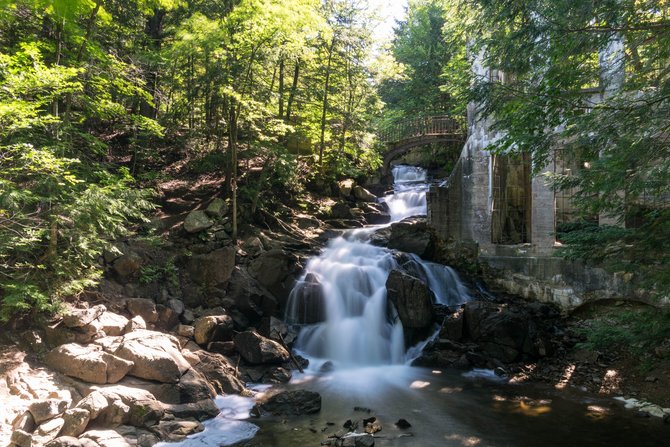
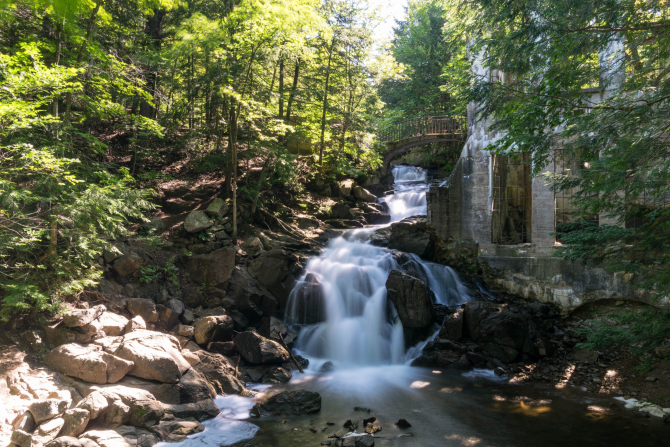
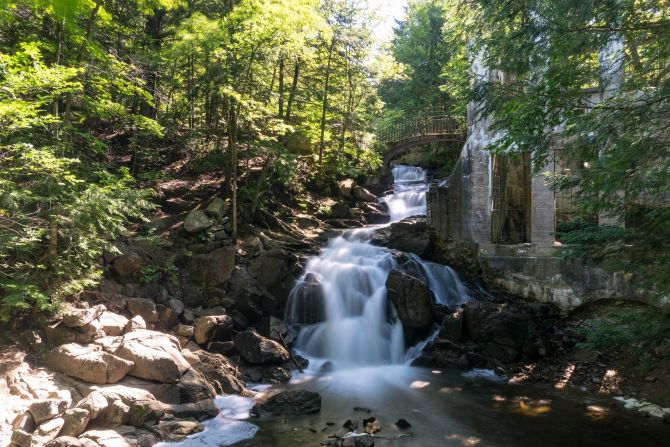
Here we have for you the same picture the first two are cropped. The first one was saved in the original size, but with JPG quality set to zero. The second image is the same crop but the image is resized to only 670 pixels wide and the JPG is the quality is set to the maximum twelve. The final image in the series is the original image not cropped but resized to 670 pixels wide. Then last, but not least, my favorite a more severe crop with the waterfalls passageway beneath the bridge in the center of the image.
optimize images Cropped then quality reduced
Cropped and JPG Quality set to zero    247 KB

optimize images Cropped then resized
Cropped then resized to 670 pixels

Optimize Images Photoshop 470KB
Photoshop: not cropped, whole image resized to 670 pixels   470KB
Optimize Images
Cropped even more. Quality = zero.    186 KB
Surprisingly the largest most stunning image in these is the last one with the smallest file size, less than half the size of the uncropped yet resized original.
We learn two things with this image:
  1. Cropping can make a beautiful image stunning.
  2. Occasionally reducing the JPG quality results in smaller files with a higher resolution than resizing.
You’ll see in the data at the end of the post, that in most cases simply reducing the quality does not sufficiently reduce file size.

Image Width Recommendations in Pixels

After all those long details and specifications, here is the summary. The recommended image width for all images in your ebooks.
DeviceFull ScreenMost Images
Desktop1,500 – 2,500500 – 700
Mobile Devices1366-1450300 – 1000
Ebook App Icons512 x 512
Now compare your image dimensions to the widths in this table. If the widths of your images are greater than these guidelines, optimize the images.
Let’s do an example together. You’re writing an ebook that will be read on desktops, and you have images on pages alongside text. These images should be 500 – 700 pixels wide. Now take a look at the image width (the first number in the dimensions listed in File Explorer). If the image width is less than 500, it’s probably too small. If the number is greater than 700, optimize it.  That’s all there is to it.
Follow the instructions below to resize the image and bring the image file size down.

Optimize Your Images

To save you time, I’m going to show you how to do all your images at once—in one batch if you want all your images the same size. If you want several different sizes, then resize in several different batches.

Online Tools

If you don’t plan on going through this process often and don’t want to download software just to resize the images, you can get it done quickly and easily online. Just drag-n-drop, select the new image size, and the images will be ready to download or even download automatically.
There are many, many online options for resizing images. I’ll share with you my favorites and tell you why I like them. If you don’t like my favorites, don’t worry there are plenty of others. Check out Web Designer Depot’s The Best Image Compression Tools the Web for an in-depth comparison of 14 online platforms.

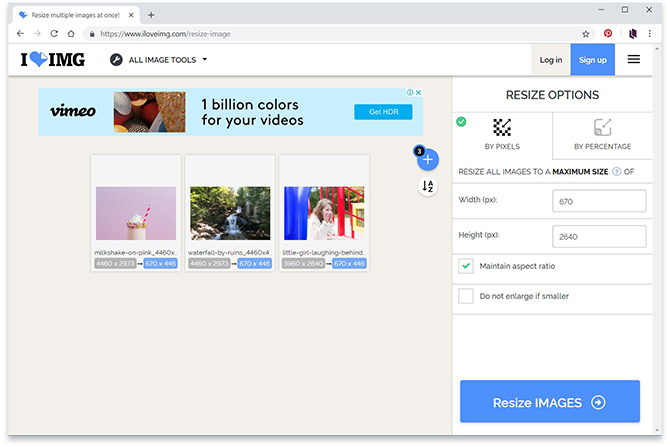
iLoveIMG

I love iLoveIMG, because it’s fast and easy. They do feature advertisements though.
optimize images iloveimg step 2
    1. Drag-n-drop all the images.
    2. Select by Pixels.
    3. Enter the image width you want. (Maintain aspect ratio should be checked.)
    4. Click Resize IMAGES.
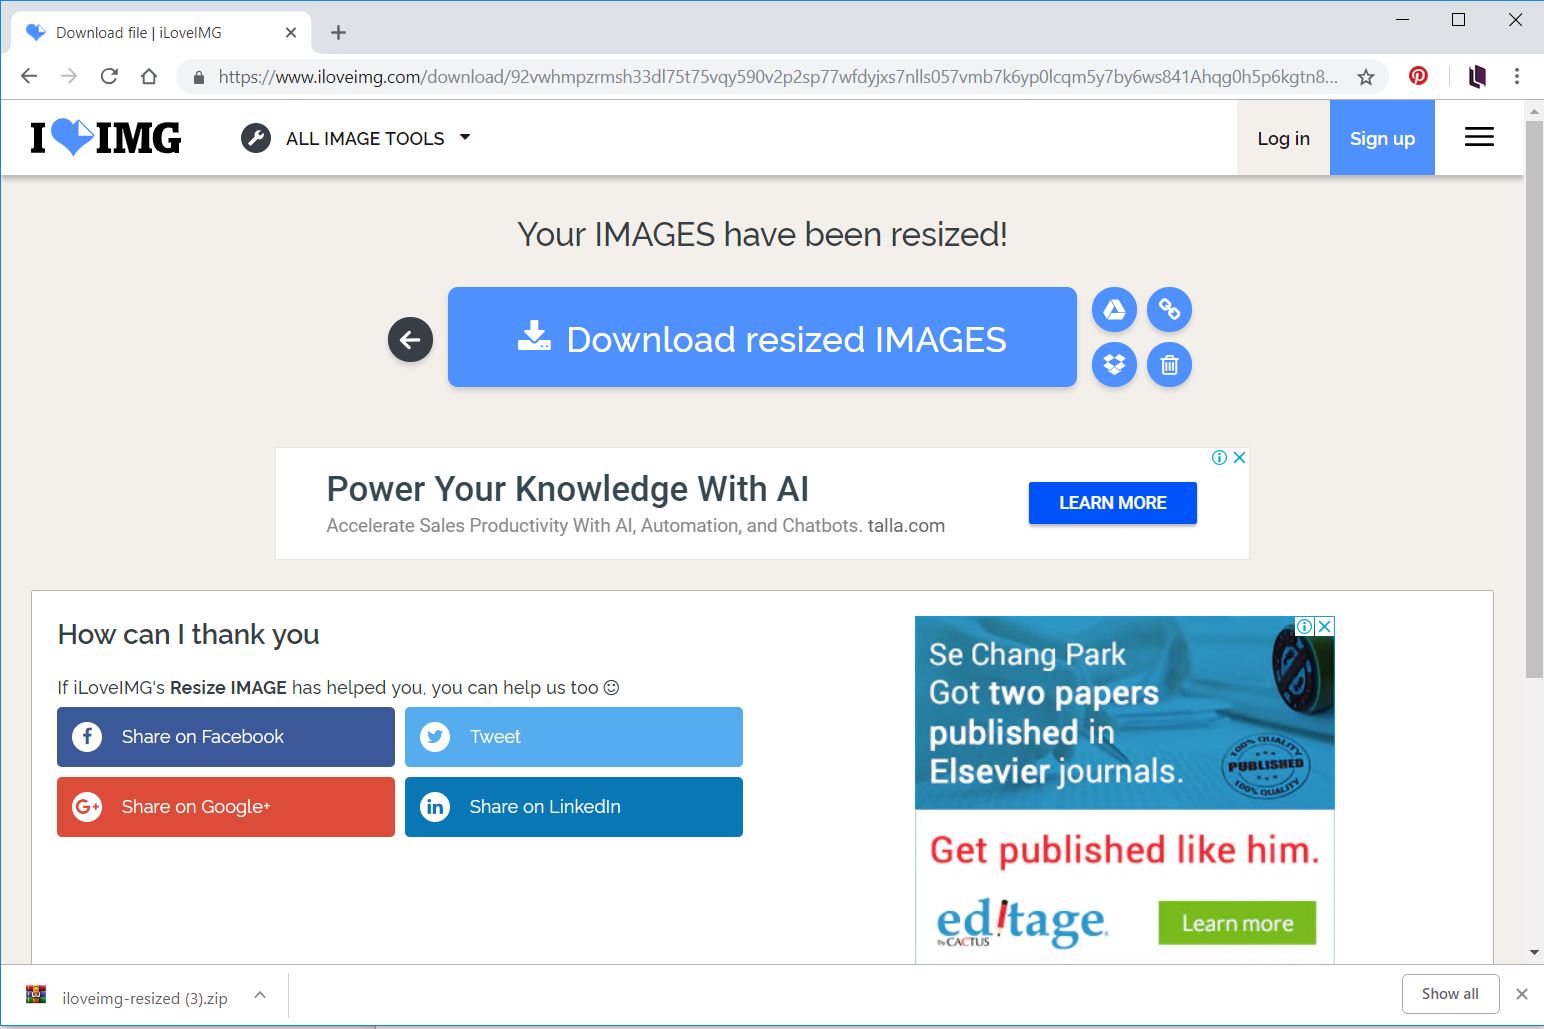
Almost instantly your resized images will be ready.
optimize Images iLoveIMG step2
  1. Click Download resized IMAGES. A zip file will download with all your images.

Crop then Resize

If you want to crop or make minor edits to the images before resizing them, try BeFunky. A nice interface with many free features in their photo editor, including resizing. Batch resizing and other advanced options, unfortunately, require a paid subscription. BeFunky is a little slower than the other options, so I only recommend it, if you want to use their photo editor.
Pixlr is a popular online editor for its Photoshop® mimicry.  You do need to have Flash® enabled, in order for Pixlr to work.

Desktop Editors

If you’d like to download a free open source photo editor, you can try Gimp for both MAC and Windows. Here we’ll show you how to use the highly reviewed, IrfanView.

IrfanView

IrfanView 32-bit is only 2.4 MB and will get the job done. Download the 64-bit if your images are over 1.3 GB.
Doing one image at a time is simple: open the image, go to menu Image>Resize/Resample, set the width (make sure aspect ratio is locked) and click OK. The file will be resized. Then go to menu File>Save As and choose JPG.
To do a batch of images in IrfanView isn’t as simple, so we’ll walk you through it.
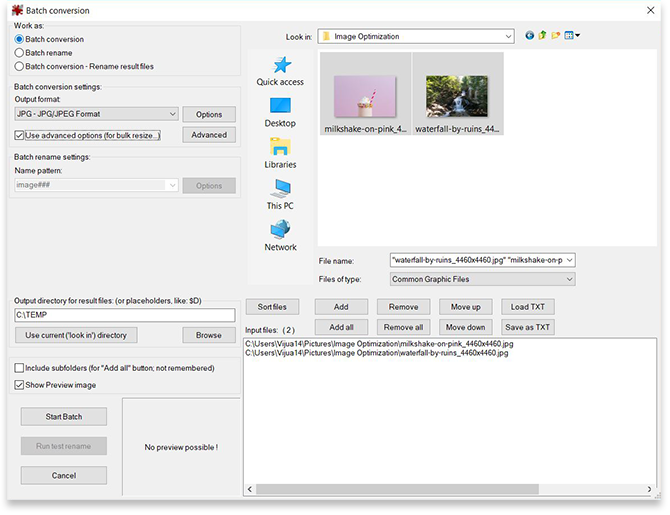
  1. Go to File Menu>Batch Conversion/Rename.optimize images irfanview batch window
  2. The Batch Conversion window will appear. Select the files you want to resize. Then click Add all.
  3. Set the Output directory, to the folder where you want the new images.
  4. Check Use advanced options. Then click the Advanced button.optimize images irfanview batch step2
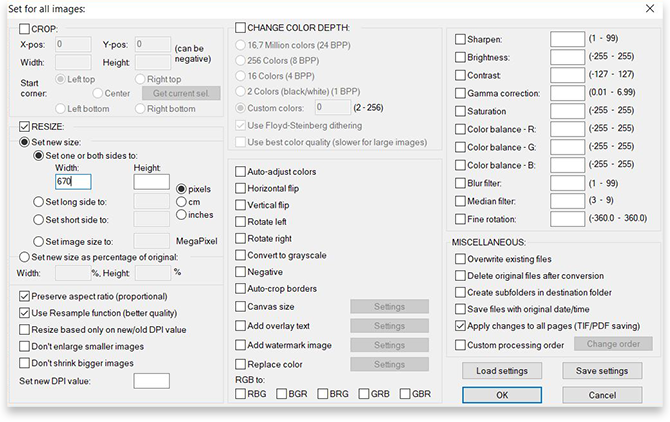
  5. Another window will appear titled Set for all images. The optional settings can be overwhelming, we’re ignoring them all, except resize.
  6. Check Resize.  Enter the new Width. (Preserve aspect ratio should be checked.) Click OK.
  7. You’ll be back in the Batch Conversion window. Click Start Batch.optimize images irfanview batch step3
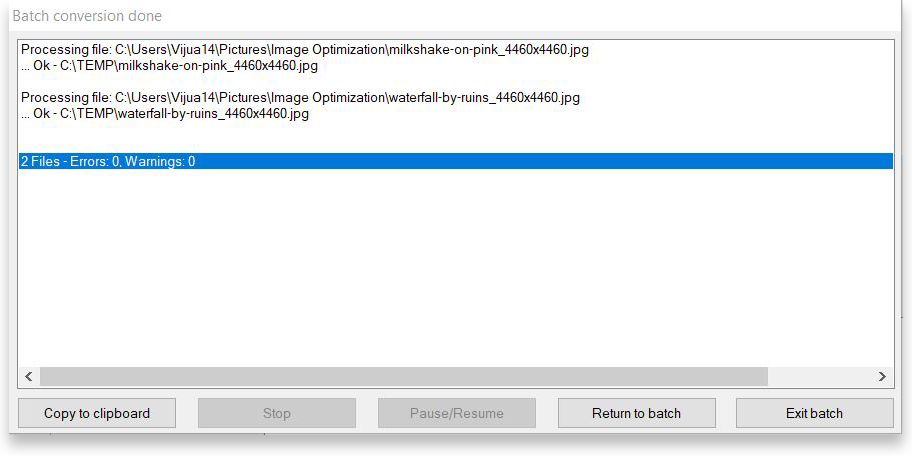
  8. When the conversion is completed, a report window will appear. You’re done.
While IrfanView offers more options and settings than the online tools. It also involves more steps and can be tedious. You’ll see in the results below though, that it’s resulting file can be comparable to Adobe’s Photoshop. Speaking of which…

Adobe Photoshop®

If you happen to be editing your images in Photoshop®, then add resizing to your list of edits. I recommend do most edits before resizing, except adding text.  Add text after you resize the image or it won’t be legible.

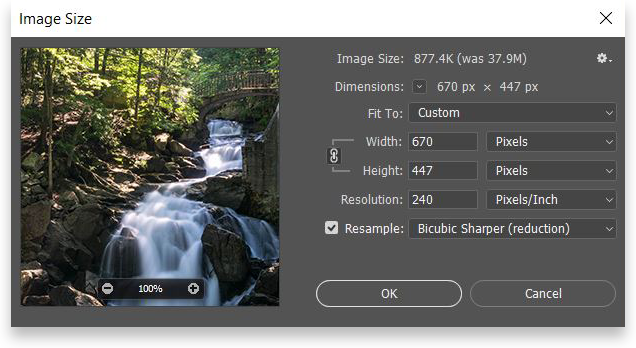
Resize while editing

Go to Image>Image Size…. When the window opens enter the desired Width: and as always make certain the Width and Height are locked together. Click OK.
optimize images photoshop

Resize when saving

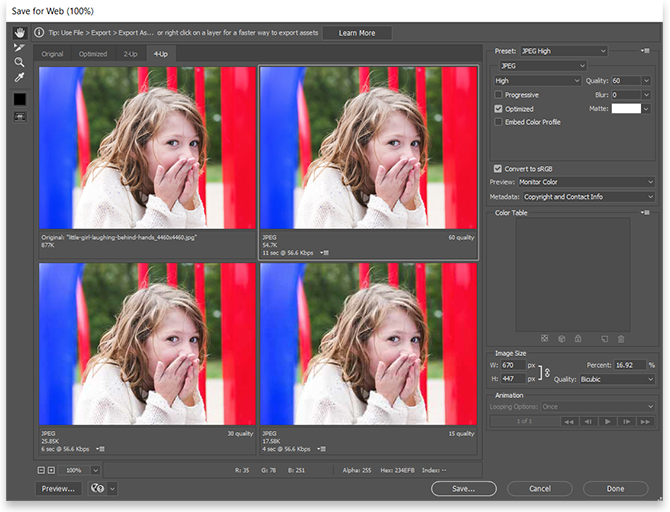
We mentioned earlier that we’ll show you how to test different image quality settings in Photoshop®, so here it is. When you’re done editing your image, you can resize the image and test different file types and image qualities in one place. From the File menu select Save for Web. The Save for Web window will appear. Before we begin, I recommend selecting the 4-Up tab, to compare different file types and quality settings.

optimize images photoshop save for web

First, set the Image Size (lower right corner), by entering the new width (W:) in pixels, and all the samples will immediately change to the new size. You’ll now have in front of you, your image at the right size and at 4 different quality settings. Then go up to the right corner where you can set the file type and image quality for each window individually: remember, for photographs JPG and for graphics PNG.
When you’re done, select the image sample you like best and click Save, and don’t forget to rename the file, to keep your original intact.

The Results

So here it is, after all the how-to’s, what you’ve all been waiting to see. The Results. Here are the images in their original size and resized using each of the software options.
Below each set of photos, you’ll find a visual showing how small the new file images are compared to the original file size.  So a file that is 50% of the original file size is half the original size, etc.
We also included for you extra data for images that we did not include in the blog:
  • PNG  is for images reduced to the same size as the others in Photoshop, then exported as a PNG.
  • JPG Quality is for images of the same size as the original image; however, was saved as a JPG with the quality set to zero.

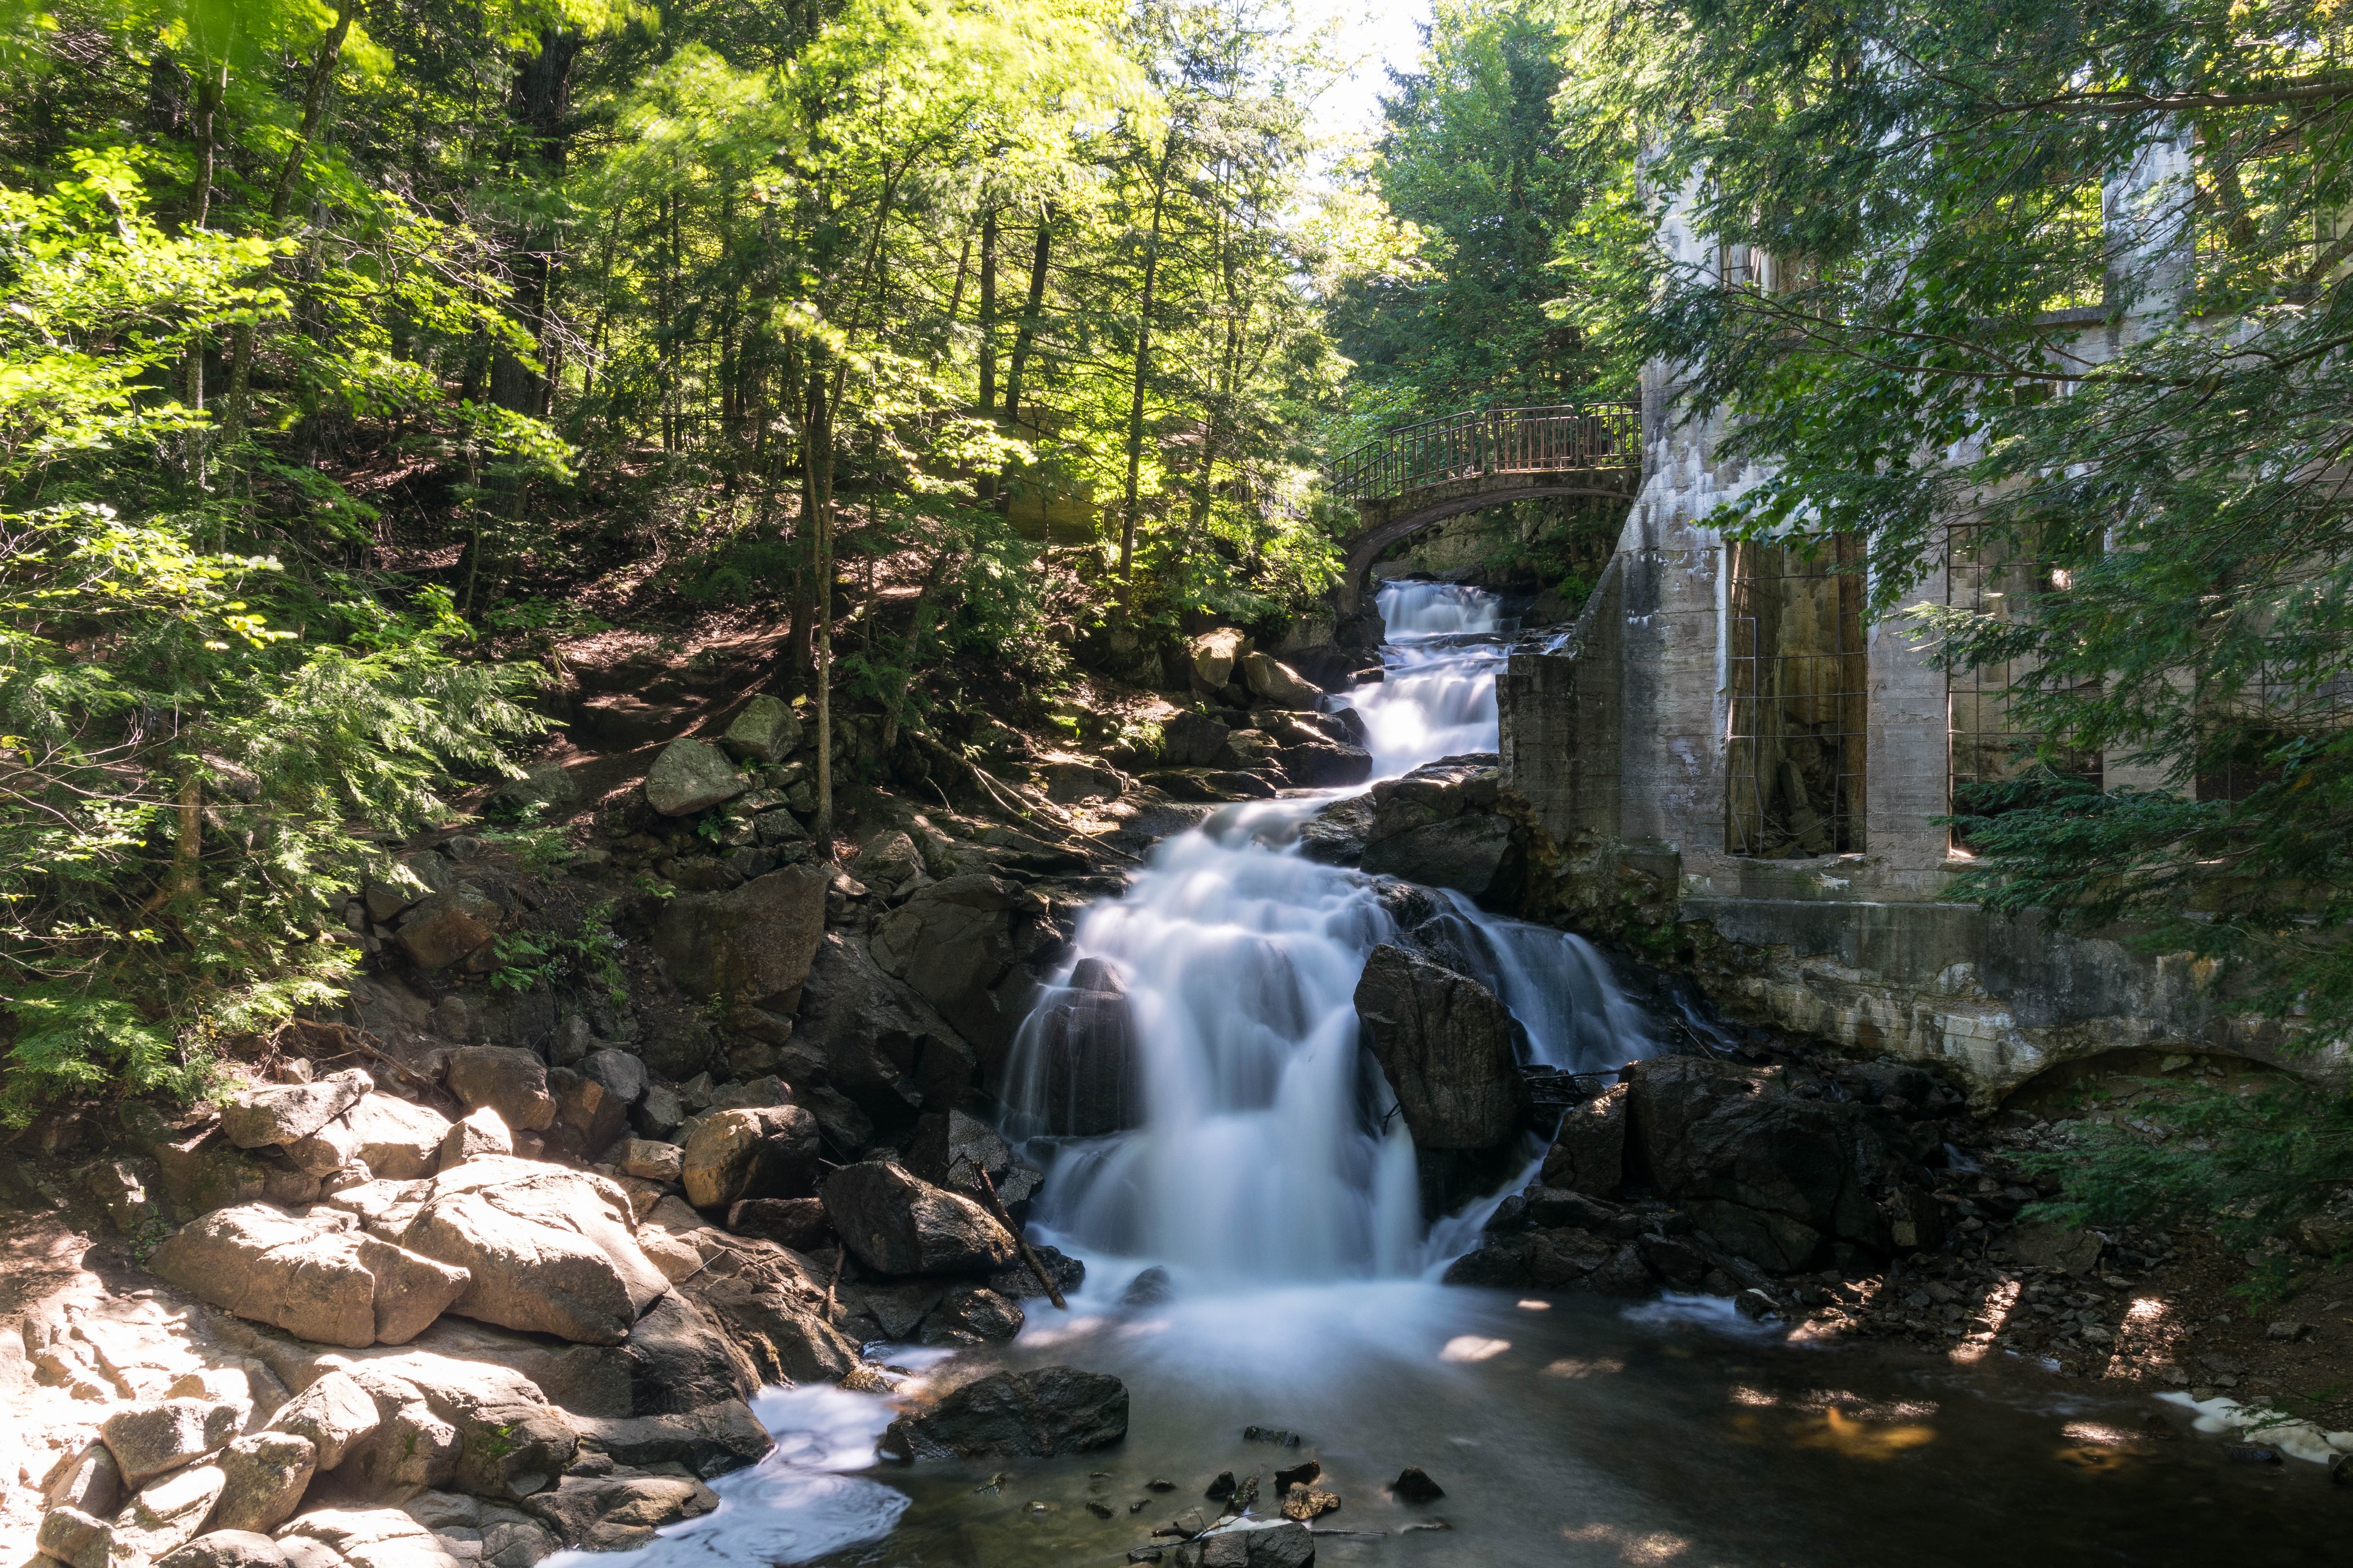
Original image

4460 x 2973 pixels      3,477 KB
optimize images waterfall original
Photo by Bruno Passos from Burst

Resized Images

Width: 670 pixels
Optimize Images iloveimg 154KB
iLoveIMG 154KB
Optimize Images BeFunky 486KB
BeFunky 486KB
Optimize Images IrfanView 134KB
IrfanView 134KB
Optimize Images Photoshop 470KB
Photoshop 470KB

optimize image percent

IrfanView reduced the file size to 137 KB just 4% of the original file size and the waterfall is just as inviting. The picture does look slightly faded compared to the others.  You’ll need to decide would your ebook benefit more from by adding more images at this quality, or is having just one large high-quality image more important.  In this case, we’re comparing having 1 picture or 25 pictures.

Original image

3960 x 2640 pixels      1.13 MB
Optimize Images girl original
Photo by Sarah Pflug from Burst
optimize images iLoveIMG 46.8 KB
iLoveIMG 46.8 KB
optimize images BeFunky 298KB
BeFunky 298KB
Optimize Images Irfanview
IrfanView 39kb
Optimize Images girl Photoshop
Photoshop 251 KB

Optimize Images Girl

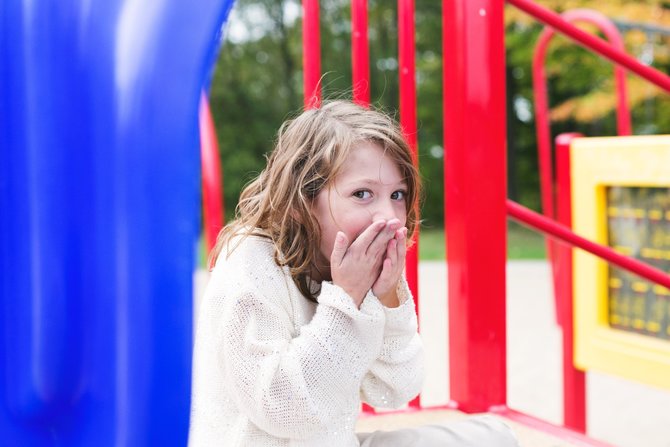
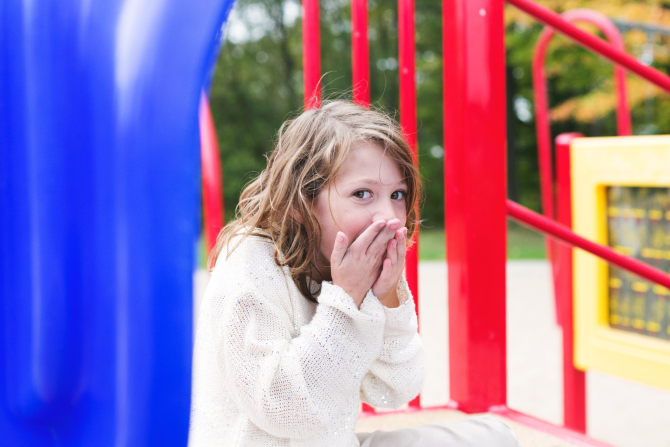
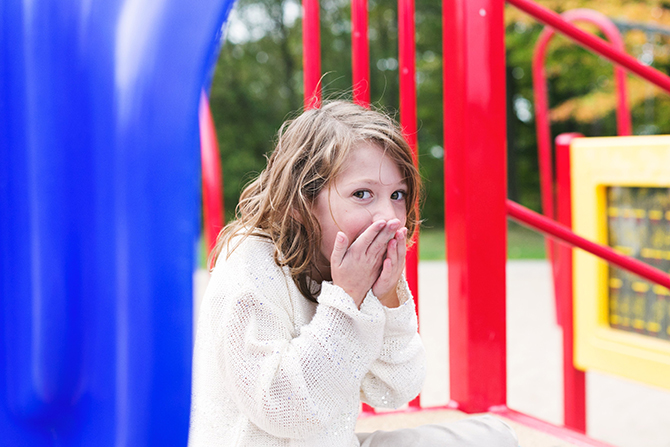
IrfanView reduced the file size to just 40 KB only 3% of the original file size and the little girl is just as adorable. The picture does look slightly faded compared to the others. If the image is surrounded by text, this little girl’s spunk will come flying off the page, even in the little 40 KB image. You’ll need to decide would your ebook benefit more from by adding more images at this quality, or is having just one large high-quality image more important.  In this case, we’re comparing having 1 picture or 33 pictures.

Original image

4460 x 2973 pixels      422 KB
Optimize Images milkshake original
Photo by Sarah Pflug from Burst
Optimize Images milkshake
iLoveIMG 12 KB
Optimize Images milkshake
BeFunky 111 KB
Optimize Images milkshake
Photoshop 119 KB
Optimize Images percent
iLoveIMG reduced the file size to only 12KB just 3% of the original file size and the milkshake is still as stunning as all the others. The colors are not as vibrant nor the sprinkles as crisp, but ultimately it has the same mouth-watering effect on us.  You’ll need to decide would your ebook benefit more from by adding more images at this quality, or is having just one large high-quality image more important.  In this case, we’re comparing having 1 picture or 33 pictures. Notice, although to our eyes it seems that the background is a uniform color, there are shadows, so technically it’s not, which is why the PNG file did not shrink more than the JPG.

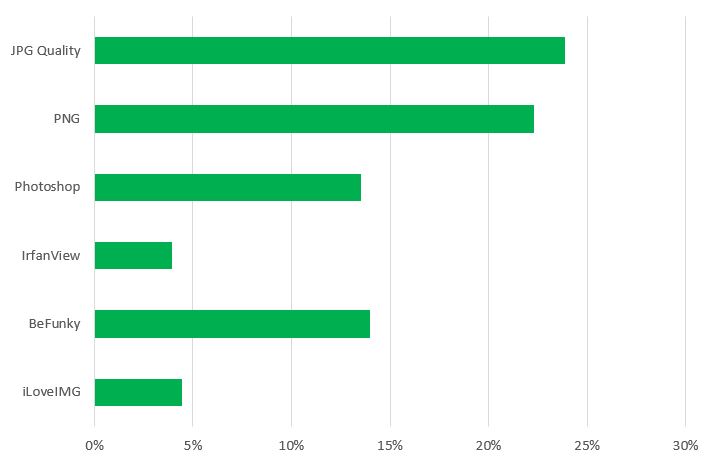
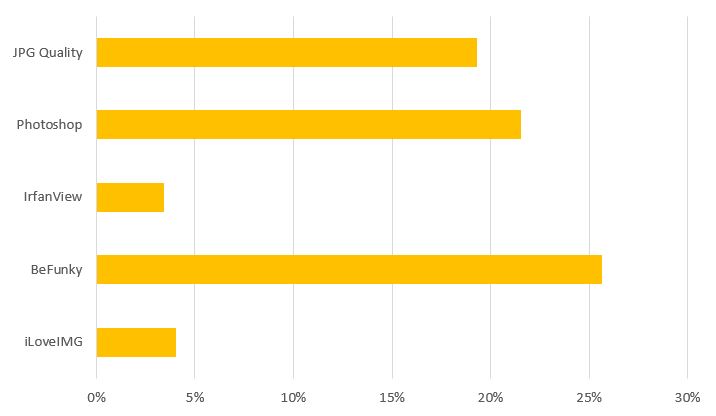
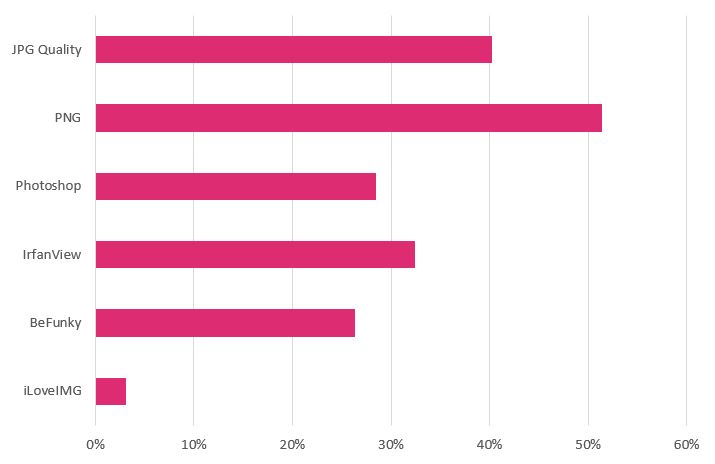
Averages

Here is the average percent reduction for each tool or method.
iLoveIMG4%
IrfanView13%
Photoshop21%
BeFunky22%
JPG Quality28%
PNG39%
Although IrfanView outperformed iLoveIMG in two of the three images, iLoveIMG consistently reduced the file size the most. As expected, saving photographs as PNGs is a waste of file space. Photoshop seems to be the perfect middle ground, high quality, and reasonable file sizes.
When you want lots of images in your ebook and they don’t need to be stellar, iLoveIMG will serve you best. It’s also the quickest and easiest tool of them all.
When you want high-quality images and consider file size a fair price to pay, then Photoshop will be your best option, especially if you’re already using it to edit your images.

Recap

Check if your images are within the advised ranges for the devices your ebooks will be read on.
DeviceFull ScreenMost Images
Desktop1,500 – 2,500500 – 700
Mobile Devices900 – 1300350 – 700
Ebook App Icons512 x 512
If the details in the image are of the essence, then use Photoshop® and play with the jpg quality setting when you save your image. If the only purpose of the image is its existence, then I recommend using the quick online tool IloveIMGs. You’ll quickly get a tiny file that still looks good. In most ebooks, you’ll need both types of images: Large vibrant images for full-screen displays, and small images that appear only in a portion of the screen. So now you have the perfect tools for all occasions.
Hope this advice helped. Happy optimizing images!