Показаны сообщения с ярлыком Google. Показать все сообщения

воскресенье, 10 мая 2020 г.

4 полезных функции «Google Объектива», о которых вы могли не знать


Копируйте рукописный текст прямо на компьютер, ищите непонятные термины и учите иностранные слова.


Среди множества приложений Google, которые мы незаслуженно обходим вниманием, есть «Объектив», или Google Lens. Эта программа умеет распознавать текст и различные объекты, попавшие в камеру смартфона. Вот несколько способов её применения.

1. Копирование рукописного текста с бумаги на компьютер

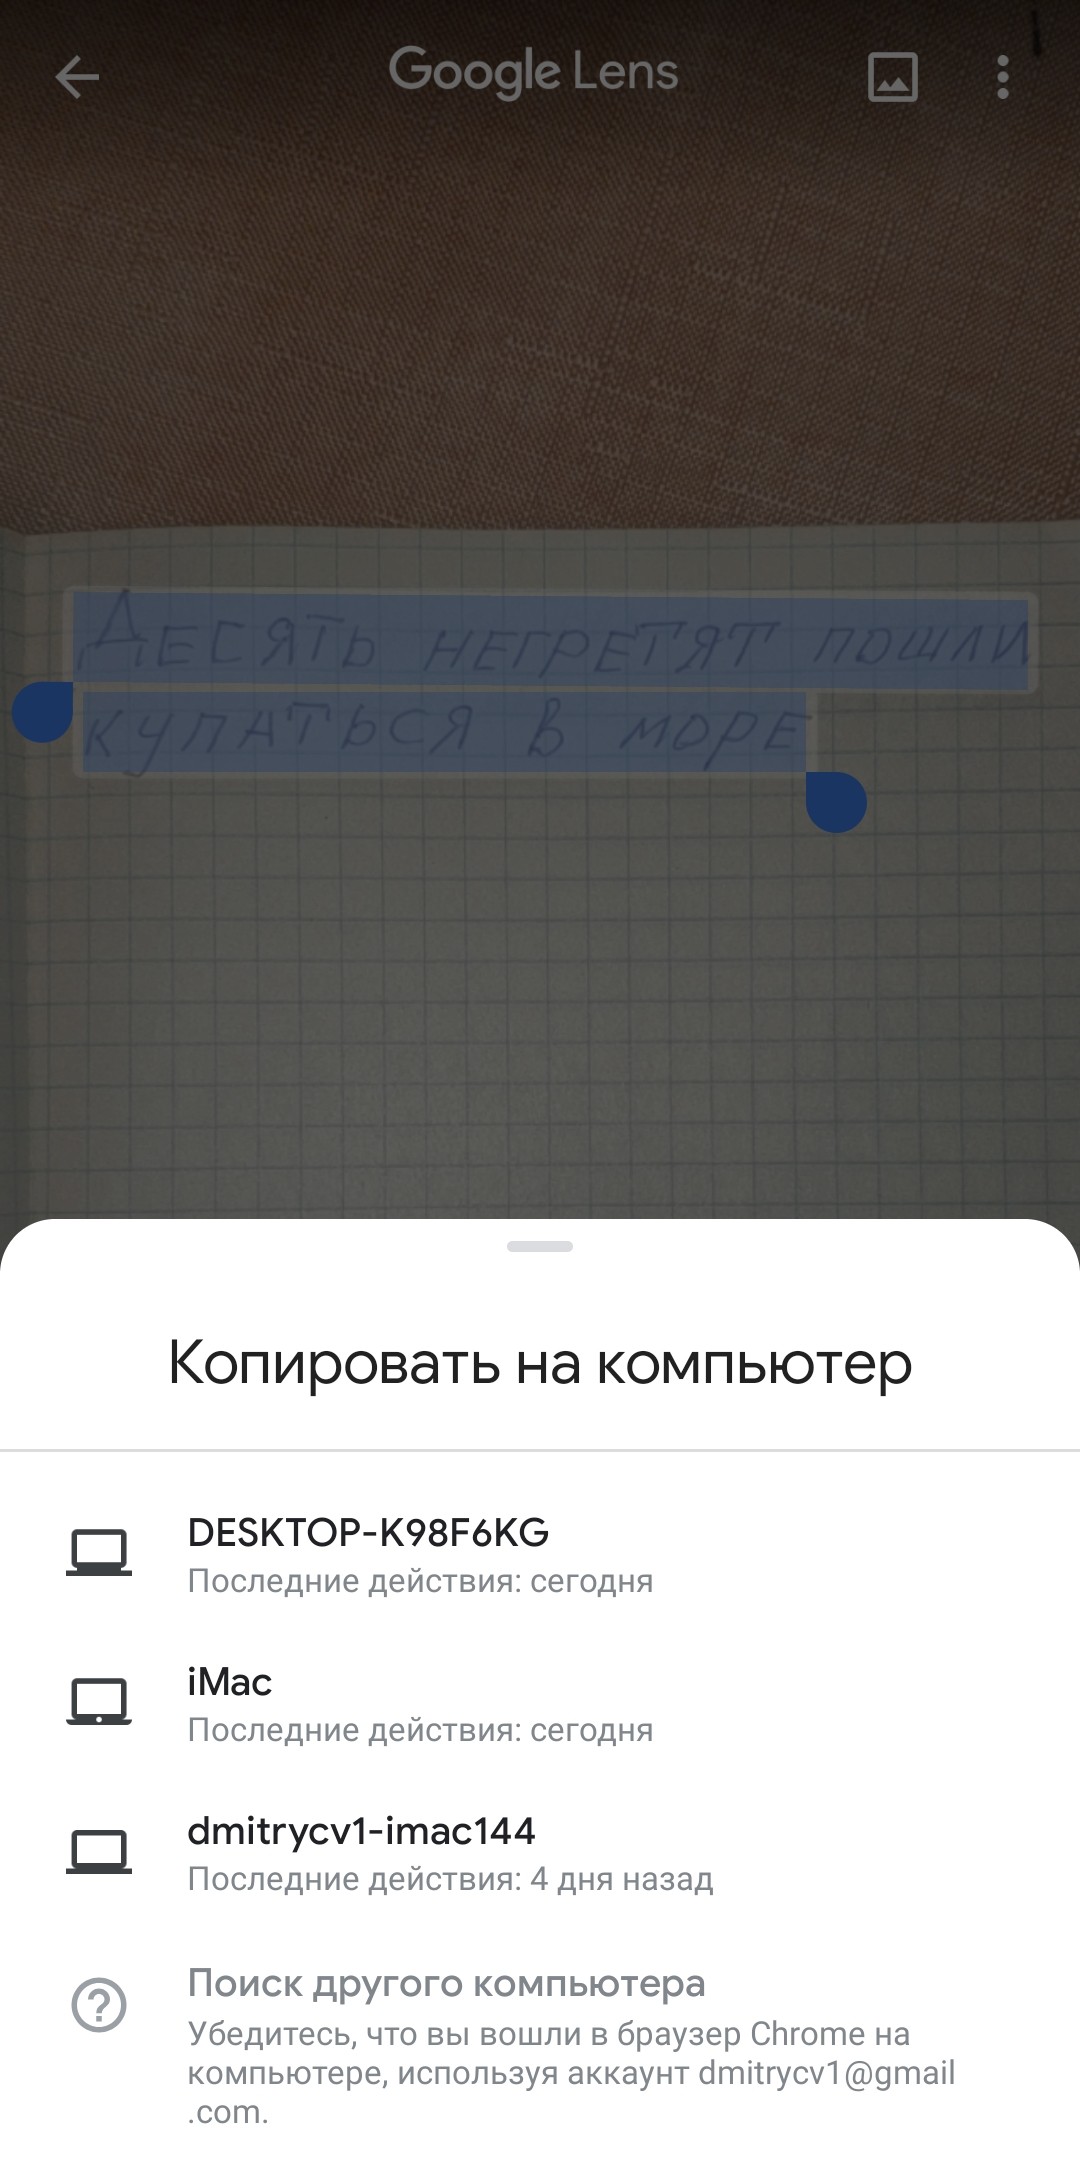
Откройте «Google Объектив» и наведите камеру на рукописный или печатный текст в блокноте или на листе бумаги. Приложение позволит вам выделить его. Затем нажмите «Копировать на компьютер», и текст будет распознан, а затем скопирован в буфер обмена вашего ПК.

Для этого нужно, чтобы у вас был установлен Google Chrome, а в нём выполнен вход с той же учётной записью, что и на смартфоне.

2. Поиск значений иностранных слов и их произношения


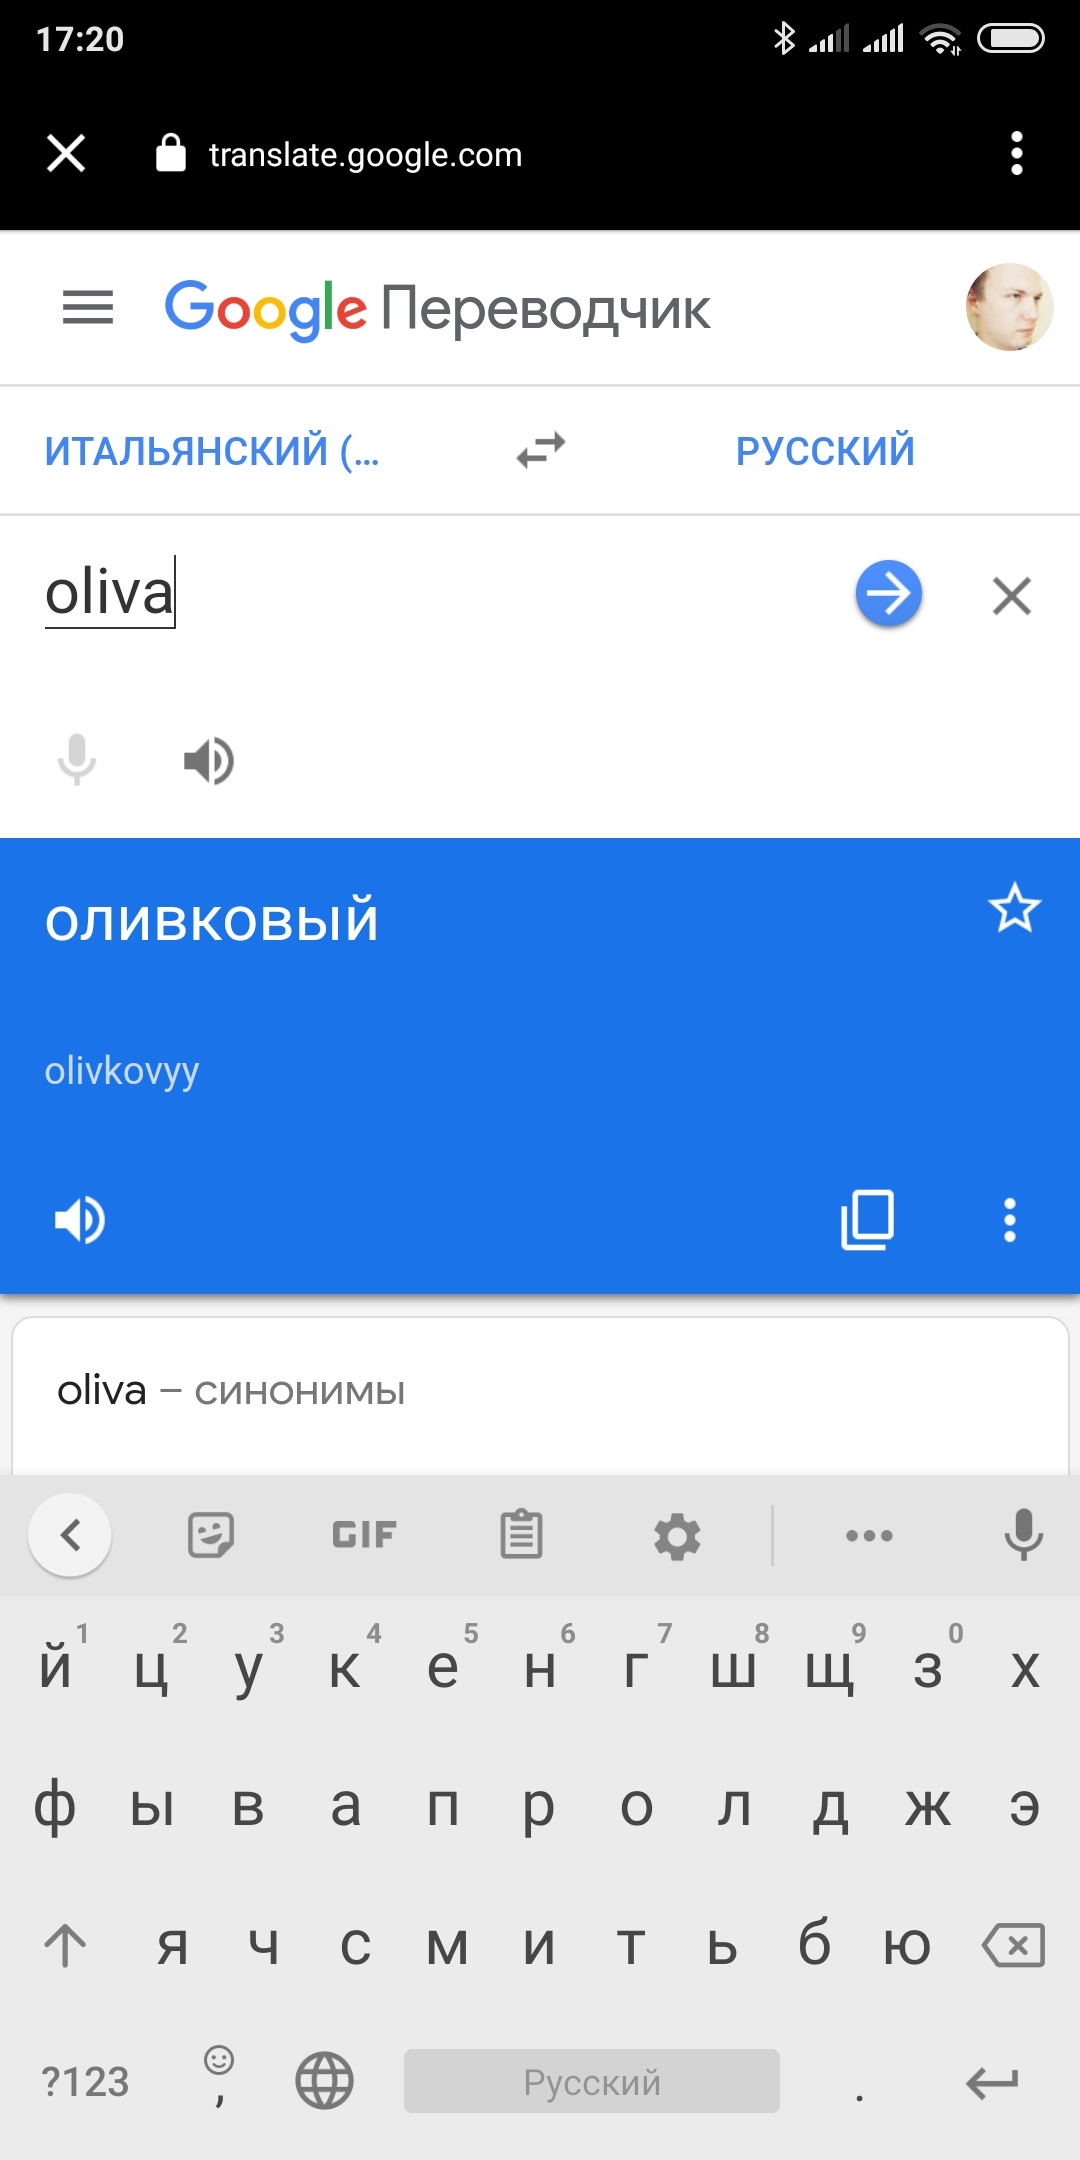
«Google Объектив» способен распознавать порядка 100 языков. Наведите камеру на текст на незнакомом языке, выделите его и нажмите «Перевести».

Ещё можно выбрать вариант «Слушать». Приложение произнесёт слово голосом. Это будет полезно, если вы учите новый язык.

3. Поиск определений неизвестных терминов

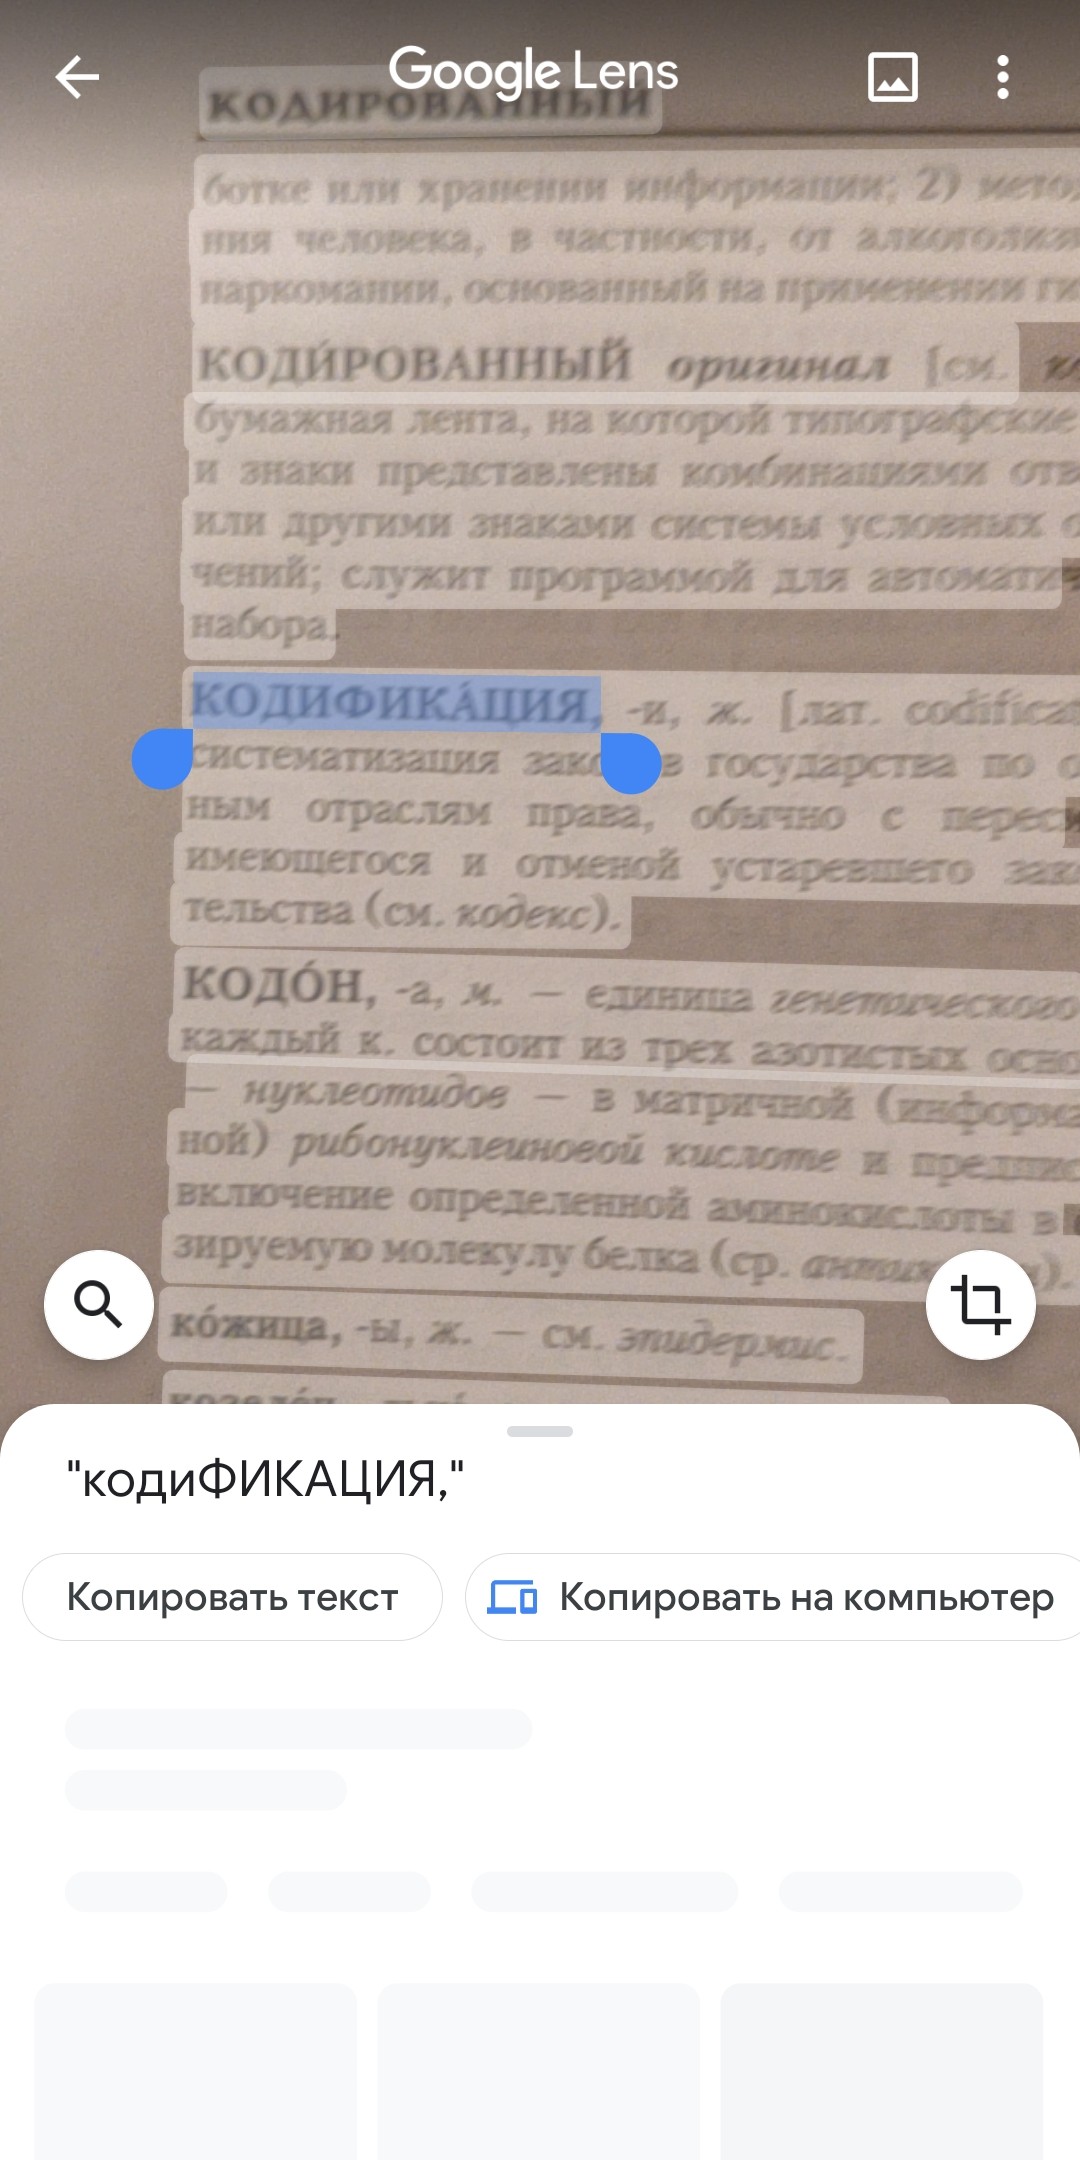
Если вы читаете какую-то сложную книжку и находите там замудрённый термин, необязательно перепечатывать его на смартфонной клавиатуре для поиска. Выделите слово и проведите пальцем снизу вверх, и перед вами откроется результат по нему в Google.

4. Сканирование визиток


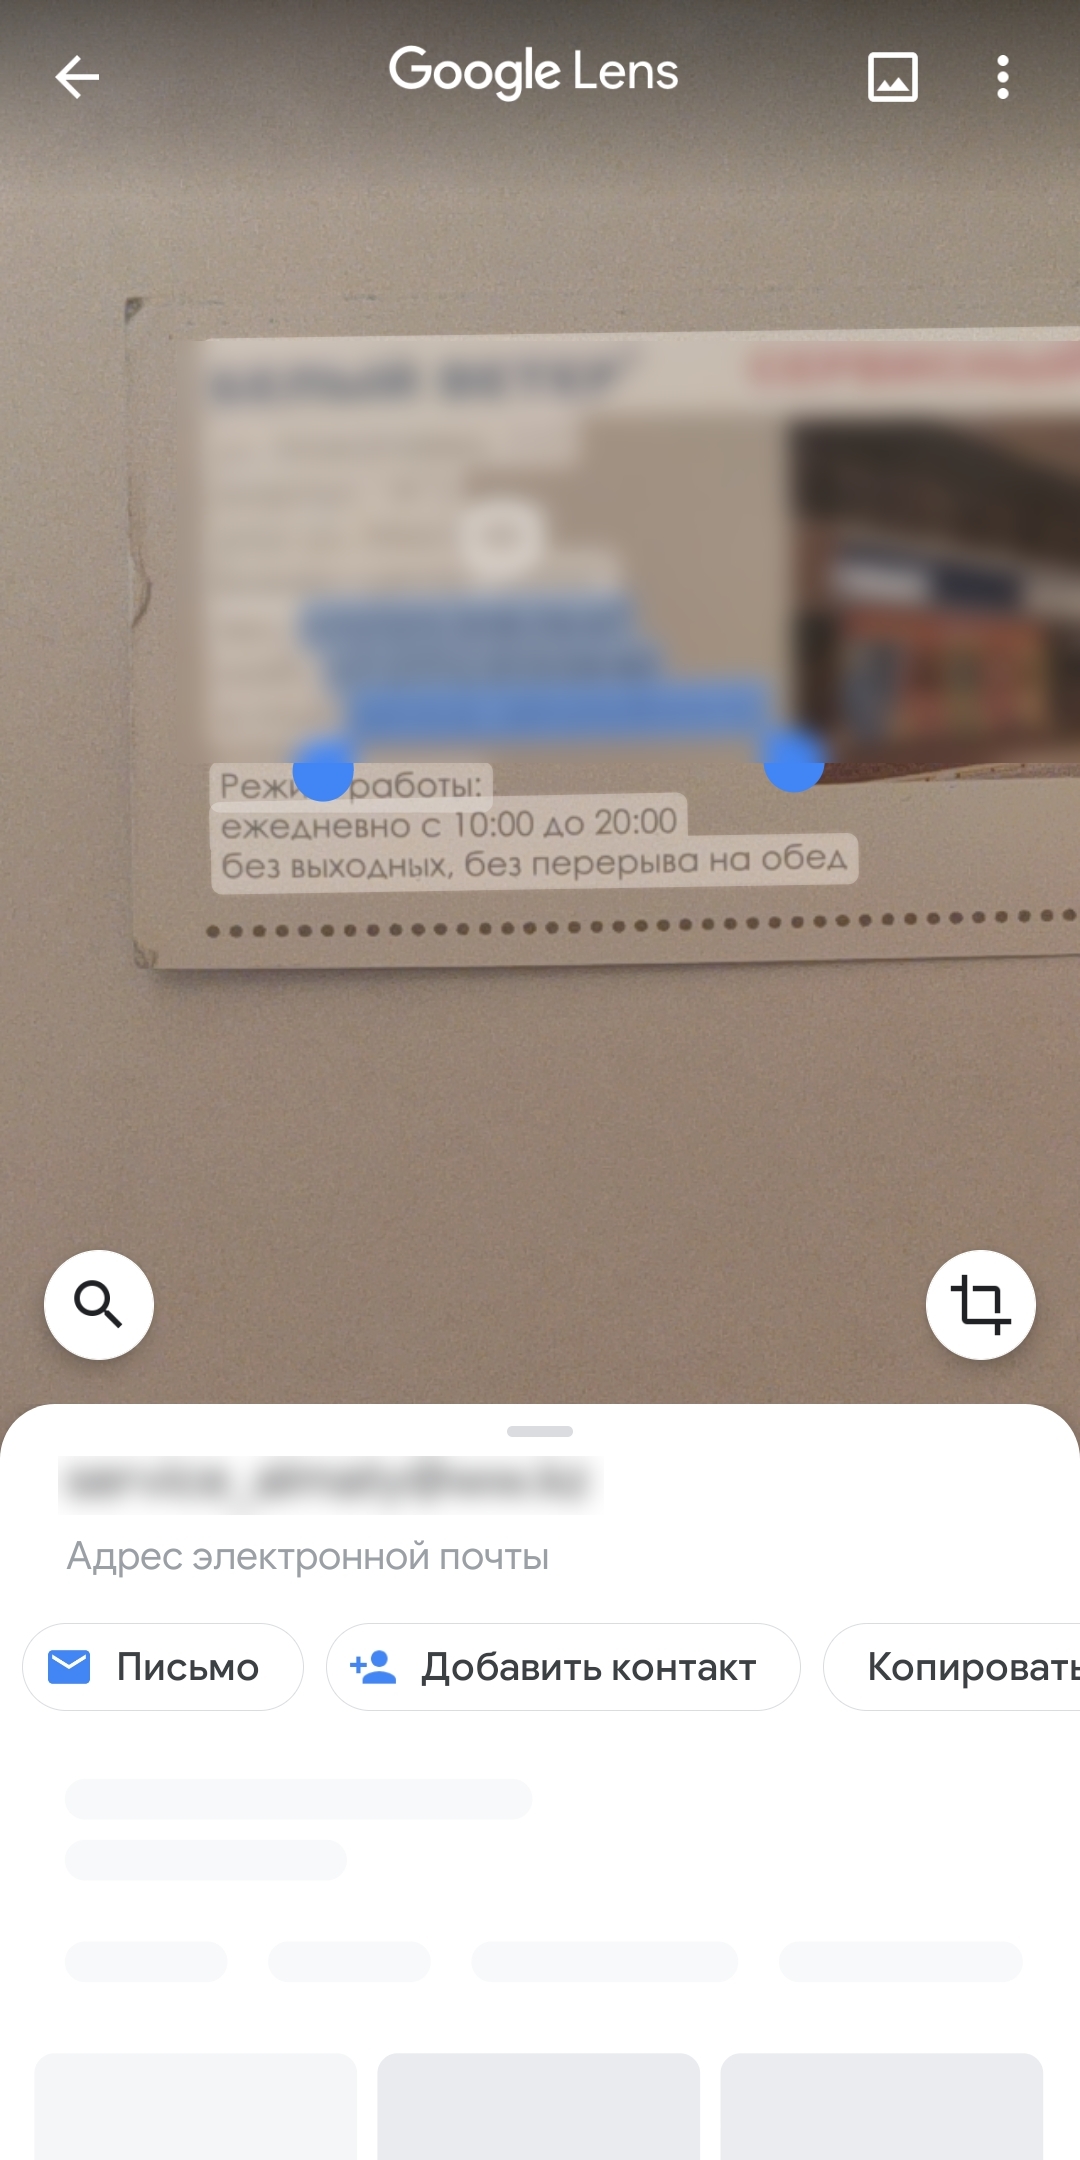
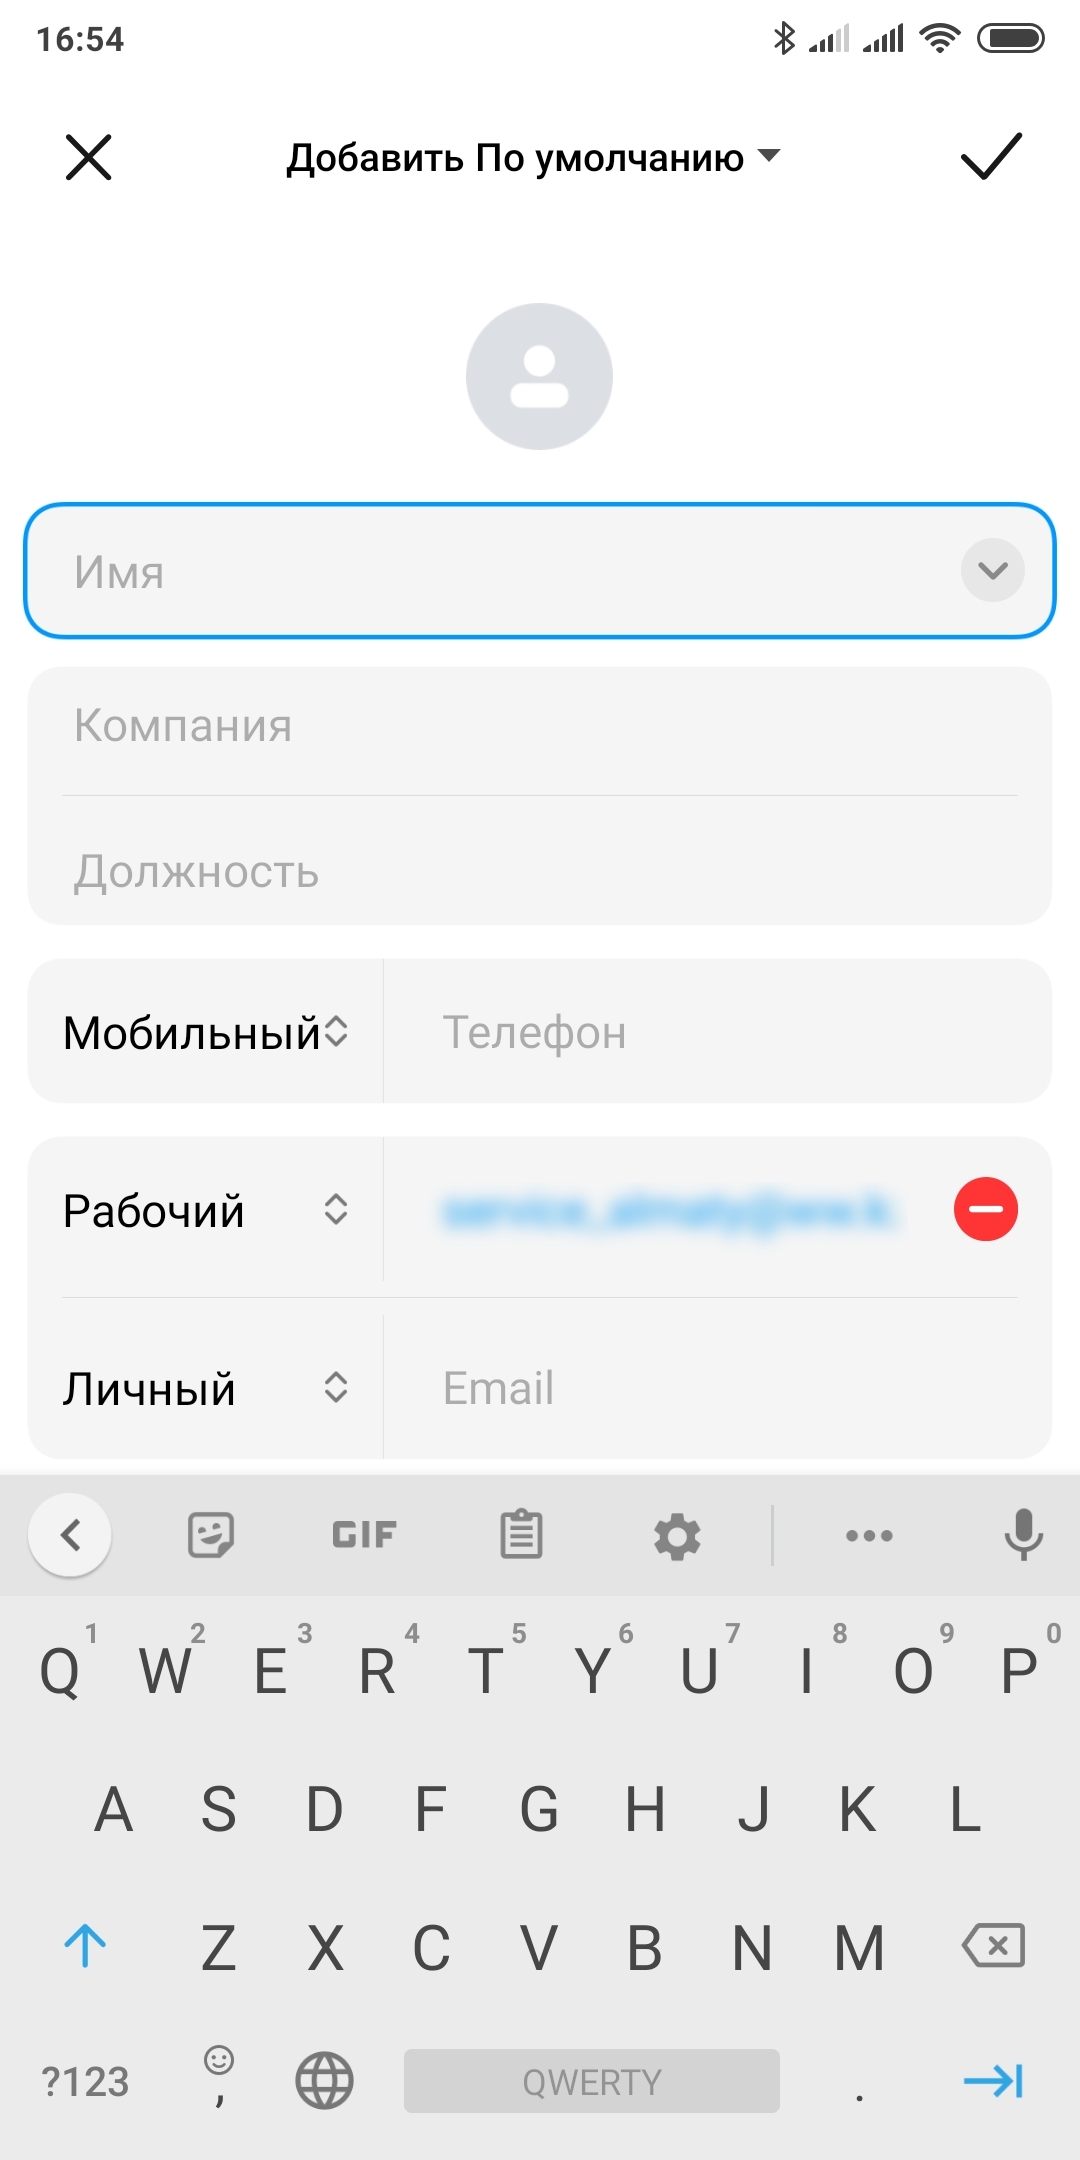
Нет необходимости вносить адреса и телефоны с визиток в контакты вручную. Наведите на визитку камеру с включенным «Google Объективом», и приложение предложит сохранить данные в записную книжку автоматически.

Цена: Бесплатно


инструмент для голосового ввода текста онлайн и офлайн


Текстовый редактор «Google Документы»

Голосовой ввод текста онлайн: текстовый редактор «Google Документы»

  • Платформы: веб.

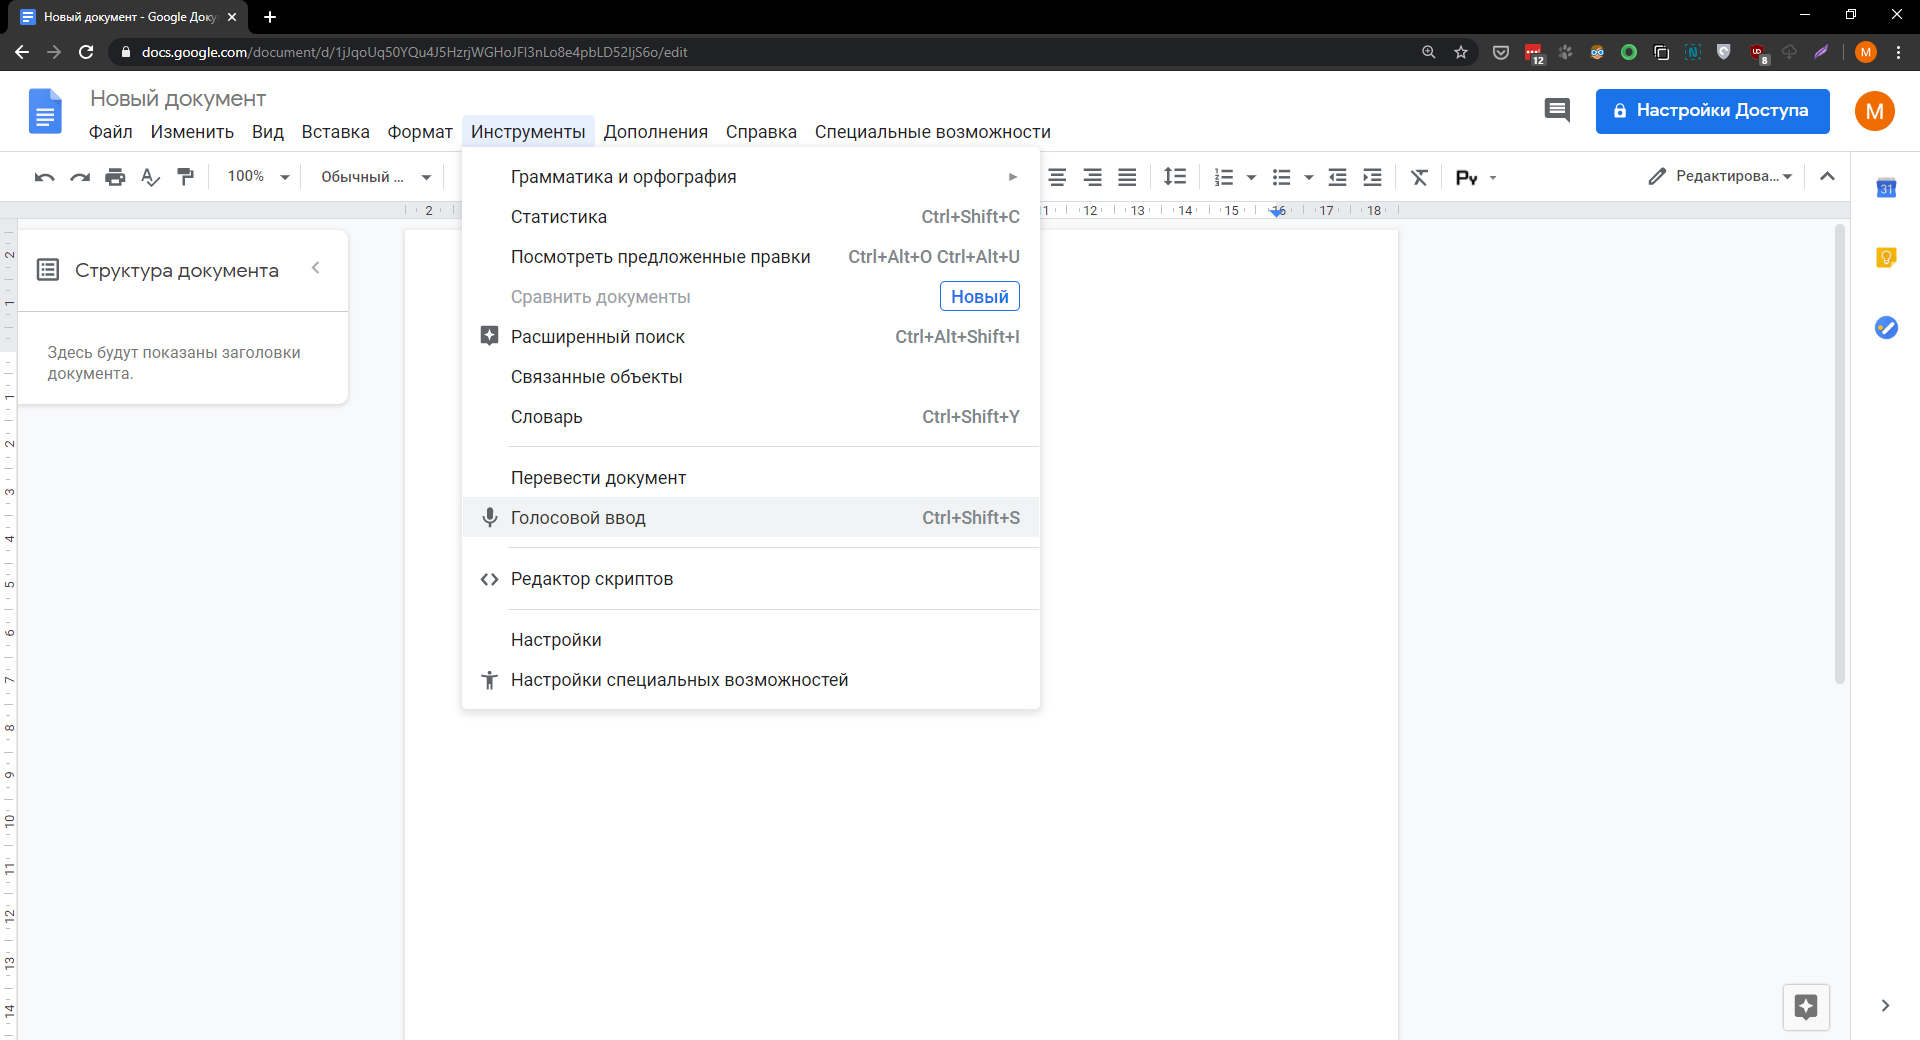
Многие пользователи «Google Документов» даже не подозревают, что этот сервис поддерживает диктовку. Правда, функция работает только в настольном браузере Google Chrome. Чтобы включить её, нажмите «Инструменты» и выберите «Голосовой ввод». На экране появится иконка микрофона. Кликните по ней, когда будете готовы диктовать.

«Google Документы» распознают знаки препинания. Так что если вы произнесёте «точка», «запятая», «восклицательный знак» или «вопросительный знак», сервис добавит соответствующий символ.

Кроме того, «Google Документы» поддерживают голосовые команды для форматирования, выделения и навигации по тексту. Но пока на русском языке можно использовать лишь две: «новая строка» и «новый абзац». Остальные команды доступны только на английском. Их полный список можно посмотреть в справке «Google Документов».

Точность распознавания у сервиса неплохая, чего нельзя сказать про скорость: иногда текст выводится с задержкой. Кроме того, после точек алгоритм часто вставляет строчные буквы вместо прописных или не к месту добавляет букву «к»

вторник, 5 мая 2020 г.

How to Create a Subdomain for my Domain

It is not always necessary to register a new domain name if you already have one and you are interested to have a separate site apart from the main one.

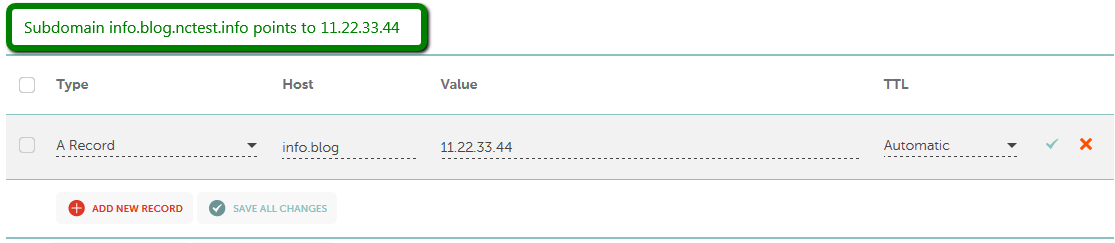
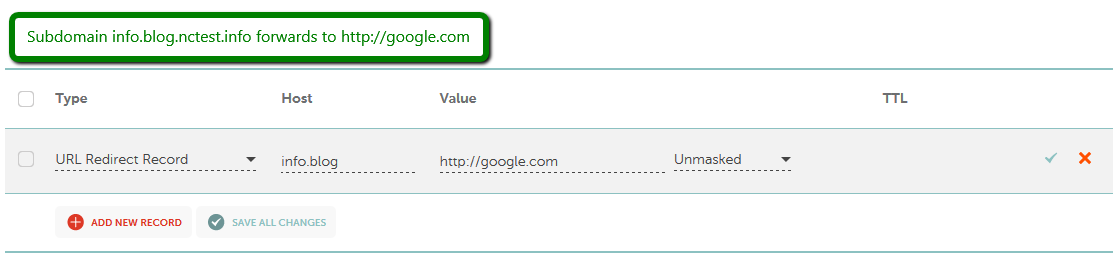
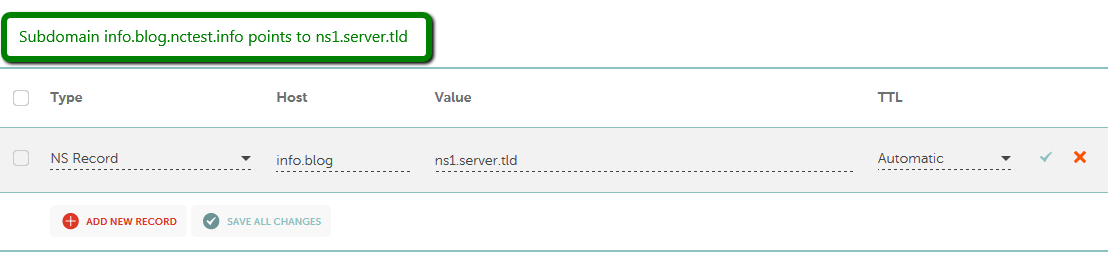
Rather than registering a new domain name, you can always create a subdomain using a domain you already own, for example blog.domain.tld or forum.domain.tld (assuming you already hold domain.tld). You can also add multiple levels of subdomains, for instance info.blog.domain.tld.

Subdomains are extensions of your domain name that you can forward to URLs or point to IP addresses instead of purchasing additional domains. Usually, they are used for segmentation or verification of different services associated with a domain name.


It is possible to set up a subdomain from Namecheap's side for domains that are using our BasicDNSBackupDNS (a legacy option), PremiumDNS or FreeDNS.

You can add up to 150 (on BasicDNS, PremiumDNS and FreeDNS) and 100 (on BackupDNS which is legacy) subdomains (including www) per a domain name. Each subdomain can be up to 60 characters long.

When you create a subdomain, you will be asked to choose a subdomain name and the location it should be pointed/forwarded to.


To create a subdomain, please do the following:

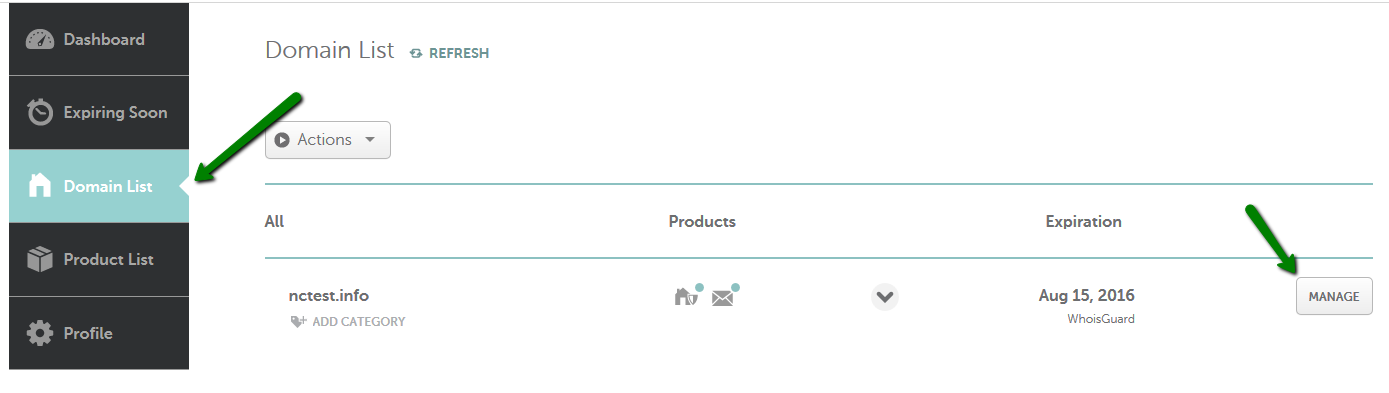
1. Go to your Domain List and click Manage next to the domain:


2. Select the Advanced DNS tab:


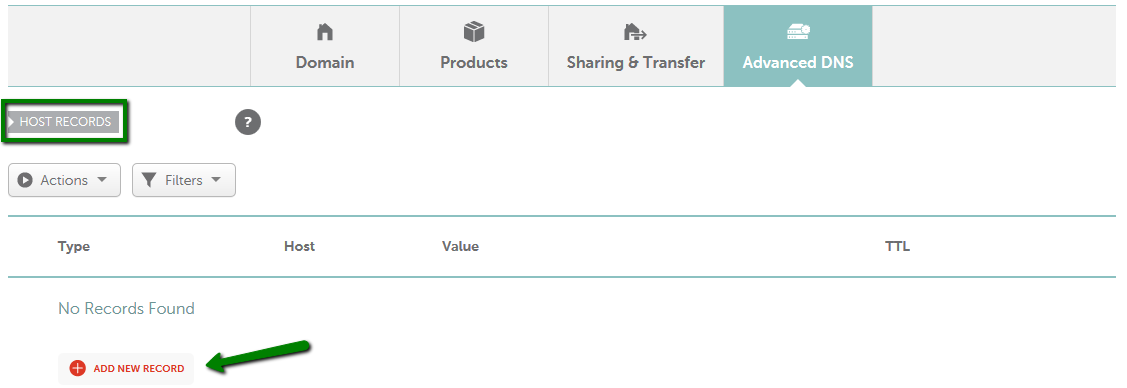
3. Find the Host Records section and click on the Add New Record button (not able to edit Host Records?):


4. Select the way your subdomain will be connected from the list below:


Subdomain that points to an IP address
Subdomain that points to IP address of the destination hostname

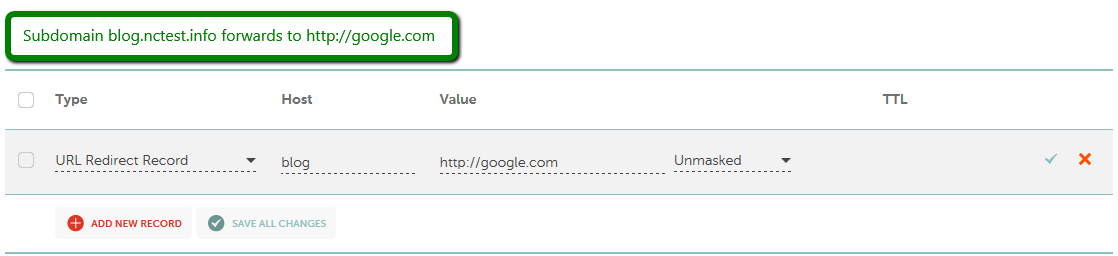
Subdomain that forwards to a link/URL

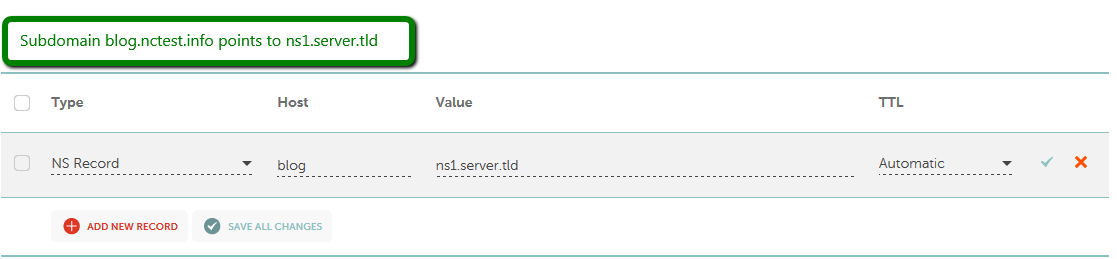
Subdomain that points to a server name

Catch-all (wildcard) subdomain


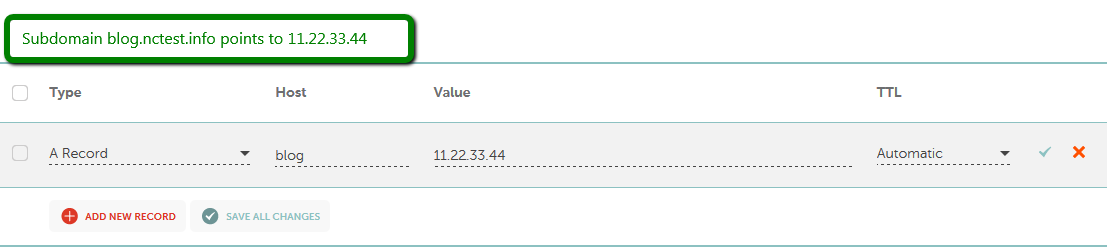
Subdomain that points to an IP address

- Select A Record for Type and enter the Host you would like to point to an IP address:


Or


Subdomain that points to a IP address of the destination hostname

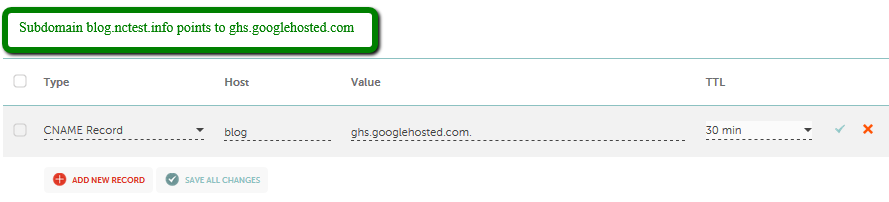
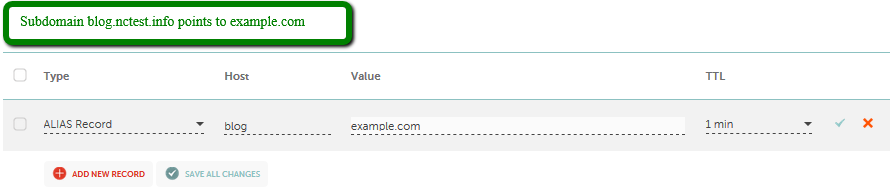
It is possible to point a subdomain to another domain name with the help of CNAME record or ALIAS record.

The important difference is that ALIAS can coexist with other records on that name. ALIAS record can also be used if you wish to alias the root domain to another service (which you cannot do with a CNAME record).

Select CNAME Record for Type, put your desired Host and enter the record itself (e.g., ghs.googlehosted.com) into Value:


- Select ALIAS record for Type, enter the Host and the destination hostname (e.g., example.com) into Value:


Subdomain that forwards to a link/URL

- Select URL Redirect Record for Type, enter the Host and the destination link/URL into the Value line. Select Unmasked/Masked/Permanent (301) depending on the Forward type:


Or


Subdomain that points to a server name

- Select NS Record for Type and enter the Host you would like to point to a server:


Or


- Check the Save All Changes button once done:


Normally, it takes 30 minutes for newly created records to take effect.

Catch-all (wildcard) subdomain


Wildcard subdomains allow you to point or redirect all non-existing subdomains to a valid page on a website. 

That's it!


How do I add my domain to Google Sites


To connect a domain name registered with Namecheap to a website built with Google Sites, you will need to modify your domain’s DNS settings.

Your domain should be using one of the following DNS sets: our BasicDNSBackupDNS (a legacy option), PremiumDNS or FreeDNS. Otherwise, please contact your hosting/DNS provider to make the necessary changes.

There are two versions of Google Sites - Classic Google Sites and New Google Sites. Both these versions provide a possibility to map your Namecheap domain to your Google Sites website for free.

You will need to take a few steps to complete the domain mapping to your Google Sites website.

STEP 1

Please make sure your website is published. 

STEP 2

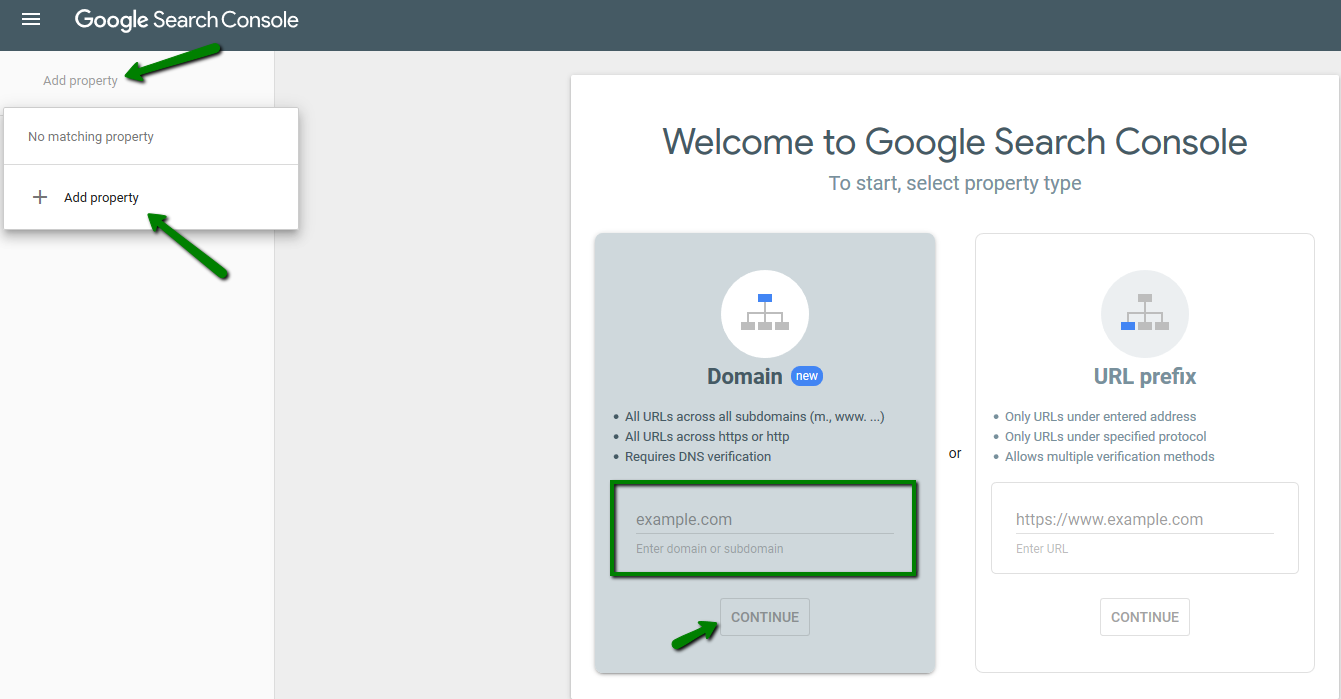
Go to Google Search Console to verify your domain name. In the top left corner click on the "Main menu" and then click on Add property >> Enter your domain name >>  Continue:


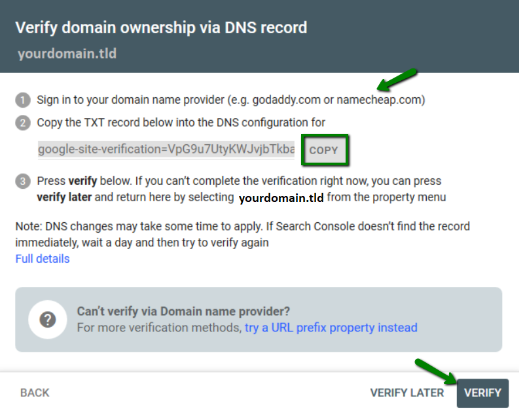
Click on Copy >> Add a TXT record for your domain in Advanced DNS >> Click on Verify:


STEP 3

It's required to add a TXT record to verify your domain name and a CNAME record to connect the domain to your website. Please proceed as follows:

1. Sign in to your Namecheap account.

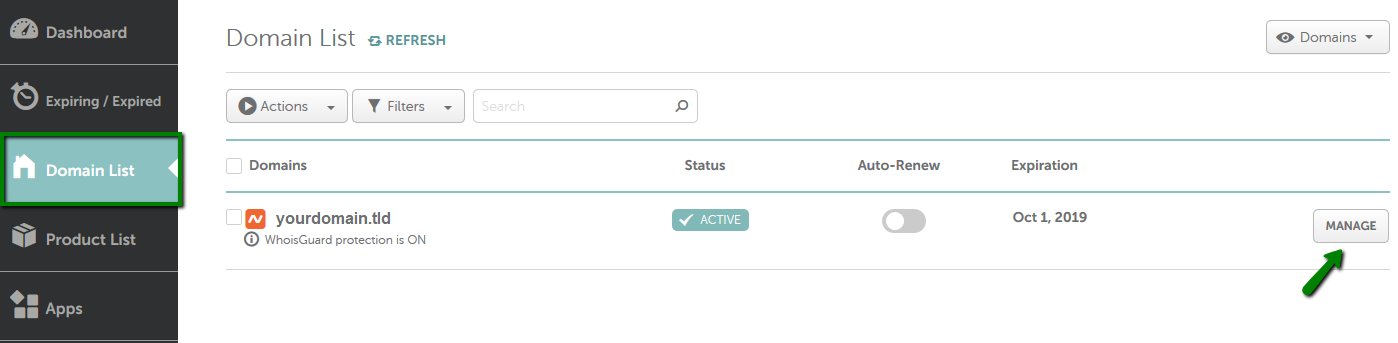
2. Select Domain List from the left navigation sidebar and click on the Manage button that appears in front of your domain name:  


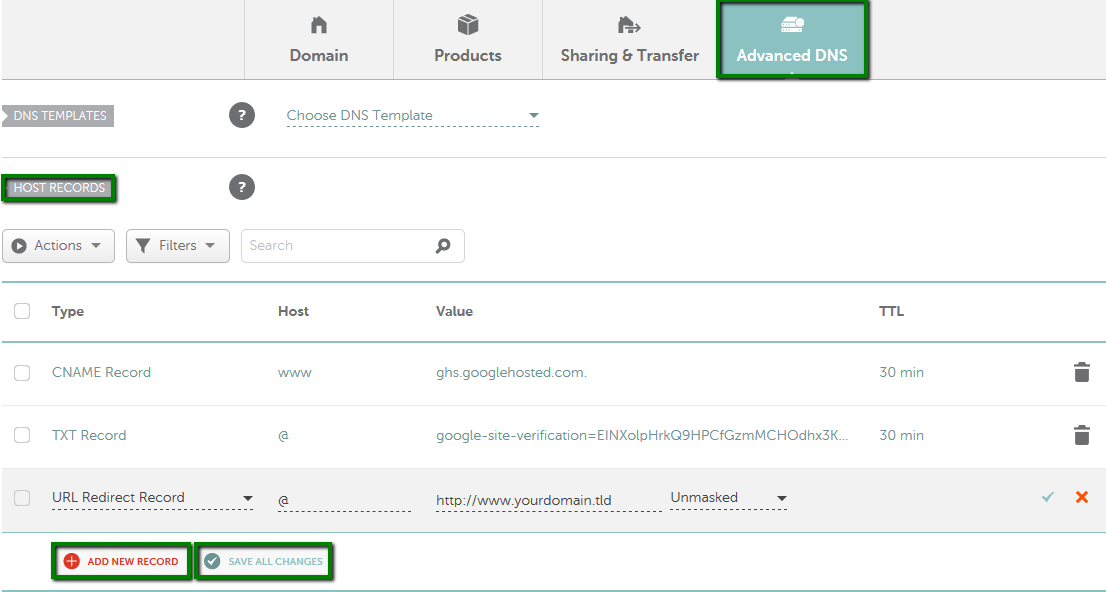
3. Click on the Advanced DNS tab and find the Host records section. Click on Add New record and create the following records:

  • Type: TXT Record | Host: @ | Value: google-site-verification=xxxxxxxxxxxxxxxxxxxxxxxxxxxx | TTL: Automatic - verifies your domain for Google Sites.
  • Type: CNAME | Host: www | Value: ghs.googlehosted.com  | TTL: Automatic - maps www.yourdomain.tld subdomain to your website.
  • Type: URL Redirect | Host: @ | Value: http://www.yourdomain.tld | Unmasked - allows the visitors to access the site via a bare domain as well (e.g., yourdomain.tld).

    *google-site-verification=xxxxxxxxxxxxxxxxxxxxxxxxxxxx is to be substituted with the verification string you've got in STEP 2.

    *for subdomains other than www (www.yourdomain.tld), please enter the subdomain you wish to connect to Google Sites (e.g., hello for hello.yourdomain.tld or mysite for mysite.yourdomain.tld, etc.).


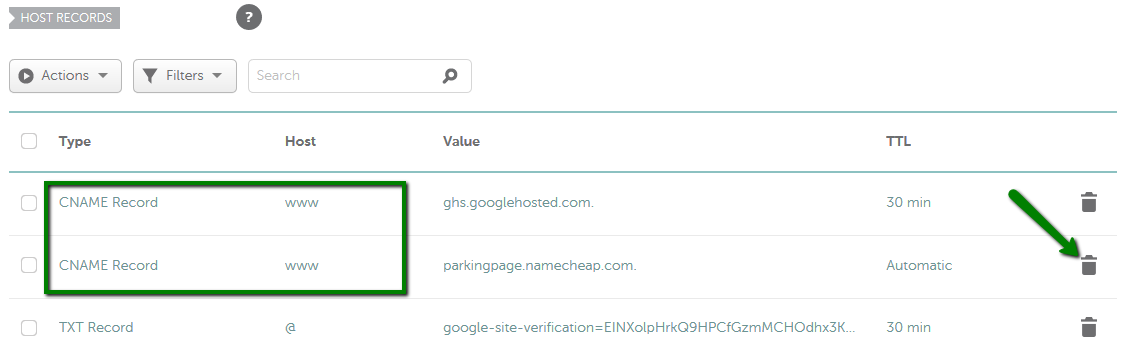
4. Please ensure there are no conflicting records (A, CNAME, URL redirect records with different values but set for the same hosts) for your domain. If there are any, remove them by using a trash bin icon next to the record:


Allow up to 30 minutes for the changes to be accepted globally.


STEP 4

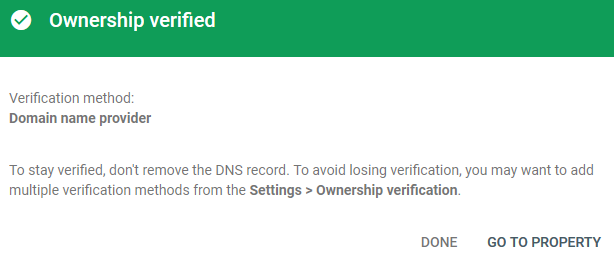
Go back to Google Search Console and click on Verify. You'll get the confirmation message once the domain is verified:


The further steps to add a domain in Google Sites are different based on whether you created a site with a regular Gmail account or an account through G Suite. Follow the steps described in Add a web address in Google Sites based on your Google Account type.


That's it!

среда, 15 января 2020 г.

Установка поиска на сайт от Google


С целью сделать сайт более удобным для посетителей, необходимо в первую очередь задуматься над удобным и релевантным поиском по сайту, особенно если сайт информационной направленности, огромный каталог или даже интернет магазин. Поскольку на подобных порталах, обратным поиском по сайту, пользуются значительно чаще, чем на проектах развлекательной или узкоспециализированной тематики.

Почему поиск от Google, а не стандартный?

Большинство популярных бесплатных систем управления (CMS) имеют встроенную систему поиска, но они настолько примитивны, что в большинстве случаев в результатах выдачи, могут не появляться соответствующие посты либо, же быть последними в списке выдачи, куда пользователь заглядывает крайне редко. Стандартный поиск обладает большим рядом недостатков, выделим наиболее важные:

  • сортирует материалы по дате добавления;
  • не учитывает морфологические запросы;
  • не учитываются запросы с 3-5 слов;
  • упущена  возможность искать изображения.

Что же предлагает поисковая система Google? Несколько лет назад специалисты google разработали сервис, который позволяет устанавливать форму поиска гугл на собственные, автономные сайты. Данная форм будет выдавать корректные, релевантные результаты, не только товаров или постов, но и изображений, которые будут сортироваться не по дате добавления, а по релевантности, то есть, первыми в результате, будут, наиболее подходящий пост/товар/статья, при этом используется технология поисковой системы.

Результаты поисковой выдачи на сайте

Следует заметить, что в результатах поиска по сайту участвуют только те страницы, которые находятся в индексе Google.

Да возможно использовать сторонние компоненты для движков, которые позволяют значительно расширить возможности стандартной поисковой машины, но в большинстве случаев, подобные компоненты или плагины не распространяются бесплатно, и при этом, значительно увеличивают нагрузку на сервер.

Устанавливаем поиск от Google на свой сайт

Есть два способа установки данного поиска, первый предполагает наличие аккаунта в Adsense, второй вариант будет удобен тем, кто не имеет выше указанного аккаунта и предполагает создание пользовательского поиска у себя на сайте, через специальный сервис, 

Мы будем рассматривать лишь первый вариант, а точнее, установку через систему Adsense, поскольку этот метод, несколько удобнее и благодаря нему, можно настроить результаты выдачи на собственном сайте, а не в стороннем окне.

Перейдем в свой аккаунт в Google Adsense (используется новый интерфейс), переходим на вкладку "Мои объявления", и слева в меню выбираем пункт: "Поиск", и нажимаем на: "Новая система пользовательского поиска".

Добавить поиск на сайт через AdSense

Заполняем форму, которая приведена на странице, все интуитивно понятно, в поле "область поиска" отмечаем, "только выбранные мною сайты", и указываем необходимый ресурс или ресурсы, этот пункт отвечает за то, какие сайты будут участвовать в поиске.

Во вкладке: "Стиль окна поиска" выбираем второй вариант, в дальнейшем будем его редактировать, а на вкладке: "результаты поиска", необходимо выбрать: "на моем веб-сайте с использованием фреймов iFrame", что позволит выводить результаты на собственном веб-сайте. При этом необходимо, создать страницу для вывода результатов и указать ее  в строке: "URL вывода результатов поиска".

Настройка поиска - 1 Настройка поиска - 2

И наконец, нажимаем на кнопку: "Сохранить и получить код", после чего увидим два различных кода. Первый отвечает за внешний вид поисковой формы, которая будет присутствовать на всех страницах сайта, то есть, этот код необходимо добавить в сам шаблон или тему.

Ниже предоставленный измененный код, который используется на портале 3cms.org. Перед использованием данного кода, уберите комментарии (все, что находится за //)

<div class="cse-branding-bottom" style="background-color:#FFFFFF;color:#000000"> //цвет заднего фона формы
<div class="cse-branding-form">
<form action="http://mysite.ru/stranca-dla-vivoda-rezultato-poiska.html" id="cse-search-box"> //не забудьте указать собственную страницу вывода результатов поиска <div>
<input type="hidden" name="cx" value="partner-pub-xxxxxxxxxxxxxx:xxxxxxxxxx" /> //укажите свой ID в AdSense <input type="hidden" name="cof" value="FORID:10" /> //вывод рекламы AdSense вверху и справа <input type="hidden" name="ie" value="UTF-8" /> //кодировка страницы <input type="text" name="q" size="30" /> //ширина формы 30px <input type="text" value="Название шаблона" onblur="if(this.value=='') this.value=' Название шаблона;" onfocus="if(this.value=='Название шаблона') this.value='';" name="q" size="23" /> //данный пункт позволяет добавлять собственный текст в форму <input type="submit" name="sa" value="&#x041f;&#x043e;&#x0438;&#x0441;&#x043a;" />
</div>
</form>
</div>
</div

Вторая часть кода, отвечает за вывод результатов поиска и данный код, необходимо установить на отдельную страницу на которой будут показываться результаты поисковой выдачи, и данная страница была предварительно создана и указана в пункте "URL вывода результатов поиска".

<div id="cse-search-results"></div>
<script type="text/javascript">
var googleSearchIframeName = "cse-search-results";
var googleSearchFormName = "cse-search-box";
var googleSearchFrameWidth = 800; //ширина в px для вывода результатов var googleSearchDomain = "www.google.ru";
var googleSearchPath = "/cse";
</script>
<script type="text/javascript" src="http://www.google.com/afsonline/show_afs_search.js"></script>

На этом установку поиска можно считать оконченной

четверг, 26 декабря 2019 г.

Як зменшити споживання пам’яті Google Chrome вивантаженням вкладок


У магазинах продається купа комп’ютерів та планшетів на Windows з 2 ГБ або навіть й 1 ГБ оперативної пам’яті. Але для браузера Chrome замало навіть 4 ГБ. Ось як власники подібних комп’ютерів можуть поліпшити собі існування.
У Chrome 79 можна скористатися функцією Tab Freeze. Вона автоматично через деякий час (стандартно 5 хвилин) вивантажує неактивні вкладки з оперативної пам’яті. Це звільняє мегабайти оперативної пам’яті. Функція Tab Freeze схожа на Tab Discard, але спрацьовує лише за часом.

Щоб активувати Tab Freeze в адресному рядку, введіть chrome://flags/#proactive-tab-freeze. Встановіть Enabled, щоб вкладки вивантажувалися через 5 хвилин. Якщо потрібно тримати вкладку актуальною, тоді виберіть Unfreeze 10 seconds every 15 minutes, щоб вона сама оновлювалася кожні 15 хвилин

вторник, 9 апреля 2019 г.

How to automatically add foreign-language audio to Anki


A few weeks back I explained how to get MP3 audio recordings of your target language from Google Translate. My goal was to add those to Anki so that I could hear the foreign-language pronunciation while reviewing words. I did it, but it was a pain. And I thought to myself, "There's got to be a better way to get audio into Anki…".
Well, wouldn't ya know it? There is. It's in a little Anki plugin called AwesomeTTS, which I concur is a pretty awesome add-on for adding text-to-speech audio to Anki.
AwesomeTTS supports Google Translate and several other text-to-speech services and can be used to automatically add MP3 audio files to your flashcards. As with doing it manually, it has the drawbacks of using text-to-speech (not completely natural, etc.), but if you want to add a large number of audio files quickly, I don't know of any better way.

Installing AwesomeTTS

Anki has a pretty convenient way to install add-ons; you get the add-on's code and paste it into Anki. More specifically:

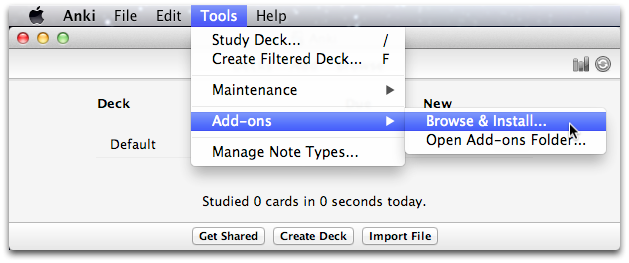
  1. In Anki, from the "Tools" menu, select "Add-ons" > "Browse & Install...".

  2. In the "Install Add-on" window, copy and paste 301952613 into the "Code" field and click "OK".

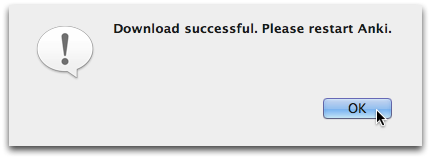
  3. Once you've successfully downloaded the add-on, click OK and then quit and then reopen Anki.


Adding audio using AwesomeTTS

AwesomeTTS has a way to do add audio "on the fly" by adding a tag to the card template. My presumption was that this would mean that the audio would somehow be automatically added (AwesomeTTS's page doesn't really elaborate on how this feature works). I added the tag but wasn't able to get that to produce any audio.
However, AwesomeTTS has another way to add audio to your cards, which will actually add MP3 files, and this works just fine on both the desktop and my iPhone:

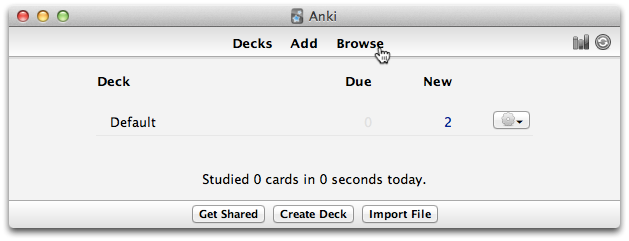
  1. Open Anki and, in the "Anki" window, click "Browse".

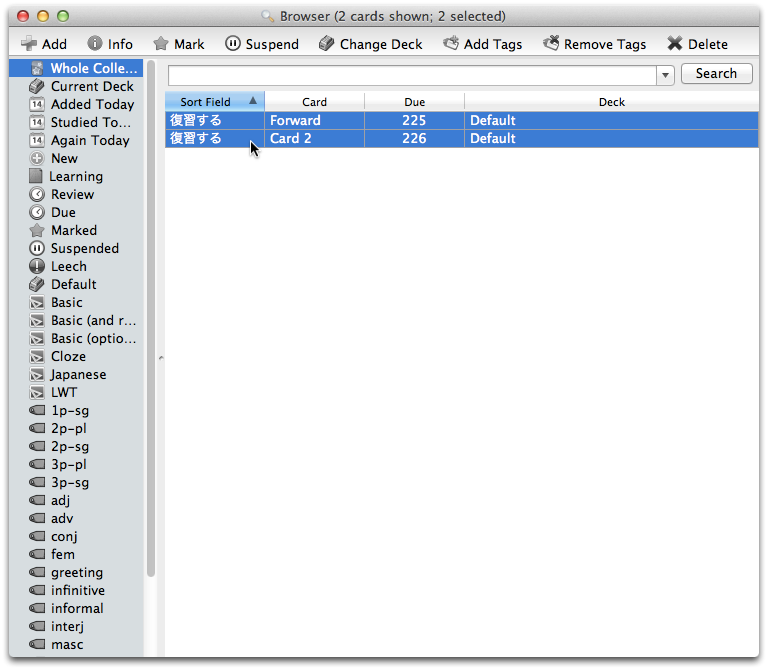
  2. In the "Browser" window, select the cards that you want to add audio to.

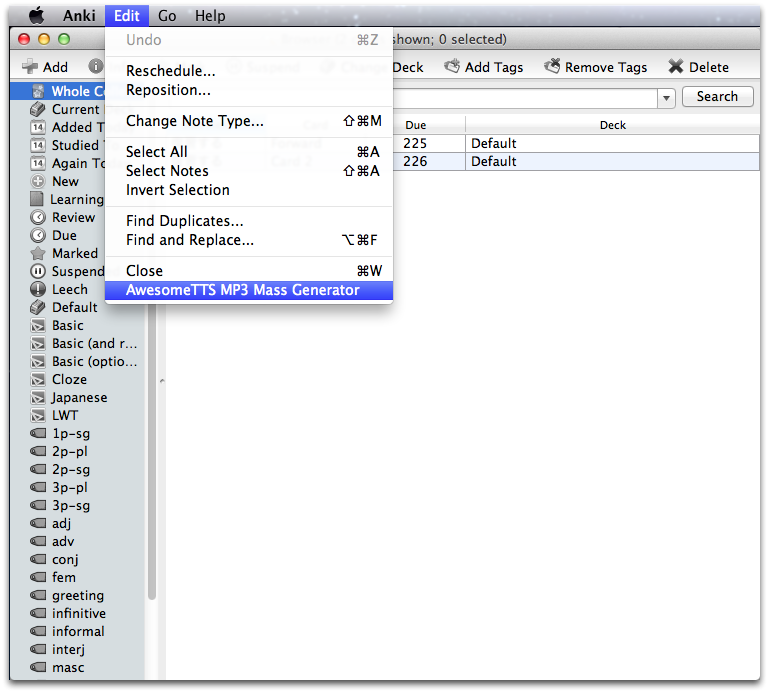
  3. From the "Edit" menu, select "AwesomeTTS MP3 Mass Generator".

  4. Set the "Service" to "Google". There are others that you can choose from here as well. I've found Google's text-to-speech to be pretty good and haven't really played with the other services yet.

  5. Set the "Language" to the language you want to generate audio for.

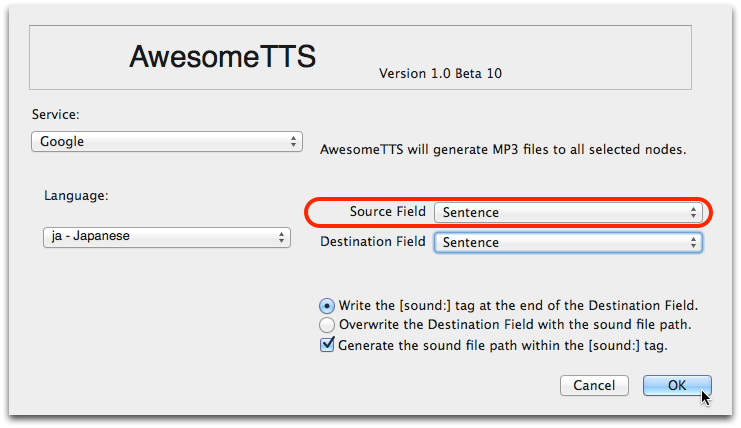
  6. Set the "Source Field" to the field in the card from which you'll get the text that will be converted to speech.

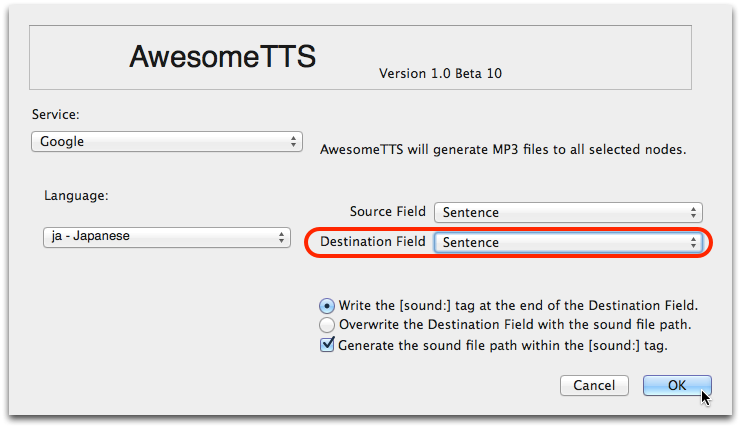
  7. Set the "Destination Field" to the field that, when displayed, will trigger the playing of the audio. If you're specifically trying to learn how a written word is pronounced, this will be different than what you set the "Source Field" to, e.g., if you're trying to learn the pronunciation of a word written with Chinese characters. In most other cases, the "Source Field" and "Destination Field" will be the same.

  8. Select "Write the [sound:] tag at the end of the Destination Field.". This will keep the text you have in that field and add the audio file to the field. Alternatively, if you want to get rid of the text in that field and only have the sound file, select "Overwrite the Destination Field with the sound file path.".

  9. Click OK and then click OK again when it tells you how many notes have been updated.
  10. Repeat steps 3 to 9 for each of the fields to which you want to add audio in those selected cards. That's usually two for me: the word in the foreign language (or the pronunciation of the word, in the case of Japanese or Chinese) and the sentence where I found the word.
You've now got text-to-speech audio in all the cards you selected. When editing the card, you'll see the audio included as a [sound:] tag that includes a named MP3 file after the colon.

четверг, 4 апреля 2019 г.

Sync multiple iCalendars


Sync multiple iCalendars (Airbnb, Flipkey, Google Calendar, etc)

I'm developing a website for apartments rental. I'm using a wordpress hotel theme that I tweaked so instead of "rooms" it uses "flats" and a booking plug-in. Each of this flats are also advertised in Airbnb and FlipKey.
What I need is to able to sync all the calendars so if, for instance, someone books the flat in Airbnb, that flat is automatically marked as "non available" in both the website and Flipkey. This is done using feeds .ics that are provided by both companies. There is an output feed and an input feed for both, so if I paste the output in the input of the other and vice versa, the thing works perfectly.
Now, what I need is a way of centralizing both calendar in one system and using that system to feed the inputs of Airbnb, Flipkey and my own booking plugin of wordpress. I've tried that with:
PHP iCalendar (it can, as google calendar, get the feeds, but it doesn't -as far as I know- provide an unified output). Services as http://www.accommodationcalendar.com only get the input, but no output either.
Maybe http://www.davical.org/ could be a good option, but as I'm using a shared hosting, I can't install it (as far as I know) -the reason being that the shared hosting only has MySql and not PostgreSQL.
Does anyone have an idea of how solve this?
THANK YOU!


After some research, I found this solution:
1) Use this library: http://kigkonsult.se/iCalcreator/
2) Get the ICS feeds and merge them and then create a new ICS (create both "import" and "export" folders and give them writing permissions).
require_once('../classes/iCalcreator/iCalcreator.class.php');

$config2 = array("unique_id" => "kigkonsult2.se",
     "directory" => "import",
);
$vcalendar2 = new vcalendar($config2);

$vcalendar2->setConfig("url" , "https://someweb/cal.ics");

$vcalendar2->parse();

$vcalendar2->setConfig("url" , "https://anotherurl/cal2.ics");
$vcalendar2->parse();

$vcalendar2->setConfig("directory", "export");
$vcalendar2->setConfig("filename", "icalmerge3.ics");
$vcalendar2->saveCalendar();


echo "done";
3) Create a CRON scheduler to run this file recurrently. Point both Airbnb and Flipkey to the url where the feed is created. You can use as many input ICS files as you want.

iCalcreator

iCalcreator is the PHP class package managing rfc5545 iCal files, supporting (non-)calendar systems and applications to process and communicate calendarinformation like events, agendas, tasks, reports, totos and journaling information.
iCalcreator features create, parse, edit and select calendar and calendarcomponents.
Knowledge of calendar and rfc5545/rfc2445 is necessary! All functions calls are made as simple as possible BUT (, !!!,) read these rfc properly as well as the iCalcreator package user guide!
Click to get iCalcreator 2.26.8
from github - at packagist
At github, you will also found the 2.28 release candidate (tag 2.27.16).

Howto summary


A short (v2.26.8) summary how to use iCalcreator: createparseeditselect and output, click on the plus to expand/minimize each section.
CREATE plus
namespace Kigkonsult\Icalcreator;

use Kigkonsult\Icalcreator\Util\Util;
use kigkonsult\iCalcreator\TimezoneHandler;

        // define time zone
$tz = "Europe/Stockholm";
        // set Your unique id, 
        // required if any component UID is missing
$config = [ 
    Util::$UNIQUE_ID => "kigkonsult.se",
        // opt. set "calendar" timezone
    Util::$TZID      => $tz
];
        // create a new calendar object instance
$calendar = new Vcalendar( $config );

        // required of some calendar software
$calendar->setProperty( Util::$METHOD,   "PUBLISH" );
$calendar->setProperty( "x-wr-calname",  "Calendar Sample" );
$calendar->setProperty( "X-WR-CALDESC",  "Calendar Description" );
$calendar->setProperty( "X-WR-TIMEZONE", $tz );

        // create an calendar event component
$vevent = $calendar->newVevent();
        // set event start
$vevent->setProperty( 
    Util::$DTSTART,
    new DateTime( '2017-04-01 19:00:00')
);
        // set event end
$vevent->setProperty(
    Util::$DTEND,
    new DateTime( '2017-04-01 22:30:00')
);
$vevent->setProperty( Util::$LOCATION,    "Central Placa" );
$vevent->setProperty( Util::$SUMMARY,     "PHP summit" );
$vevent->setProperty( Util::$DESCRIPTION, "This is a description" );
$vevent->setProperty( Util::$COMMENT,     "This is a comment" );
$vevent->setProperty( Util::$ATTENDEE,    "attendee1@icaldomain.net" );

        // create an event alarm
$valarm = $vevent->newValarm();
$valarm->setProperty( Util::$ACTION, "DISPLAY" );
        // reuse the event description
$valarm->setProperty( 
    Util::$DESCRIPTION,
    $vevent->getProperty( Util::$DESCRIPTION )
);
        // create alarm trigger (in UTC datetime)
$valarm->setProperty(
    Util::$TRIGGER,
    new DateTime( '2017-04-01 08:00:00 UTC')
);

        // create another calendar event component
$vevent = $calendar->newVevent();
        // alt. date format, here for an all-day event
$vevent->setProperty( 
    Util::$DTSTART,
    "20170401",
    [ "VALUE" => "DATE" ]
);
$vevent->setProperty( Util::$ORGANIZER,   "boss@icaldomain.com" );
$vevent->setProperty( Util::$SUMMARY,     "ALL-DAY event" );
$vevent->setProperty( Util::$DESCRIPTION, "An all-day event" );
$vevent->setProperty( Util::$RESOURCES,   "Full attension" );
        // weekly, four occasions
$vevent->setProperty( 
    Util::$RRULE,
    [ 
        "FREQ"  => "WEEKLY",
        "count" => 4
    ]
);
        // supporting parse of strict rfc5545 formatted text
$vevent->parse( "LOCATION:1CP Conference Room 4350" );

        // all calendar components are described in rfc5545
        // a complete iCalcreator function list (ex. setProperty) in
        // iCalcreator manual

        // create timezone component(-s)
        // based on all start dates in events (i.e. all dtstarts)
        // X-LIC-LOCATION required of some calendar software
$xprops = [ "X-LIC-LOCATION" => $tz ];
TimezoneHandler::createTimezone( $v, $tz, $xprops );

[top] [up]
PARSE plus
[top] [up]
EDIT plus
[top] [up]
SELECT plus
[top] [up]
OUTPUT plus
[top] [up]

iCalcreator used in.. .

AgenDAVAgenDAV is an open source CalDAV web client
albavenun Sistema Informático Abierto de Gestión Unificada para Unidades Educacionales
All-in-One Event CalendarCalendar Software for Everybody, a WordPress plugin
Bugscopefree interactive access to a scanning electron microscope (SEM)
Date iCalDrupal plugin
Dokeosan elearning and course management web application
event_connectan iCal import/export tool in lorea
ESS FeedESS: A XML Standard - ESS is The Events Feed
Exponent CMSa website content management system
EQDKP PlusThe Gamer CMS & DKP system
GCalendarconnects google calendars with your Joomla powered web site
GLPIan Information Resource-Manager
Gumbo MillenniumStudentenvereniging Gumbo Millennium
HypecalThere is always something going on
iCalDrupal suite of iCal integration modules
iCalendar-to-Facebook-Eventcreate facebook events from an iCalendar (iCal/ics) file
JCal Proan events calendar for Joomla
kitEventEvent manager and calendar for WebsiteBaker and LEPTON CMS
MarkupiCalendarProcesswire module
One Big SYSTemFeng Office calendar module
Open Atriuma collaboration platform
Repository based CMSA CMS system based on the structure of the dokeos LCMS (2.0) code
sfiCalCreatorPluginSymfony plugin
Telaena webmail interface
terncalthe WordPress Event System
twicaltakes a web calendar or ics file and tweets it "from you"
Virtual Loup-De-Mera web-based real-time Sailboat-routing simulation
"Weather Forecast"a UK ‘Weather Forecast’ PHP Calendar Service

And many, many more.. ..look especially at Ohloh Code.
Please use the contact page if you would like to
  • report your site / application / module / plugin as a new entry in the list
  • report a dead link
  • tell us what iCalcreator is missing!!
[top]

Create/edit/show iCal files


You can test iCalcreator online and create iCal test files on-the-fly, using tiCalFile, example of how to employ iCalcreator in software development.
An example how to present and display iCal calendar file information, tinycal, using iCalcreator class in the server back end software.